Prerequisites
- Access to the sheet configuration (the configuration editor at Menu > Configuration > Edit Risksheet Configuration supports YAML editing since v25.5.0)
- Understanding of which Polarion fields hold the source data for your calculations (the
bindingsof the source columns) - Familiarity with JavaScript expression syntax
Two Ways to Define Formulas
Risksheet supports two complementary places to write formula functions:| Method | Where | When to use |
|---|---|---|
| Method 1 — Sheet configuration | The formulas section of the sheet configuration | Simple, self-contained calculations (RPN = S * O * D, conditional thresholds, value combinations) |
| Method 2 — Top panel configuration | A <script> block inside risksheetTopPanel.vm | Complex logic, risk matrices, shared functions reused by several columns, code that benefits from a code review gate |
Define the Formula
Open your sheet configuration and add a named formula to the top-level The
formulas section. Each formula is a JavaScript function that receives an info parameter containing the current row data.info object provides access to:| Property | Description |
|---|---|
info.item | The current row’s data object, keyed by column id / binding |
info.item['<id>'] | Value of any column in the same row (use the column id as the key) |
For complex calculation logic you can define the function body in The actual
risksheetTopPanel.vm and call it from a thin wrapper in the sheet configuration:getCommonRpn(info) function is then defined inside a <script> block in the top panel template. This pattern is the recommended approach for regulated environments because the sheet configuration stays declarative and auditable.Create the Calculated Column
Add a column entry in the Key column properties for calculated columns:
columns section and reference your named formula by setting the formula property to the formula name.| Property | Default | Description |
|---|---|---|
formula | none | Name of the formula defined in the formulas section |
readOnly | true for formula columns | Formula columns are automatically read-only. Set readOnly: false to also enable persisting the calculated value back to Polarion (see below) |
type | auto-detected | Data type inferred from bindings; override explicitly if needed |
width | auto | Column width in pixels |
header | column id | Display text shown in the column header |
level | (none for task columns) | 1-indexed visual hierarchy level for cell merging |
filterable | true | Controls whether users can filter by this column’s values |
cellRenderer | none | Optional reference to a function in cellDecorators for custom cell rendering |
By default, formula columns are calculated on the fly every time the grid renders — the computed value is not written back to a Polarion custom field. The result lives only in the visible cell.If you need the value to be stored on the underlying work item (for example, to query it through Polarion Lucene, export it through OData, or use it on dashboards outside Risksheet), set With 
readOnly: false and provide a bindings to a custom field that will hold the value:readOnly: false, Risksheet writes the formula result into the bound custom field whenever the row is saved.Build Common Formula Patterns
RPN Calculation (Severity x Occurrence x Detection)
The standard Risk Priority Number formula multiplies three rating values. Most FMEA workflows use both an initial RPN and a revised RPN (after mitigations) — but the same shape applies to other methodologies that combine numeric ratings.Combining Fields from Linked Items
You can build formulas that concatenate or transform values from linked upstream items. For example, to combine an ID and title into a single display value:Conditional Value Formula
Return different values based on cell data for risk classification:Conditional Editability via Cell Decorators
You can usecellDecorators together with info.item.systemReadOnlyFields to conditionally lock cells based on data values. The systemReadOnlyFields value is a pipe-delimited string — appending |fieldId| makes that cell read-only for the current row:Add Conditional Formatting
Pair your calculated columns with The decorator function receives

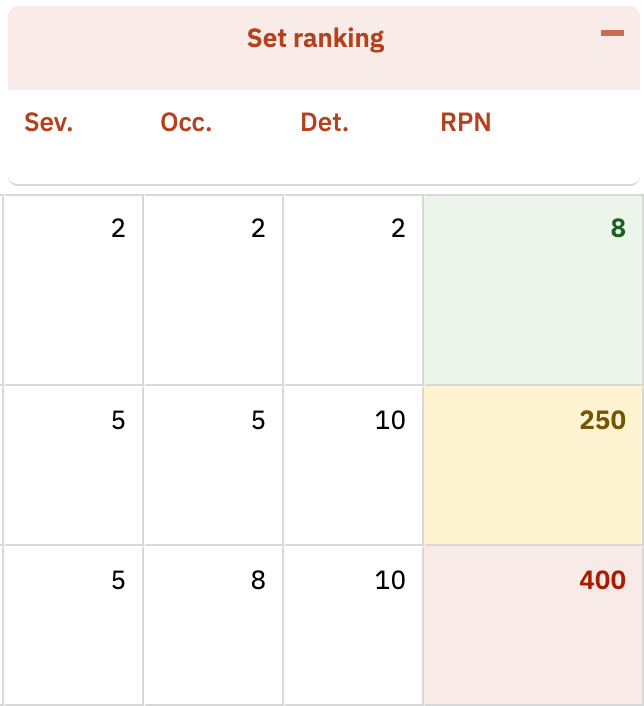
cellDecorators and styles for visual risk indicators. Cell decorators must use toggleClass (not inline style assignment) — Risksheet reuses cell DOM elements as the user scrolls, and inline styles will bleed between rows.info.value (the computed formula result) and info.cell (the DOM element), so it can toggle CSS classes based on thresholds:| RPN Range | Style Class | Appearance |
|---|---|---|
| 1 — 150 | rpn1 | Green background (low risk) |
| 151 — 250 | rpn2 | Yellow background (medium risk) |
| > 250 | rpn3 | Red background (high risk) |
These thresholds are deployment-specific; adjust them to your project’s risk-acceptance criteria. Some deployments use simple low/medium/high bands (such as 4 / 8) instead of RPN cutoffs. Risksheet does not impose default RPN thresholds — choose values that match your organization’s risk policy.
Apply Formula-Based Styling to Row Headers
You can also drive row header coloring from a formula value through the When scanning a large risk analysis table, you can immediately spot high-risk rows by their colored header cells.
headers.rowHeader.renderer property. This colors the entire row header based on a data value, giving an at-a-glance risk indicator:Verify Your Configuration
- Save your sheet configuration changes
- Refresh the Risksheet page in your browser
- The calculated column displays computed values automatically
- The column is read-only — clicking a formula cell does not open an editor (unless you set
readOnly: falseto persist results) - Change a source value (for example, update a severity rating) and confirm the formula recalculates immediately
- Confirm cell decorators apply the correct color coding based on the formula result
Complete Example
A full sheet configuration snippet for an FMEA-style table with initial and revised RPN calculations, conditional formatting, and row header coloring:See Also
- Configure Downstream Traceability Columns — set up source columns that feed into calculated formulas
- Apply Conditional Formatting — cell decorators and styles in depth
- Configure Cell Styles — define custom CSS classes for calculated columns
- Work with Formulas and Hidden Columns — the interaction between column visibility and formula execution
- Configure Row Header Styles — formula-based row header coloring
- Add a Basic Column — general column setup fundamentals