

Prerequisites
- The Teams Service must be configured for your project. See Set Up Teams Service.
- Your board must use the Users (Assignee) swimlane assignment type. See User and Assignee Swimlanes.
- Each team member must have a calendar entry in the Teams Service so total capacity can be derived from working hours.
- Work items must have
remainingEstimateorinitialEstimatevalues set (or a custom capacity field configured).
How User Capacity Is Calculated
Nextedy PLANNINGBOARD tracks three values per user per plan column:
Both
allocatedCapacity and availableCapacity are rounded to one decimal place.
1
Enable the Teams Service Integration
In your board’s widget parameters, locate Capacity settings and enable the Teams Service integration by setting the
useTeamsService flag. When enabled, Planningboard uses team calendar data to populate totalCapacity for each user rather than a static plan capacity value.Verify in applicationThe exact widget parameter name for enabling the Teams Service integration should be confirmed against your installed version. See Configure Capacity Tracking for the full parameter reference.
2
Configure the Capacity Load Mode
Enable per-user capacity tracking by setting the capacity parameters in your widget configuration. These are separate boolean parameters — not values of a single parameter.For per-user capacity display (where each swimlane cell shows that user’s own capacity progress), enable both If you need each swimlane row to show its own capacity bar independently (rather than an aggregate column bar), enable Use
capacityLoad and userCapacityLoad:multiCapacityLoad alongside capacityLoad:userCapacityLoad=true when the swimlane assignment type is Users (Assignee) and you want per-person total capacity drawn from the Teams Service. Use multiCapacityLoad=true when you want a separate capacity bar rendered inside each individual swimlane cell. Both require capacityLoad=true to be active.3
Verify the Swimlane Assignment Type
User capacity tracking requires swimlanes grouped by individual users. In the widget parameters, confirm:
- Swimlanes (Rows) > Assignment Type is set to Users (Assignee)
- User Role is set to the Polarion role that identifies team members (for example,
project_user)
4
Read the Capacity Display
Once configured, each user row on the board shows a capacity bar in the plan column summary cell. The bar visualizes: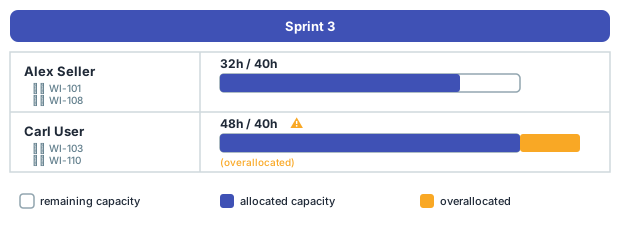
- Filled portion — allocated capacity (hours assigned to this user in this plan)
- Total bar width — total capacity from the team calendar
- Overallocation — when allocated exceeds total, the bar overflows or changes state to signal the overallocation
5
Balance Workloads
With capacity visible per user per plan column:
- Identify swimlane rows where allocated capacity exceeds total capacity (overallocated users).
- Drag one or more cards from the overallocated user’s row into a future plan column or into the unplanned sidebar.
- Observe the capacity bar update as you move cards — allocated capacity recalculates on drop.
- Repeat until all user rows show available capacity at or above zero.
Verification
You should now see:- Each user swimlane row displays a capacity bar in every plan column header.
- The bar shows allocated vs total hours derived from the team calendar.
- Moving cards between columns or between users updates the bars immediately.
- Users without calendar entries show 0.0 total capacity — address these in the Teams Service configuration.
Limitations
- No multi-assignee support — effort is not distributed across co-assignees.
- No sub-item rollup — capacity is not calculated from child work item estimates.
- Users not covered by the team calendar default to 0.0 total capacity.