

1
Open the Data Model
- Navigate to Administration > Nextedy POWERSHEET > Data Models
- Select the data model you want to edit
- Locate the entity type under
domainModelTypeswhere you want to add constraints
2
Understand the Three Constraint Stages
Powersheet supports three constraint stages, each controlling a different operation: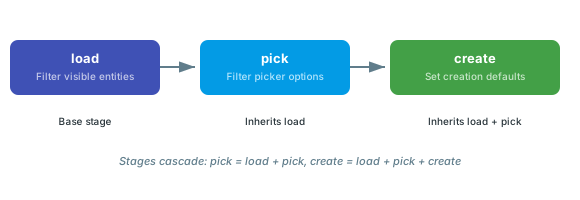
Stage cascadingStages cascade upward: pick inherits
load constraints, and create inherits both load and pick. If no create constraints are defined, the system falls back to pick constraints for the create stage.3
Add Load Constraints
Load constraints filter which entities are visible when data loads into the sheet. Add a With this constraint, only
constraints block with load to the entity type:UserNeed work items that exist in documents of type stakeholderRequirement will appear in the sheet.4
Add Pick Constraints
Pick constraints filter what appears in relationship picker dialogs. This is useful when users link entities and you want to restrict which items they can select:This ensures that when a user picks a
SystemRequirement through a relationship picker, only items from the Requirements space in documents of type systemSpecification are shown.5
Add Create Constraints
Create constraints specify the default document location when new items of this type are created through the sheet:When a user creates a new
DesignRequirement from the sheet, it will be placed in the Design Specification document within the Design space.6
Combine Multiple Stages
You can define multiple constraint stages on the same entity type. Each stage applies to its respective operation, and cascading applies automatically:In this example:
- Load stage: only system requirements from
systemSpecificationdocuments are visible - Pick stage: inherits the load filter, plus restricts to the
Requirementsspace - Create stage: inherits both, plus targets a specific document name
7
Use Comparison Operators
Constraint values support five comparison operators beyond exact matching:
When you use a plain string value (e.g.,
type: systemSpecification), the equals operator is applied by default. To use another operator, wrap the value in an operator object:8
Use Logical Operators
Multiple properties within the same This matches work items from either the “Alpha Requirements” or “Beta Requirements” document.
document block are combined with AND logic — all conditions must match simultaneously.For OR logic, use the or keyword inside the document block to match entities from multiple locations:9
Use Dynamic Context References
For component-scoped relationships, use This ensures picker results are scoped to the same component as the source entity’s document. For example, if a user is editing a
$context.source.document.component to dynamically filter based on the source entity’s document component:UserNeed in a document with component “Braking System”, the picker will only show system requirements from documents that also belong to the “Braking System” component.Constrainable Document Properties
Thedocument block in constraints supports the following properties:
Verification
After saving the data model with constraints:- Open a sheet that uses this data model
- For load constraints: verify that only matching entities appear in the sheet rows
- For pick constraints: click a relationship picker cell and verify the dropdown shows only items matching your filter criteria
- For create constraints: create a new item through the sheet and verify it appears in the expected document location
type ID and moduleFolder values.
See Also
- Configure Context Constraints — advanced context-based constraint patterns
- Configure a Relationship — setting up relationships that constraints apply to
- Create an Entity Type — defining the entity types that hold constraints
- Create an Entity Type — ensuring
polarionTypevalues are correct - Data Model Reference — complete constraints property reference