> ## Documentation Index
> Fetch the complete documentation index at: https://learn.nextedy.com/llms.txt
> Use this file to discover all available pages before exploring further.
# Add the Scheduler Widget
> Place the Nextedy SCHEDULER widget on a Polarion Rich Page and work through its parameter groups: the work item query, swimlane rows, date mapping, effort, the Unplanned sidebar, card height and tooltip fields.
export const LastReviewed = ({date}) => {
if (!date) return null;
const formatted = new Date(`${date}T00:00:00Z`).toLocaleDateString("en-US", {
year: "numeric",
month: "long",
day: "numeric",
timeZone: "UTC"
});
return
Last reviewed on {formatted}
;
};
Scheduler is delivered as a Polarion Rich Page widget. Everything the board shows -- which work items load, what the rows stand for, which fields carry the dates -- comes from the widget's parameters, so placing the widget and configuring it is one continuous task.
## Prerequisites
* Scheduler installed and licensed on your Polarion server (see [Installation](/scheduler/getting-started/installation))
* A Polarion project that contains the work items you want to plan
* Edit permission on the project's **Documents & Pages**
## Place the Widget on a Page
Open your project and navigate to **Documents & Pages**. Select the space that should hold the board, click **Expand Tools** in the upper toolbar, then use the gear button and **Create New** to create an **Info or LiveReport Page**. Give it a title (for example, "Scheduler") and create it.
The new page opens in edit mode with the widget picker on the right-hand side. If you are returning to an existing page instead, click **Expand Tools** and then **Edit** to put it into edit mode.
In the widget picker, select the **Scheduler** widget. It is tagged *Plans*, *Work Items* and *Nextedy*, so it appears under each of those categories.
The widget loads onto the page and immediately renders a board using its default parameters: a timeline of day columns, one row per project user, and the **Unplanned** sidebar on the right.
Select the Scheduler widget on the page and choose **Edit widget parameters**.
The parameter editor lists the widget's sections in this order:
| Section | What it controls |
| ------------------------ | -------------------------------------------------------------------------------------------------------------------------------------------------------- |
| **Work Items** | The query that selects the work items the board loads, plus **Sort by**, **Dependency Roles**, **Plans Type**, **Sidebar Fields** and **Tooltip Fields** |
| **Data Mapping** | Which work item fields hold the schedule: **Start Field**, **End Field**, **Duration Field** |
| **Queries** | Named queries that appear in the sidebar's filter menu |
| **Swimlanes (Rows)** | What a row represents: **Assignment Type** and, for enumeration rows, **Field ID** |
| **Unplanned Sidebar** | **Load Parents**, **Parent Roles** and the sidebar **Width (%)** |
| **Create New Work Item** | **Enable Create New** and the **Work Item Type** created on the timeline |
| **Advanced** | **User Role** for user rows, the timeline window, **Card Height**, **Show Time Points**, the item cap and the scripts |
**Data Mapping** and **Advanced** are collapsed when the editor opens -- expand them to reach their parameters.
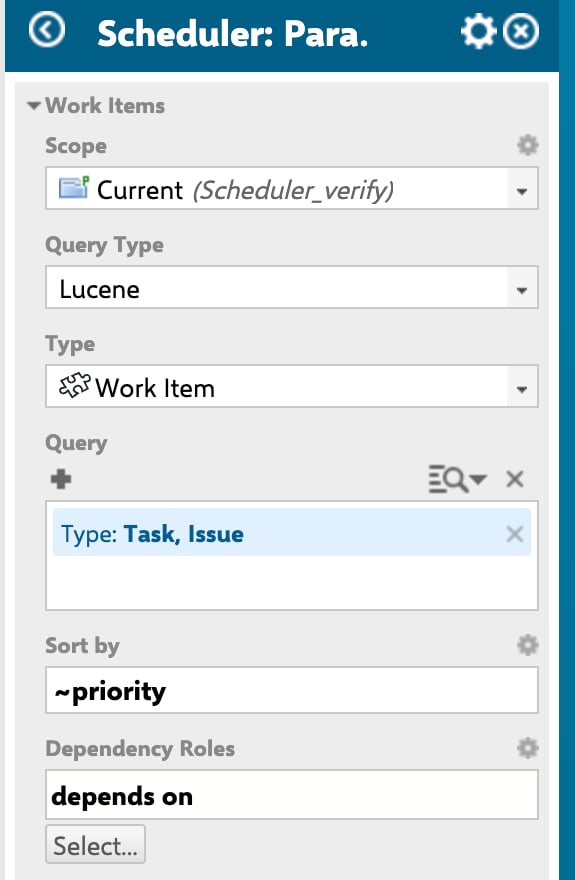 Apply your parameter changes, then save the page with Polarion's page toolbar. Widget configuration lives on the page, so an unsaved page loses the configuration when you navigate away.
Saving the page and saving the schedule are two different things. The page must be saved to keep your **parameter** changes. Scheduling work on the finished board is saved automatically -- the board has no Save control (see [Schedule and Reschedule Tasks](/scheduler/guides/schedule-and-reschedule-tasks)).
## Select the Work Items
The **Work Items** section defines the population of the board. Build its query so it returns exactly the items you plan on this page -- everything else on the board is derived from that set: the cards on the timeline, the contents of the **Unplanned** sidebar, and the per-day load on each row.
Two neighbouring parameters in the same section are worth setting at the same time:
* **Sort by** -- the field the loaded items are ordered by.
* **Dependency Roles** -- the work item link role(s) that count as a dependency. Leave it empty and the board has no dependency features at all: the **Add Link** handle on a card stays hidden and the **Show Dependencies** toolbar button does not appear. See [Link Task Dependencies](/scheduler/guides/link-task-dependencies).
Keep the query narrow. The **Advanced** section carries a **Max Items** cap on how many work items the board will load, and a broad query makes the board slower to read as well as slower to load.
A query that matches nothing does not produce a message. The board draws its rows as usual with no cards on them, and the footer reads "Items loaded: 0 / Scheduled: 0". If the timeline looks empty, check the query first.
## Set What the Rows Represent
Open **Swimlanes (Rows)** and set **Assignment Type**:
* **Users (Assignee)** -- one row per project user. This is the default. The **User Role** parameter in **Advanced** decides which users get a row.
* **Enumeration Field** -- one row per option of an enumeration field. Selecting it reveals **Field ID**, which defaults to `team`.
Both modes are covered step by step, together with the fields that cannot be used as rows and the error the board shows for them, in [Configure Swimlanes](/scheduler/guides/configure-swimlanes).
## Map the Dates
Expand **Data Mapping**. It holds three parameters and you set exactly **two** of them:
| Parameter | Default | Holds |
| ------------------ | --------- | ---------------------------------------------- |
| **Start Field** | `start` | The work item field with the task's start date |
| **End Field** | `end` | The work item field with the task's end date |
| **Duration Field** | *(empty)* | The work item field with the task's duration |
Which two you fill in gives you three working modes:
* **Start Field + End Field** -- both ends of the bar are read from, and written back to, date fields. This is the out-of-the-box mapping.
* **Start Field + Duration Field** -- the bar starts at the start date and runs for the mapped duration.
* **End Field + Duration Field** -- the bar ends at the end date and its length comes from the mapped duration.
The mapped fields must exist on the work item types your query returns, and the account using the board needs write access to them -- these are the fields the board writes when you drag a task.
The mapping also determines how a reader changes a task's length: bars on the board cannot be resized. See [Schedule and Reschedule Tasks](/scheduler/guides/schedule-and-reschedule-tasks) and [Dates, Duration and Effort](/scheduler/concepts/dates-duration-and-effort).
## Choose How Effort Is Read
**Plans Type**, in the **Work Items** section, selects which of Polarion's time-tracking values the board treats as a task's effort. It offers three options:
* **Initial Estimate**
* **Remaining Estimate**
* **Remaining Estimate + Time Spent**
Effort does real work on the board: it appears on the right-hand fields line of each card, it drives the per-day load markers on the rows, and it sets the length of an item dropped from the sidebar. [Capacity and Load](/scheduler/concepts/capacity-and-load) explains how effort turns into load.
## Set Up the Unplanned Sidebar
The **Unplanned Sidebar** section configures the backlog panel on the right of the board.
| Parameter | Default | Effect |
| ---------------- | --------- | -------------------------------------------------------------------------------------------------------------------------------------------------------------------------------- |
| **Load Parents** | `0` | How many levels of parent work items to load. Above `0`, sidebar cards are grouped under their parent's heading, and items with no parent land under a "-- NO PARENT --" heading |
| **Parent Roles** | *(empty)* | The link role(s) that lead from an item to its parent, used when **Load Parents** is above `0` |
| **Width (%)** | `20` | How much of the board's width the sidebar takes |
Readers can hide and show the panel at any time with the **Show unscheduled items in sidebar** toolbar button, which is on by default. Its filters, search box and item count are covered in [Filter the Unplanned Sidebar](/scheduler/guides/filter-the-unplanned-sidebar).
## Adjust the Card Height
**Card Height** lives in the **Advanced** section and is a number of pixels; the default is `50`. Raise it when your cards carry long titles or several tooltip-worthy fields and the text is cramped; lower it to fit more rows on screen at once.
## Choose the Tooltip Fields
**Tooltip Fields**, in the **Work Items** section, lists the work item fields shown as label-and-value lines when a reader hovers a task bar. Out of the box it contains **Project**, **Type**, **Status** and **Assignee(s)**.
The tooltip always leads with the work item's title and the task's date range; your **Tooltip Fields** are appended underneath. Pick the two or three fields a planner needs without opening the work item -- the tooltip is the fastest read on the board.
**Sidebar Fields**, right above it, does the same job for the cards in the **Unplanned** sidebar. It starts with **Title** only, so add the fields that help a planner decide where an item belongs before dragging it out.
## Verification
With the page saved, reload it and check the board:
1. Rows appear for the resources you configured -- project users, or the options of your enumeration field.
2. Scheduled work items appear as bars in the day columns, and unscheduled ones appear as cards under the **Unplanned** header.
3. The footer reads "Items loaded: N / Scheduled: M" with N matching the size of your query result, followed by "Timeline range: `` - ``" and the Scheduler version.
4. Hovering a bar shows the work item title, the date range, and the fields you listed under **Tooltip Fields**.
5. Dragging a card out of the sidebar onto a row schedules it and the change persists without any Save action.
If rows are missing or an error appears in place of them, the **Swimlanes (Rows)** configuration is the place to look -- see [Configure Swimlanes](/scheduler/guides/configure-swimlanes).
## See Also
* [Configure Swimlanes](/scheduler/guides/configure-swimlanes) -- user rows versus enumeration-field rows, and the errors the board shows for unsupported fields
* [Schedule and Reschedule Tasks](/scheduler/guides/schedule-and-reschedule-tasks) -- drop items onto rows, move bars, and change a task's duration
* [Widget Parameters](/scheduler/reference/widget-parameters) -- every parameter with its default value
* [Advanced Configuration](/scheduler/guides/advanced-configuration) -- the timeline window and the Item and Config scripts
* [Board and Timeline](/scheduler/concepts/board-and-timeline) -- how the timeline, columns and views fit together
Apply your parameter changes, then save the page with Polarion's page toolbar. Widget configuration lives on the page, so an unsaved page loses the configuration when you navigate away.
Saving the page and saving the schedule are two different things. The page must be saved to keep your **parameter** changes. Scheduling work on the finished board is saved automatically -- the board has no Save control (see [Schedule and Reschedule Tasks](/scheduler/guides/schedule-and-reschedule-tasks)).
## Select the Work Items
The **Work Items** section defines the population of the board. Build its query so it returns exactly the items you plan on this page -- everything else on the board is derived from that set: the cards on the timeline, the contents of the **Unplanned** sidebar, and the per-day load on each row.
Two neighbouring parameters in the same section are worth setting at the same time:
* **Sort by** -- the field the loaded items are ordered by.
* **Dependency Roles** -- the work item link role(s) that count as a dependency. Leave it empty and the board has no dependency features at all: the **Add Link** handle on a card stays hidden and the **Show Dependencies** toolbar button does not appear. See [Link Task Dependencies](/scheduler/guides/link-task-dependencies).
Keep the query narrow. The **Advanced** section carries a **Max Items** cap on how many work items the board will load, and a broad query makes the board slower to read as well as slower to load.
A query that matches nothing does not produce a message. The board draws its rows as usual with no cards on them, and the footer reads "Items loaded: 0 / Scheduled: 0". If the timeline looks empty, check the query first.
## Set What the Rows Represent
Open **Swimlanes (Rows)** and set **Assignment Type**:
* **Users (Assignee)** -- one row per project user. This is the default. The **User Role** parameter in **Advanced** decides which users get a row.
* **Enumeration Field** -- one row per option of an enumeration field. Selecting it reveals **Field ID**, which defaults to `team`.
Both modes are covered step by step, together with the fields that cannot be used as rows and the error the board shows for them, in [Configure Swimlanes](/scheduler/guides/configure-swimlanes).
## Map the Dates
Expand **Data Mapping**. It holds three parameters and you set exactly **two** of them:
| Parameter | Default | Holds |
| ------------------ | --------- | ---------------------------------------------- |
| **Start Field** | `start` | The work item field with the task's start date |
| **End Field** | `end` | The work item field with the task's end date |
| **Duration Field** | *(empty)* | The work item field with the task's duration |
Which two you fill in gives you three working modes:
* **Start Field + End Field** -- both ends of the bar are read from, and written back to, date fields. This is the out-of-the-box mapping.
* **Start Field + Duration Field** -- the bar starts at the start date and runs for the mapped duration.
* **End Field + Duration Field** -- the bar ends at the end date and its length comes from the mapped duration.
The mapped fields must exist on the work item types your query returns, and the account using the board needs write access to them -- these are the fields the board writes when you drag a task.
The mapping also determines how a reader changes a task's length: bars on the board cannot be resized. See [Schedule and Reschedule Tasks](/scheduler/guides/schedule-and-reschedule-tasks) and [Dates, Duration and Effort](/scheduler/concepts/dates-duration-and-effort).
## Choose How Effort Is Read
**Plans Type**, in the **Work Items** section, selects which of Polarion's time-tracking values the board treats as a task's effort. It offers three options:
* **Initial Estimate**
* **Remaining Estimate**
* **Remaining Estimate + Time Spent**
Effort does real work on the board: it appears on the right-hand fields line of each card, it drives the per-day load markers on the rows, and it sets the length of an item dropped from the sidebar. [Capacity and Load](/scheduler/concepts/capacity-and-load) explains how effort turns into load.
## Set Up the Unplanned Sidebar
The **Unplanned Sidebar** section configures the backlog panel on the right of the board.
| Parameter | Default | Effect |
| ---------------- | --------- | -------------------------------------------------------------------------------------------------------------------------------------------------------------------------------- |
| **Load Parents** | `0` | How many levels of parent work items to load. Above `0`, sidebar cards are grouped under their parent's heading, and items with no parent land under a "-- NO PARENT --" heading |
| **Parent Roles** | *(empty)* | The link role(s) that lead from an item to its parent, used when **Load Parents** is above `0` |
| **Width (%)** | `20` | How much of the board's width the sidebar takes |
Readers can hide and show the panel at any time with the **Show unscheduled items in sidebar** toolbar button, which is on by default. Its filters, search box and item count are covered in [Filter the Unplanned Sidebar](/scheduler/guides/filter-the-unplanned-sidebar).
## Adjust the Card Height
**Card Height** lives in the **Advanced** section and is a number of pixels; the default is `50`. Raise it when your cards carry long titles or several tooltip-worthy fields and the text is cramped; lower it to fit more rows on screen at once.
## Choose the Tooltip Fields
**Tooltip Fields**, in the **Work Items** section, lists the work item fields shown as label-and-value lines when a reader hovers a task bar. Out of the box it contains **Project**, **Type**, **Status** and **Assignee(s)**.
The tooltip always leads with the work item's title and the task's date range; your **Tooltip Fields** are appended underneath. Pick the two or three fields a planner needs without opening the work item -- the tooltip is the fastest read on the board.
**Sidebar Fields**, right above it, does the same job for the cards in the **Unplanned** sidebar. It starts with **Title** only, so add the fields that help a planner decide where an item belongs before dragging it out.
## Verification
With the page saved, reload it and check the board:
1. Rows appear for the resources you configured -- project users, or the options of your enumeration field.
2. Scheduled work items appear as bars in the day columns, and unscheduled ones appear as cards under the **Unplanned** header.
3. The footer reads "Items loaded: N / Scheduled: M" with N matching the size of your query result, followed by "Timeline range: `` - ``" and the Scheduler version.
4. Hovering a bar shows the work item title, the date range, and the fields you listed under **Tooltip Fields**.
5. Dragging a card out of the sidebar onto a row schedules it and the change persists without any Save action.
If rows are missing or an error appears in place of them, the **Swimlanes (Rows)** configuration is the place to look -- see [Configure Swimlanes](/scheduler/guides/configure-swimlanes).
## See Also
* [Configure Swimlanes](/scheduler/guides/configure-swimlanes) -- user rows versus enumeration-field rows, and the errors the board shows for unsupported fields
* [Schedule and Reschedule Tasks](/scheduler/guides/schedule-and-reschedule-tasks) -- drop items onto rows, move bars, and change a task's duration
* [Widget Parameters](/scheduler/reference/widget-parameters) -- every parameter with its default value
* [Advanced Configuration](/scheduler/guides/advanced-configuration) -- the timeline window and the Item and Config scripts
* [Board and Timeline](/scheduler/concepts/board-and-timeline) -- how the timeline, columns and views fit together