> ## Documentation Index
> Fetch the complete documentation index at: https://learn.nextedy.com/llms.txt
> Use this file to discover all available pages before exploring further.
# Dates, Duration and Effort
> Nextedy SCHEDULER places every task bar from a Data Mapping of Start, End and Duration fields, and reads how much work a task represents separately through the Plans Type parameter.
export const LastReviewed = ({date}) => {
if (!date) return null;
const formatted = new Date(`${date}T00:00:00Z`).toLocaleDateString("en-US", {
year: "numeric",
month: "long",
day: "numeric",
timeZone: "UTC"
});
return
Last reviewed on {formatted}
;
};
A task bar on the board answers two independent questions, and Scheduler answers them from different Polarion fields.
**Where does the bar sit, and how wide is it?** That comes from the work item's date and duration fields, which you nominate in the widget's **Data Mapping** parameters.
**How much work does the bar represent?** That comes from one of Polarion's estimate fields, chosen with the **Plans Type** parameter. Effort never resizes a bar that is already on the board -- it drives the number printed on the card and the per-day load figures underneath it. The one moment effort does set a bar's width is when you drop an item out of the **Unplanned** sidebar, described below.
Keeping the two apart explains a board that looks contradictory at first glance: two tasks can occupy exactly the same three days and still produce completely different load, because their estimates differ.
## The Data Mapping Parameters
Scheduler does not assume which Polarion fields hold a task's schedule. You tell it, in the widget parameter editor under **Data Mapping**:
| Parameter | What you enter | Out-of-the-box value |
| -------------- | -------------------------------------------------- | -------------------- |
| Start Field | ID of the date field holding the task's start | `start` |
| End Field | ID of the date field holding the task's end | `end` |
| Duration Field | ID of the duration field holding the task's length | *(empty)* |
The values are **field IDs** -- the technical IDs Polarion uses internally, not the labels shown on a work item form. A field displayed as "Planned Start" might have the ID `plannedStart`. Look the IDs up in Polarion's Administration pages for the work item types your board queries.
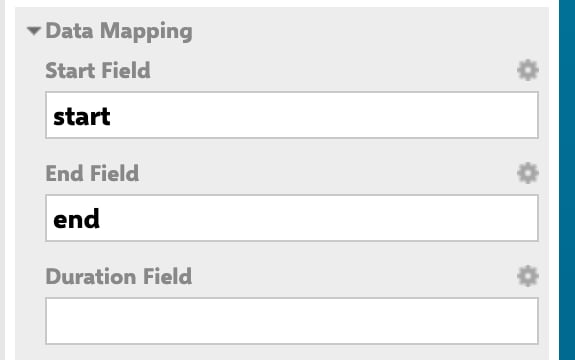 Open the page that hosts the board, expand the tools panel, switch the page to edit mode, select the Scheduler widget, and choose to edit the widget parameters. **Data Mapping** is one of the collapsible parameter sections; expand it to see the three fields.
## Set Exactly Two of the Three
The three parameters are not independent settings you fill in as completely as possible. **Map exactly two of them, and the third is derived.** Which two you map decides how Scheduler interprets and writes back a task's schedule.
| Fields you map | How the bar is placed | What "duration" means |
| ---------------------------- | ---------------------------------------------------------- | --------------------------------------------------------------- |
| Start Field + End Field | Both ends are read straight from the work item | The span between the two dates -- no duration field is involved |
| Start Field + Duration Field | The start is read; the end is calculated forward from it | Read from the duration field |
| End Field + Duration Field | The end is read; the start is calculated backwards from it | Read from the duration field |
Each combination is a complete, self-consistent way to describe a schedule, so pick the one that matches how your project already records dates:
* **Start + End** suits projects whose work items carry both dates as first-class planning data, and where nobody thinks in "this takes four days".
* **Start + Duration** suits estimate-driven planning: a task begins on a committed date and runs for a known number of days.
* **End + Duration** suits deadline-driven planning: a task has to be finished by a fixed date, and its start is whatever the duration implies.
Writes follow the same logic. When you move a bar on the board, Scheduler saves the fields the active mode owns -- the two dates in Start + End mode, or the anchoring date plus a recalculated duration in the two duration modes.
Mapping only one of the three fields, or all three at once, is not a valid configuration. Instead of the board, the widget renders a data-mapping error explaining which combination is missing. If a Scheduler widget shows a configuration error where you expected a timeline, the Data Mapping section is the first place to look.
## Duration Is Counted in Working Days
When Scheduler derives one end of a bar from a duration -- or recalculates a duration after you have moved a bar -- it counts **working days** and steps over weekends. A three-day task starting on a Thursday therefore ends on the following Monday, not on the Saturday.
This matches the timeline itself, which hides weekend columns by default. See [Board and Timeline](/scheduler/concepts/board-and-timeline) for the day grid and the timeline window.
A duration of zero is treated as **one day**, so a task with an empty or zero duration still gets a visible one-day bar rather than a zero-width sliver.
## Effort: The Plans Type Parameter
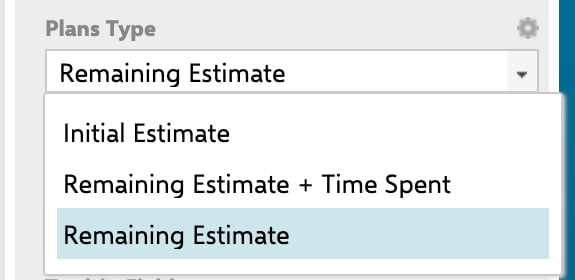
Polarion work items can carry several time figures, and different teams plan against different ones. The **Plans Type** parameter -- in the widget's **Work Items** parameter section -- decides which one Scheduler treats as the task's effort:
| Plans Type option | Effort Scheduler uses |
| ------------------------------- | ------------------------------------------------ |
| Initial Estimate | The work item's Initial Estimate |
| Remaining Estimate | The work item's Remaining Estimate |
| Remaining Estimate + Time Spent | Remaining Estimate and Time Spent added together |
Open the page that hosts the board, expand the tools panel, switch the page to edit mode, select the Scheduler widget, and choose to edit the widget parameters. **Data Mapping** is one of the collapsible parameter sections; expand it to see the three fields.
## Set Exactly Two of the Three
The three parameters are not independent settings you fill in as completely as possible. **Map exactly two of them, and the third is derived.** Which two you map decides how Scheduler interprets and writes back a task's schedule.
| Fields you map | How the bar is placed | What "duration" means |
| ---------------------------- | ---------------------------------------------------------- | --------------------------------------------------------------- |
| Start Field + End Field | Both ends are read straight from the work item | The span between the two dates -- no duration field is involved |
| Start Field + Duration Field | The start is read; the end is calculated forward from it | Read from the duration field |
| End Field + Duration Field | The end is read; the start is calculated backwards from it | Read from the duration field |
Each combination is a complete, self-consistent way to describe a schedule, so pick the one that matches how your project already records dates:
* **Start + End** suits projects whose work items carry both dates as first-class planning data, and where nobody thinks in "this takes four days".
* **Start + Duration** suits estimate-driven planning: a task begins on a committed date and runs for a known number of days.
* **End + Duration** suits deadline-driven planning: a task has to be finished by a fixed date, and its start is whatever the duration implies.
Writes follow the same logic. When you move a bar on the board, Scheduler saves the fields the active mode owns -- the two dates in Start + End mode, or the anchoring date plus a recalculated duration in the two duration modes.
Mapping only one of the three fields, or all three at once, is not a valid configuration. Instead of the board, the widget renders a data-mapping error explaining which combination is missing. If a Scheduler widget shows a configuration error where you expected a timeline, the Data Mapping section is the first place to look.
## Duration Is Counted in Working Days
When Scheduler derives one end of a bar from a duration -- or recalculates a duration after you have moved a bar -- it counts **working days** and steps over weekends. A three-day task starting on a Thursday therefore ends on the following Monday, not on the Saturday.
This matches the timeline itself, which hides weekend columns by default. See [Board and Timeline](/scheduler/concepts/board-and-timeline) for the day grid and the timeline window.
A duration of zero is treated as **one day**, so a task with an empty or zero duration still gets a visible one-day bar rather than a zero-width sliver.
## Effort: The Plans Type Parameter
Polarion work items can carry several time figures, and different teams plan against different ones. The **Plans Type** parameter -- in the widget's **Work Items** parameter section -- decides which one Scheduler treats as the task's effort:
| Plans Type option | Effort Scheduler uses |
| ------------------------------- | ------------------------------------------------ |
| Initial Estimate | The work item's Initial Estimate |
| Remaining Estimate | The work item's Remaining Estimate |
| Remaining Estimate + Time Spent | Remaining Estimate and Time Spent added together |
 The third option has two refinements worth knowing:
* On an **unresolved** work item that has neither a Remaining Estimate nor any Time Spent recorded, Scheduler falls back to the Initial Estimate -- so a task nobody has logged against still shows the effort that was planned for it.
* A **resolved** work item contributes **zero** effort, because there is no remaining work left to schedule against a resource.
Pick Initial Estimate for a board used to plan up front and compare against the original commitment. Pick Remaining Estimate when the board is a live picture of what is still outstanding. Pick Remaining Estimate + Time Spent when you want the board to reflect the full effort a task has consumed and will still consume.
## How Effort and Duration Show on a Card
Every task card ends with a right-aligned **fields line**. It carries the effort figure for the active Plans Type, rendered the way Polarion renders that duration field (for example `5d`), followed by the work item's status icon.
In **Remaining Estimate + Time Spent** mode the line is a little richer: it shows the Remaining Estimate, then the combined figure in parentheses -- so you can read the outstanding work and the total side by side on one card.
Effort also has a visible consequence the moment you schedule something. When you drag an item out of the **Unplanned** sidebar onto a row, Scheduler sizes the new bar from that item's effort: it converts the effort into whole days against an eight-hour day and rounds up. An item with no effort at all becomes a **one-day** bar.
## Effort Feeds the Load Heatmap
The per-day figures in each swimlane are effort divided across the days a bar covers, compared against that row's capacity. That is why a wide bar with a small estimate barely tints its row while a short bar with a large estimate can push the same row over 100%.
[Capacity and Load](/scheduler/concepts/capacity-and-load) covers the load markers, the four bands, and the capacity each kind of row carries.
## Changing a Task's Duration
Task bars **cannot be resized**. There are no resize handles on the ends of a bar, and dragging near an edge moves the whole bar without changing its length -- so a drag on the board can reschedule a task, but never lengthen or shorten it.
To change how long a task takes, change the field the active mapping mode reads:
Open the widget parameters and expand **Data Mapping**. Note which two of Start Field, End Field and Duration Field carry values -- that tells you which field owns the task's length.
Click the body of the task card. Polarion opens the work item in its properties sidebar, where its fields are editable.
In Start + Duration or End + Duration mode, change the mapped **duration** field. In Start + End mode there is no duration field -- change the mapped **end date** (or start date) instead. Save the work item.
Back on the board, click **Refresh data** in the toolbar. The bar is redrawn at its new length and the load figures under it are recalculated.
Everything you do on the board itself -- moving a bar, dropping an item from the sidebar, unplanning a task -- is written to Polarion as soon as you finish the gesture. Scheduler's toolbar has no Save control because there is nothing to save manually.
## See Also
* [Board and Timeline](/scheduler/concepts/board-and-timeline) -- the day grid, the timeline window, and how far the board looks forward and back
* [Capacity and Load](/scheduler/concepts/capacity-and-load) -- how effort becomes the per-day load figures and colour bands
* [Schedule and Reschedule Tasks](/scheduler/guides/schedule-and-reschedule-tasks) -- the drag gestures the board supports, step by step
* [Add the Scheduler Widget](/scheduler/guides/add-the-scheduler-widget) -- placing the widget and filling in Data Mapping and Plans Type
* [Widget Parameters](/scheduler/reference/widget-parameters) -- every parameter with its default
The third option has two refinements worth knowing:
* On an **unresolved** work item that has neither a Remaining Estimate nor any Time Spent recorded, Scheduler falls back to the Initial Estimate -- so a task nobody has logged against still shows the effort that was planned for it.
* A **resolved** work item contributes **zero** effort, because there is no remaining work left to schedule against a resource.
Pick Initial Estimate for a board used to plan up front and compare against the original commitment. Pick Remaining Estimate when the board is a live picture of what is still outstanding. Pick Remaining Estimate + Time Spent when you want the board to reflect the full effort a task has consumed and will still consume.
## How Effort and Duration Show on a Card
Every task card ends with a right-aligned **fields line**. It carries the effort figure for the active Plans Type, rendered the way Polarion renders that duration field (for example `5d`), followed by the work item's status icon.
In **Remaining Estimate + Time Spent** mode the line is a little richer: it shows the Remaining Estimate, then the combined figure in parentheses -- so you can read the outstanding work and the total side by side on one card.
Effort also has a visible consequence the moment you schedule something. When you drag an item out of the **Unplanned** sidebar onto a row, Scheduler sizes the new bar from that item's effort: it converts the effort into whole days against an eight-hour day and rounds up. An item with no effort at all becomes a **one-day** bar.
## Effort Feeds the Load Heatmap
The per-day figures in each swimlane are effort divided across the days a bar covers, compared against that row's capacity. That is why a wide bar with a small estimate barely tints its row while a short bar with a large estimate can push the same row over 100%.
[Capacity and Load](/scheduler/concepts/capacity-and-load) covers the load markers, the four bands, and the capacity each kind of row carries.
## Changing a Task's Duration
Task bars **cannot be resized**. There are no resize handles on the ends of a bar, and dragging near an edge moves the whole bar without changing its length -- so a drag on the board can reschedule a task, but never lengthen or shorten it.
To change how long a task takes, change the field the active mapping mode reads:
Open the widget parameters and expand **Data Mapping**. Note which two of Start Field, End Field and Duration Field carry values -- that tells you which field owns the task's length.
Click the body of the task card. Polarion opens the work item in its properties sidebar, where its fields are editable.
In Start + Duration or End + Duration mode, change the mapped **duration** field. In Start + End mode there is no duration field -- change the mapped **end date** (or start date) instead. Save the work item.
Back on the board, click **Refresh data** in the toolbar. The bar is redrawn at its new length and the load figures under it are recalculated.
Everything you do on the board itself -- moving a bar, dropping an item from the sidebar, unplanning a task -- is written to Polarion as soon as you finish the gesture. Scheduler's toolbar has no Save control because there is nothing to save manually.
## See Also
* [Board and Timeline](/scheduler/concepts/board-and-timeline) -- the day grid, the timeline window, and how far the board looks forward and back
* [Capacity and Load](/scheduler/concepts/capacity-and-load) -- how effort becomes the per-day load figures and colour bands
* [Schedule and Reschedule Tasks](/scheduler/guides/schedule-and-reschedule-tasks) -- the drag gestures the board supports, step by step
* [Add the Scheduler Widget](/scheduler/guides/add-the-scheduler-widget) -- placing the widget and filling in Data Mapping and Plans Type
* [Widget Parameters](/scheduler/reference/widget-parameters) -- every parameter with its default