> ## Documentation Index
> Fetch the complete documentation index at: https://learn.nextedy.com/llms.txt
> Use this file to discover all available pages before exploring further.
# Implement STRIDE Analysis
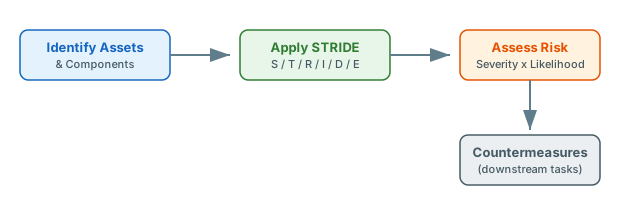
> Configure Nextedy RISKSHEET for cybersecurity threat analysis using the STRIDE methodology, applicable to ISO/SAE 21434 (automotive cybersecurity) and IEC 62443 (industrial security) workflows.
export const LastReviewed = ({date}) => {
if (!date) return null;
const formatted = new Date(`${date}T00:00:00Z`).toLocaleDateString("en-US", {
year: "numeric",
month: "long",
day: "numeric",
timeZone: "UTC"
});
return
Last reviewed on {formatted}
;
};
Risksheet is a generic risk analysis tool supporting any methodology through configuration alone — FMEA (Failure Mode and Effects Analysis), HARA (Hazard Analysis and Risk Assessment), TARA (Threat Analysis and Risk Assessment), STRIDE, and CVSS (Common Vulnerability Scoring System). Nextedy provides solution templates for typical methodologies; start from the closest template for your industry rather than from a blank configuration.
## Prerequisites
* A Polarion project with threat and countermeasure work item types defined in Administration
* The six STRIDE threat categories defined as a Polarion enumeration (**Administration > Enumerations**) — see Step 2
* Two rating enumerations for threat severity and likelihood, defined in **Administration > Enumerations**
* A sheet configuration attached to your LiveDoc document — the sheet configuration file (`risksheet.json`). See [Find Configuration Files](/risksheet/guides/configuration/finding-config-files)
* Familiarity with the STRIDE methodology
## How configuration data is sourced
Risksheet does not store data separately. Threats, countermeasures, and link relationships are standard Polarion work items, subject to Polarion authorization and fully traceable through Polarion's audit infrastructure. Rating scales and enumeration values live in Polarion's central administration, not in the sheet configuration:
* **Rating scales** (severity, likelihood) are Polarion enumerations defined in **Administration > Enumerations**. A custom field on the threat work item type binds to the enumeration. A column then uses `type: rating:` with `bindings: ` — the server loads enum values automatically.
* **Categorical enums** (STRIDE categories, status values) follow the same pattern but use `type: enum:` (or `type: multiEnum:` for multi-select).
The sheet configuration defines columns, levels, formulas, styles, and decorators — it does not redeclare rating scales or enums.
Configure the `dataTypes` section to use threat-specific work item types. STRIDE analysis uses a threat work item as the main risk row and countermeasures as downstream tasks:
```yaml theme={null}
dataTypes:
risk:
type: threat
task:
type: countermeasure
role: mitigates_threat
name: Countermeasure
zoomColumn: countermeasureTitle
```
The `type` and `role` values must match the work item types and link roles defined in your Polarion project. Both `dataTypes.risk` and `dataTypes.task` accept `name` (display name in toolbar/menus) and `zoomColumn` (zoom navigation target). Additional optional task properties include `document` (restrict tasks to a LiveDoc path), `query` (extra Lucene filter), `projects` (multi-project array, v23.7.0+), `createInCurrentDocument`, and `createInDocument` (v24.8.1+).
The six STRIDE categories are managed as a Polarion enumeration. In Polarion, open **Administration > Enumerations**, create an enumeration (for example, `strideCategory`), and add the six values:
| STRIDE Category | Threat Type | Security Property Violated |
| -------------------------- | --------------- | -------------------------- |
| **S**poofing | Identity | Authentication |
| **T**ampering | Data integrity | Integrity |
| **R**epudiation | Non-repudiation | Non-repudiation |
| **I**nformation Disclosure | Confidentiality | Confidentiality |
| **D**enial of Service | Availability | Availability |
| **E**levation of Privilege | Authorization | Authorization |
Bind a custom field on your threat work item type (for example, `strideCategory`) to this enumeration. The sheet configuration references it through a column type of `enum:strideCategory`.
Create two enumerations in **Administration > Enumerations** — one for severity, one for likelihood — and bind custom fields (`threatSeverity`, `threatLikelihood`) on the threat work item type to them. Reference them through column types `type: rating:threatSeverity` and `type: rating:threatLikelihood`.
Risk Priority Number (RPN) thresholds and severity/likelihood scale points are deployment-specific. Adapt them to the cybersecurity standard your team follows (for example, the qualitative scales used in ISO/SAE 21434 TARA).
Set up the column layout to capture threat details, STRIDE classification, risk assessment, and countermeasures:
```yaml theme={null}
columns:
- id: title
bindings: title
header: Threat Description
width: 250
- id: strideCategory
bindings: strideCategory
header: STRIDE
type: enum:strideCategory
width: 140
- id: asset
bindings: asset
header: Asset
width: 150
- id: attackVector
bindings: attackVector
header: Attack Vector
width: 200
- id: threatSeverity
bindings: threatSeverity
header: Severity
type: rating:threatSeverity
width: 100
- id: threatLikelihood
bindings: threatLikelihood
header: Likelihood
type: rating:threatLikelihood
width: 100
- id: riskLevel
bindings: riskLevel
header: Risk Level
formula: threatRisk
cellRenderer: threatRiskDecorator
width: 100
- id: countermeasure
bindings: task.title
header: Countermeasure
width: 200
```
Each column uses `bindings` (plural) to point at the Polarion field ID. Linked-task fields use the `task.` pattern.
The `levels` array creates a visual hierarchy through cell merging — consecutive rows that share the same value in a `controlColumn` get their cells merged vertically. For STRIDE, you typically group threats by asset and STRIDE category:
```yaml theme={null}
levels:
- name: Asset
controlColumn: asset
zoomColumn: asset
- name: STRIDE Category
controlColumn: strideCategory
zoomColumn: strideCategory
```
Every level entry requires `name` (display name in the zoom navigation menu), `controlColumn` (grouping key for cell merging), and `zoomColumn` (target column for zoom navigation).
Define a named JavaScript function in the `formulas` section that calculates threat risk from severity and likelihood:
```yaml theme={null}
formulas:
threatRisk: "function(info){ var s = info.item['threatSeverity']; var l = info.item['threatLikelihood']; if (!s || !l) return null; return s * l; }"
```
The column with `formula: threatRisk` invokes this function for each row.
 Add a cell decorator and matching styles to color-code threat risk levels. Cell decorators must use `toggleClass` (not inline styles) because the grid reuses cell DOM nodes across rows:
```yaml theme={null}
cellDecorators:
threatRiskDecorator: "function(info){ var val = info.value; $(info.cell).toggleClass('rpn1', val > 0 && val <= 4); $(info.cell).toggleClass('rpn2', val > 4 && val <= 9); $(info.cell).toggleClass('rpn3', val > 9); }"
styles:
".rpn1": "{background-color: #eaf5e9 !important; color: #1d5f20 !important;}"
".rpn2": "{background-color: #fff3d2 !important; color: #735602 !important;}"
".rpn3": "{background-color: #f8eae7 !important; color: #ab1c00 !important;}"
```
The decorator is referenced from the column via `cellRenderer: threatRiskDecorator`. Style values must be wrapped in `{...}` braces. Thresholds (4 and 9) are illustrative — set bands that match your organization's risk acceptance criteria.
A single Polarion project can host several sheet configurations — for example, a STRIDE threat analysis alongside an FMEA safety analysis. Each LiveDoc carries its own sheet configuration attachment.
The STRIDE sheet uses the same engine as FMEA and HARA. Before deploying, confirm the threat and countermeasure work item types, the `mitigates_threat` link role, and the STRIDE/severity/likelihood enumerations exist in your Polarion administration.
## Verification
After saving the sheet configuration:
1. Open Risksheet inside the configured LiveDoc document.
2. Create a new threat row — confirm the STRIDE category dropdown lists all six categories from the Polarion enumeration.
3. Select severity and likelihood — confirm the risk level formula calculates automatically.
4. Add a countermeasure — confirm it appears as a downstream task with the configured link role and that the `name` you set for `dataTypes.task` appears in the toolbar.
5. Confirm conditional formatting highlights risk levels with the configured color bands.
6. Group consecutive rows by asset and STRIDE category — confirm the level definitions merge cells correctly.
You now have a Risksheet grid tailored for STRIDE threat analysis with category classification, risk scoring, color-coded risk levels, and linked countermeasures.
## See Also
* [Set Up Risk Matrices](/risksheet/guides/risk-management/risk-matrices) — risk matrix configuration patterns
* [Configure Downstream Tasks](/risksheet/guides/risk-management/downstream-tasks) — countermeasure task setup
* [Configure Enum Columns](/risksheet/guides/columns/enum-columns) — enum column configuration
* [Apply Conditional Formatting](/risksheet/guides/styling/conditional-formatting) — cell decorator patterns
* [Configure FMEA Workflows](/risksheet/guides/risk-management/fmea-configuration) — alternative safety risk methodology
* [TARA Configuration Example](/risksheet/reference/examples/tara-example) — complete annotated ISO/SAE 21434 TARA configuration with feasibility scoring, verdict matrix, and workflow views
Add a cell decorator and matching styles to color-code threat risk levels. Cell decorators must use `toggleClass` (not inline styles) because the grid reuses cell DOM nodes across rows:
```yaml theme={null}
cellDecorators:
threatRiskDecorator: "function(info){ var val = info.value; $(info.cell).toggleClass('rpn1', val > 0 && val <= 4); $(info.cell).toggleClass('rpn2', val > 4 && val <= 9); $(info.cell).toggleClass('rpn3', val > 9); }"
styles:
".rpn1": "{background-color: #eaf5e9 !important; color: #1d5f20 !important;}"
".rpn2": "{background-color: #fff3d2 !important; color: #735602 !important;}"
".rpn3": "{background-color: #f8eae7 !important; color: #ab1c00 !important;}"
```
The decorator is referenced from the column via `cellRenderer: threatRiskDecorator`. Style values must be wrapped in `{...}` braces. Thresholds (4 and 9) are illustrative — set bands that match your organization's risk acceptance criteria.
A single Polarion project can host several sheet configurations — for example, a STRIDE threat analysis alongside an FMEA safety analysis. Each LiveDoc carries its own sheet configuration attachment.
The STRIDE sheet uses the same engine as FMEA and HARA. Before deploying, confirm the threat and countermeasure work item types, the `mitigates_threat` link role, and the STRIDE/severity/likelihood enumerations exist in your Polarion administration.
## Verification
After saving the sheet configuration:
1. Open Risksheet inside the configured LiveDoc document.
2. Create a new threat row — confirm the STRIDE category dropdown lists all six categories from the Polarion enumeration.
3. Select severity and likelihood — confirm the risk level formula calculates automatically.
4. Add a countermeasure — confirm it appears as a downstream task with the configured link role and that the `name` you set for `dataTypes.task` appears in the toolbar.
5. Confirm conditional formatting highlights risk levels with the configured color bands.
6. Group consecutive rows by asset and STRIDE category — confirm the level definitions merge cells correctly.
You now have a Risksheet grid tailored for STRIDE threat analysis with category classification, risk scoring, color-coded risk levels, and linked countermeasures.
## See Also
* [Set Up Risk Matrices](/risksheet/guides/risk-management/risk-matrices) — risk matrix configuration patterns
* [Configure Downstream Tasks](/risksheet/guides/risk-management/downstream-tasks) — countermeasure task setup
* [Configure Enum Columns](/risksheet/guides/columns/enum-columns) — enum column configuration
* [Apply Conditional Formatting](/risksheet/guides/styling/conditional-formatting) — cell decorator patterns
* [Configure FMEA Workflows](/risksheet/guides/risk-management/fmea-configuration) — alternative safety risk methodology
* [TARA Configuration Example](/risksheet/reference/examples/tara-example) — complete annotated ISO/SAE 21434 TARA configuration with feasibility scoring, verdict matrix, and workflow views