> ## Documentation Index
> Fetch the complete documentation index at: https://learn.nextedy.com/llms.txt
> Use this file to discover all available pages before exploring further.
# Add Multi-Page Images to PDF
> Display logos, headers, or other images on every page of your Nextedy RISKSHEET PDF export by configuring the `doc.pageAdded` event in your custom export script.
export const LastReviewed = ({date}) => {
if (!date) return null;
const formatted = new Date(`${date}T00:00:00Z`).toLocaleDateString("en-US", {
year: "numeric",
month: "long",
day: "numeric",
timeZone: "UTC"
});
return
Last reviewed on {formatted}
;
};
## Prerequisites
* A custom PDF export script (`risksheetPdfExport.vm`) attached to your document or template
* An image file accessible via URL or embedded as a Base64 string
* Familiarity with [PDF export customization](/risksheet/guides/export/pdf-custom-scripts)
The PDF export engine fires a `doc.pageAdded` event each time a new page is created. You must register this event on every page where you want the image to appear.
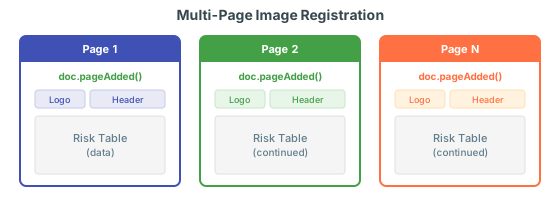 The `doc.pageAdded` event only applies to the page where it is registered. It does **not** automatically repeat on subsequent pages. For large risk tables that span multiple pages, the image will not appear on overflow pages unless you explicitly re-register the event after each `#newPage()` call.
```javascript theme={null}
doc.pageAdded.addHandler(function(sender, args) {
var img = new wijmo.pdf.PdfImage("https://your-server/logo.png");
doc.drawImage(img, 10, 10, { width: 80, height: 30 });
});
```
If your export script uses `#newPage()` to create manual page breaks (for example, between the main risk table and rating definition tables), you must re-register `doc.pageAdded` after each break:
```javascript theme={null}
// Export main risk sheet
exporter.exportMainSheet();
// Manual page break for rating tables
#newPage()
// Re-register image handler for the new page
doc.pageAdded.addHandler(function(sender, args) {
var img = new wijmo.pdf.PdfImage("https://your-server/logo.png");
doc.drawImage(img, 10, 10, { width: 80, height: 30 });
});
// Export rating tables
exporter.exportRatingTable("severity");
exporter.exportRatingTable("occurrence");
```
Define the image drawing logic once and call it from each `pageAdded` handler to avoid code duplication:
```javascript theme={null}
function drawPageHeader(doc) {
var img = new wijmo.pdf.PdfImage("https://your-server/logo.png");
doc.drawImage(img, 10, 10, { width: 80, height: 30 });
}
doc.pageAdded.addHandler(function(s, e) { drawPageHeader(doc); });
```
Use the `x` and `y` parameters of `doc.drawImage()` to control placement:
| Parameter | Description | Typical Value |
| --------- | ----------------------------------------- | --------------------- |
| `x` | Horizontal offset from left edge (points) | `10` for left margin |
| `y` | Vertical offset from top edge (points) | `10` for top margin |
| `width` | Image width (points) | `80` for a small logo |
| `height` | Image height (points) | `30` for a small logo |
When a large FMEA or HARA risk table spans multiple pages automatically (without explicit `#newPage()` calls), the `doc.pageAdded` event registered before the table export will fire on each overflow page. However, text from long cells may repeat at the top of the next page by design to provide context for reviewers.
## Verification
After configuring your export script:
1. Save all changes to your document
2. Click **Export to PDF** from the toolbar
3. Wait for the export to complete
You should now see your logo or image appearing on every page of the generated PDF, including pages created by table overflow.
## See Also
* [Export to PDF](/risksheet/guides/export/pdf-export) -- Base PDF export configuration
* [Customize PDF Export Scripts](/risksheet/guides/export/pdf-custom-scripts) -- Full script customization reference
* [Control Column Visibility in Exports](/risksheet/guides/export/column-visibility-export) -- Hide columns during export
The `doc.pageAdded` event only applies to the page where it is registered. It does **not** automatically repeat on subsequent pages. For large risk tables that span multiple pages, the image will not appear on overflow pages unless you explicitly re-register the event after each `#newPage()` call.
```javascript theme={null}
doc.pageAdded.addHandler(function(sender, args) {
var img = new wijmo.pdf.PdfImage("https://your-server/logo.png");
doc.drawImage(img, 10, 10, { width: 80, height: 30 });
});
```
If your export script uses `#newPage()` to create manual page breaks (for example, between the main risk table and rating definition tables), you must re-register `doc.pageAdded` after each break:
```javascript theme={null}
// Export main risk sheet
exporter.exportMainSheet();
// Manual page break for rating tables
#newPage()
// Re-register image handler for the new page
doc.pageAdded.addHandler(function(sender, args) {
var img = new wijmo.pdf.PdfImage("https://your-server/logo.png");
doc.drawImage(img, 10, 10, { width: 80, height: 30 });
});
// Export rating tables
exporter.exportRatingTable("severity");
exporter.exportRatingTable("occurrence");
```
Define the image drawing logic once and call it from each `pageAdded` handler to avoid code duplication:
```javascript theme={null}
function drawPageHeader(doc) {
var img = new wijmo.pdf.PdfImage("https://your-server/logo.png");
doc.drawImage(img, 10, 10, { width: 80, height: 30 });
}
doc.pageAdded.addHandler(function(s, e) { drawPageHeader(doc); });
```
Use the `x` and `y` parameters of `doc.drawImage()` to control placement:
| Parameter | Description | Typical Value |
| --------- | ----------------------------------------- | --------------------- |
| `x` | Horizontal offset from left edge (points) | `10` for left margin |
| `y` | Vertical offset from top edge (points) | `10` for top margin |
| `width` | Image width (points) | `80` for a small logo |
| `height` | Image height (points) | `30` for a small logo |
When a large FMEA or HARA risk table spans multiple pages automatically (without explicit `#newPage()` calls), the `doc.pageAdded` event registered before the table export will fire on each overflow page. However, text from long cells may repeat at the top of the next page by design to provide context for reviewers.
## Verification
After configuring your export script:
1. Save all changes to your document
2. Click **Export to PDF** from the toolbar
3. Wait for the export to complete
You should now see your logo or image appearing on every page of the generated PDF, including pages created by table overflow.
## See Also
* [Export to PDF](/risksheet/guides/export/pdf-export) -- Base PDF export configuration
* [Customize PDF Export Scripts](/risksheet/guides/export/pdf-custom-scripts) -- Full script customization reference
* [Control Column Visibility in Exports](/risksheet/guides/export/column-visibility-export) -- Hide columns during export