> ## Documentation Index
> Fetch the complete documentation index at: https://learn.nextedy.com/llms.txt
> Use this file to discover all available pages before exploring further.
# Customize Link Rendering
> Control how linked work items are displayed in Nextedy RISKSHEET columns by configuring custom bindings, display properties, and rendering options for `itemLink`, `multiItemLink`, and `taskLink` columns.
export const LastReviewed = ({date}) => {
if (!date) return null;
const formatted = new Date(`${date}T00:00:00Z`).toLocaleDateString("en-US", {
year: "numeric",
month: "long",
day: "numeric",
timeZone: "UTC"
});
return
Last reviewed on {formatted}
;
};
## Default Link Display
By default, link columns display the linked item's ID as a clickable hyperlink. The link URL is provided through a `_link` postfix property (e.g., a column with binding `requirement` uses `requirement_link` for the URL).
To render both the work item ID and another property (such as title) in a single column, use `typeProperties.itemTemplate` -- a Velocity template string that overrides the default rendering:
```yaml theme={null}
{
"columns": [
{
"id": "mitigationTask",
"bindings": "task",
"header": "Mitigation",
"type": "taskLink",
"typeProperties": {
"itemTemplate": ""
},
"width": 250
}
]
}
```
The `itemTemplate` controls how each linked item is displayed, so you can combine the linked item's ID and title in one cell. It is evaluated by Polarion's Velocity rendering engine — reference the linked item's fields using the syntax documented in [Velocity Templates](/risksheet/reference/templates/velocity-templates).
An `itemTemplate` whose reference does not resolve (for example an undefined variable) renders **literally as text** in the cell rather than the field value. Verify the exact linked-item field-access syntax against [Velocity Templates](/risksheet/reference/templates/velocity-templates) and your project's top-panel / PDF-export templates before relying on it.
To display **only** the linked title (no custom template needed), use the dot-notation binding instead:
```yaml theme={null}
{
"columns": [
{
"id": "mitigationTask",
"bindings": "task.title",
"header": "Mitigation",
"type": "taskLink",
"width": 250
}
]
}
```
For full server-side control over the rendered HTML, use the `serverRender` option described below instead of `itemTemplate`.
For `multiItemLink` columns, each linked item is rendered as a separate entry with a tooltip showing the full ID and title:
```yaml theme={null}
{
"columns": [
{
"id": "safetyReqs",
bindings: "safetyReq",
"header": "Safety Requirements",
"type": "multiItemLink",
"width": 250
}
]
}
```
Each item in the list displays:
* The item label (typically the ID)
* A tooltip with the full ID and title
* An asterisk prefix (\*) for newly created items that have not been saved
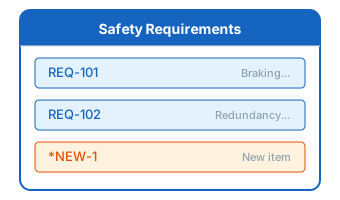 Items created in the current session but not yet saved to the server are prefixed with an asterisk (\*) and styled with a distinct CSS class. This visual indicator helps distinguish between saved and unsaved links.
For complex link display requirements (such as showing properties from indirectly linked items), use `serverRender` to generate HTML via Velocity scripts:
```yaml theme={null}
{
"columns": [
{
"id": "indirectLinks",
bindings: "indirectLinks",
"header": "Related Items",
"serverRender": "indirectLinksRenderer",
"width": 200
}
]
}
```
Columns with `serverRender` automatically become read-only. Use this approach only for display-only columns where you need access to Polarion's full data model for rendering.
Apply custom CSS classes to link columns using the `cellCss` property:
```yaml theme={null}
{
"columns": [
{
"id": "reqLink",
bindings: "requirement",
"header": "Requirement",
"type": "itemLink",
"cellCss": "link-column-highlight",
"width": 150
}
],
"styles": {
".link-column-highlight": "{font-weight: 600; color: #3f51b5;}"
}
}
```
## Link Rendering in Exports
Link columns are handled differently during export:
| Export Format | Rendering |
| ------------- | ------------------------------------------------------------------ |
| Excel | Plain text (HTML stripped), multi-item links separated by newlines |
| PDF | Plain text labels, multi-item links as formatted lists |
For PDF exports, the `mainSheetCellFormatter` strips HTML from link columns and renders them as plain text. Multi-item links display the `label` property of each linked item.
## Verification
Save the configuration and reload your Risksheet. You should now see linked items displayed with your custom rendering. Hover over link cells to verify tooltips show the expected information. For multi-item link columns, confirm that all linked items are visible as separate entries in the cell.
## See Also
* [Configure Upstream Traceability Columns](/risksheet/guides/columns/upstream-traceability) -- set up link columns
* [Show Multiple Linked Items](/risksheet/guides/columns/multiple-linked-items) -- multiItemLink configuration
* [Render Custom Data](/risksheet/guides/columns/custom-data-rendering) -- cell renderers and decorators
* [Display Sub-Columns](/risksheet/guides/columns/sub-columns) -- show properties of linked items as sub-columns
* [Create Clickable Links](/risksheet/guides/columns/clickable-links) -- add clickable URL links
Items created in the current session but not yet saved to the server are prefixed with an asterisk (\*) and styled with a distinct CSS class. This visual indicator helps distinguish between saved and unsaved links.
For complex link display requirements (such as showing properties from indirectly linked items), use `serverRender` to generate HTML via Velocity scripts:
```yaml theme={null}
{
"columns": [
{
"id": "indirectLinks",
bindings: "indirectLinks",
"header": "Related Items",
"serverRender": "indirectLinksRenderer",
"width": 200
}
]
}
```
Columns with `serverRender` automatically become read-only. Use this approach only for display-only columns where you need access to Polarion's full data model for rendering.
Apply custom CSS classes to link columns using the `cellCss` property:
```yaml theme={null}
{
"columns": [
{
"id": "reqLink",
bindings: "requirement",
"header": "Requirement",
"type": "itemLink",
"cellCss": "link-column-highlight",
"width": 150
}
],
"styles": {
".link-column-highlight": "{font-weight: 600; color: #3f51b5;}"
}
}
```
## Link Rendering in Exports
Link columns are handled differently during export:
| Export Format | Rendering |
| ------------- | ------------------------------------------------------------------ |
| Excel | Plain text (HTML stripped), multi-item links separated by newlines |
| PDF | Plain text labels, multi-item links as formatted lists |
For PDF exports, the `mainSheetCellFormatter` strips HTML from link columns and renders them as plain text. Multi-item links display the `label` property of each linked item.
## Verification
Save the configuration and reload your Risksheet. You should now see linked items displayed with your custom rendering. Hover over link cells to verify tooltips show the expected information. For multi-item link columns, confirm that all linked items are visible as separate entries in the cell.
## See Also
* [Configure Upstream Traceability Columns](/risksheet/guides/columns/upstream-traceability) -- set up link columns
* [Show Multiple Linked Items](/risksheet/guides/columns/multiple-linked-items) -- multiItemLink configuration
* [Render Custom Data](/risksheet/guides/columns/custom-data-rendering) -- cell renderers and decorators
* [Display Sub-Columns](/risksheet/guides/columns/sub-columns) -- show properties of linked items as sub-columns
* [Create Clickable Links](/risksheet/guides/columns/clickable-links) -- add clickable URL links