> ## Documentation Index
> Fetch the complete documentation index at: https://learn.nextedy.com/llms.txt
> Use this file to discover all available pages before exploring further.
# Evaluate Risksheet
> This tutorial walks you through evaluating Nextedy RISKSHEET on Siemens Polarion ALM.
export const LastReviewed = ({date}) => {
if (!date) return null;
const formatted = new Date(`${date}T00:00:00Z`).toLocaleDateString("en-US", {
year: "numeric",
month: "long",
day: "numeric",
timeZone: "UTC"
});
return
Last reviewed on {formatted}
;
};
## What you will achieve
By the end of this tutorial, you will have:
* Chosen one of two evaluation paths (hosted by Nextedy, or self-hosted on your own Polarion server).
* Instantiated a working risksheet from a Nextedy solution template — starting from the **functional safety template**, the simplest entry point.
* Opened the risksheet, explored the grid, edited a risk item, observed Risk Priority Number (RPN) calculation and conditional formatting, and used the review workflow.
* Identified whether Risksheet covers your team's Failure Mode and Effects Analysis (FMEA), Hazard Analysis and Risk Assessment (HARA), Threat Analysis and Risk Assessment (TARA), or other risk methodology needs.
Always **start from a solution template** and modify it to match your process. Never build a risksheet configuration from a blank file. Templates encode methodology expertise — column structures, levels, formulas, cell decorators, and review workflows — that you should adapt, not recreate.
## Prerequisites
* A modern web browser (Chrome, Firefox, or Edge).
* For the **hosted** path: an email address to request demo access.
* For the **self-hosted** path: a Polarion server running version **19.1 or later**, with administrator access for plugin deployment.
## Evaluation paths
 Choose **one** path below. Both converge on the same common flow (Steps 4 through 8).
***
## Part 1 — Hosted evaluation (Nextedy demo server)
Use this path when you want to evaluate quickly without installing anything on your own infrastructure.
### Step 1: Request hosted trial access
Contact Nextedy to request demo server credentials. Provide your email address and the methodology you want to evaluate. The Nextedy team responds with a URL, username, and password for a pre-configured Polarion instance that already has Risksheet installed.
You should receive credentials for a Polarion instance that exposes one or more **solution template projects** — at minimum a functional safety FMEA example, often accompanied by HARA and other variants.
Ask for access to the **functional safety template** first. It is the simplest configuration and is the recommended entry point for evaluation. HARA and other templates demonstrate advanced features such as catalog reuse and dependent enums, which can distract from a first-pass evaluation.
### Step 2: Log in and locate the template projects
Open the demo URL in your browser and log in with the provided credentials. In the Polarion project navigator, you should see one or more template projects (for example, a project named for functional safety FMEA).
You should land on the Polarion home page with the demo projects listed. Skip ahead to **Part 3 — Common evaluation flow**.
***
## Part 2 — Self-hosted evaluation
Use this path when your security policy requires on-premises evaluation, or when you want to test Risksheet against your own Polarion configuration, user accounts, and link roles.
### Step 1: Verify Polarion version
Confirm your Polarion server is running version **19.1 or later**. Risksheet does not support earlier Polarion releases.
You should see the Polarion version on the **About Polarion** dialog (Help menu) or in the server admin panel.
### Step 2: Download Risksheet
Download the Risksheet plugin distribution from:
```text theme={null}
https://go.nextedy.com/risksheet-download-page
```
You should receive a plugin archive suitable for deployment into your Polarion installation directory.
### Step 3: Deploy the plugin
Stop the Polarion server, copy the Risksheet plugin into your Polarion extensions directory (`[POLARION_INSTALL]/polarion/extensions/`) as instructed by the download page README, then prepare to restart.
Before restarting Polarion, **delete the workspace config cache**:
```text theme={null}
[POLARION_INSTALL]/data/workspace/.config
```
Skipping this step causes the Polarion OSGi runtime to use stale plugin metadata and Risksheet menus will not appear. The `.config` directory is regenerated automatically on the next start.
Restart Polarion. You should see Risksheet entries appear under **Administration > Nextedy Risksheet > Setup** after the server finishes initializing.
### Create a sandbox project from a solution template
In **Administration > Nextedy Risksheet > Setup**, use **Create New Project**. On the template-selection page, choose the template **Nextedy Risksheet FMEA Demo** (or **Nextedy Risksheet HARA Demo**), then click **Finish**.
Open the new project and select **Risksheet** in the left navigator (below **Work Items** and **Documents & Pages**). You should see a pre-configured risk specification with a working grid of example risk items, ready for exploration.
Choose **one** path below. Both converge on the same common flow (Steps 4 through 8).
***
## Part 1 — Hosted evaluation (Nextedy demo server)
Use this path when you want to evaluate quickly without installing anything on your own infrastructure.
### Step 1: Request hosted trial access
Contact Nextedy to request demo server credentials. Provide your email address and the methodology you want to evaluate. The Nextedy team responds with a URL, username, and password for a pre-configured Polarion instance that already has Risksheet installed.
You should receive credentials for a Polarion instance that exposes one or more **solution template projects** — at minimum a functional safety FMEA example, often accompanied by HARA and other variants.
Ask for access to the **functional safety template** first. It is the simplest configuration and is the recommended entry point for evaluation. HARA and other templates demonstrate advanced features such as catalog reuse and dependent enums, which can distract from a first-pass evaluation.
### Step 2: Log in and locate the template projects
Open the demo URL in your browser and log in with the provided credentials. In the Polarion project navigator, you should see one or more template projects (for example, a project named for functional safety FMEA).
You should land on the Polarion home page with the demo projects listed. Skip ahead to **Part 3 — Common evaluation flow**.
***
## Part 2 — Self-hosted evaluation
Use this path when your security policy requires on-premises evaluation, or when you want to test Risksheet against your own Polarion configuration, user accounts, and link roles.
### Step 1: Verify Polarion version
Confirm your Polarion server is running version **19.1 or later**. Risksheet does not support earlier Polarion releases.
You should see the Polarion version on the **About Polarion** dialog (Help menu) or in the server admin panel.
### Step 2: Download Risksheet
Download the Risksheet plugin distribution from:
```text theme={null}
https://go.nextedy.com/risksheet-download-page
```
You should receive a plugin archive suitable for deployment into your Polarion installation directory.
### Step 3: Deploy the plugin
Stop the Polarion server, copy the Risksheet plugin into your Polarion extensions directory (`[POLARION_INSTALL]/polarion/extensions/`) as instructed by the download page README, then prepare to restart.
Before restarting Polarion, **delete the workspace config cache**:
```text theme={null}
[POLARION_INSTALL]/data/workspace/.config
```
Skipping this step causes the Polarion OSGi runtime to use stale plugin metadata and Risksheet menus will not appear. The `.config` directory is regenerated automatically on the next start.
Restart Polarion. You should see Risksheet entries appear under **Administration > Nextedy Risksheet > Setup** after the server finishes initializing.
### Create a sandbox project from a solution template
In **Administration > Nextedy Risksheet > Setup**, use **Create New Project**. On the template-selection page, choose the template **Nextedy Risksheet FMEA Demo** (or **Nextedy Risksheet HARA Demo**), then click **Finish**.
Open the new project and select **Risksheet** in the left navigator (below **Work Items** and **Documents & Pages**). You should see a pre-configured risk specification with a working grid of example risk items, ready for exploration.
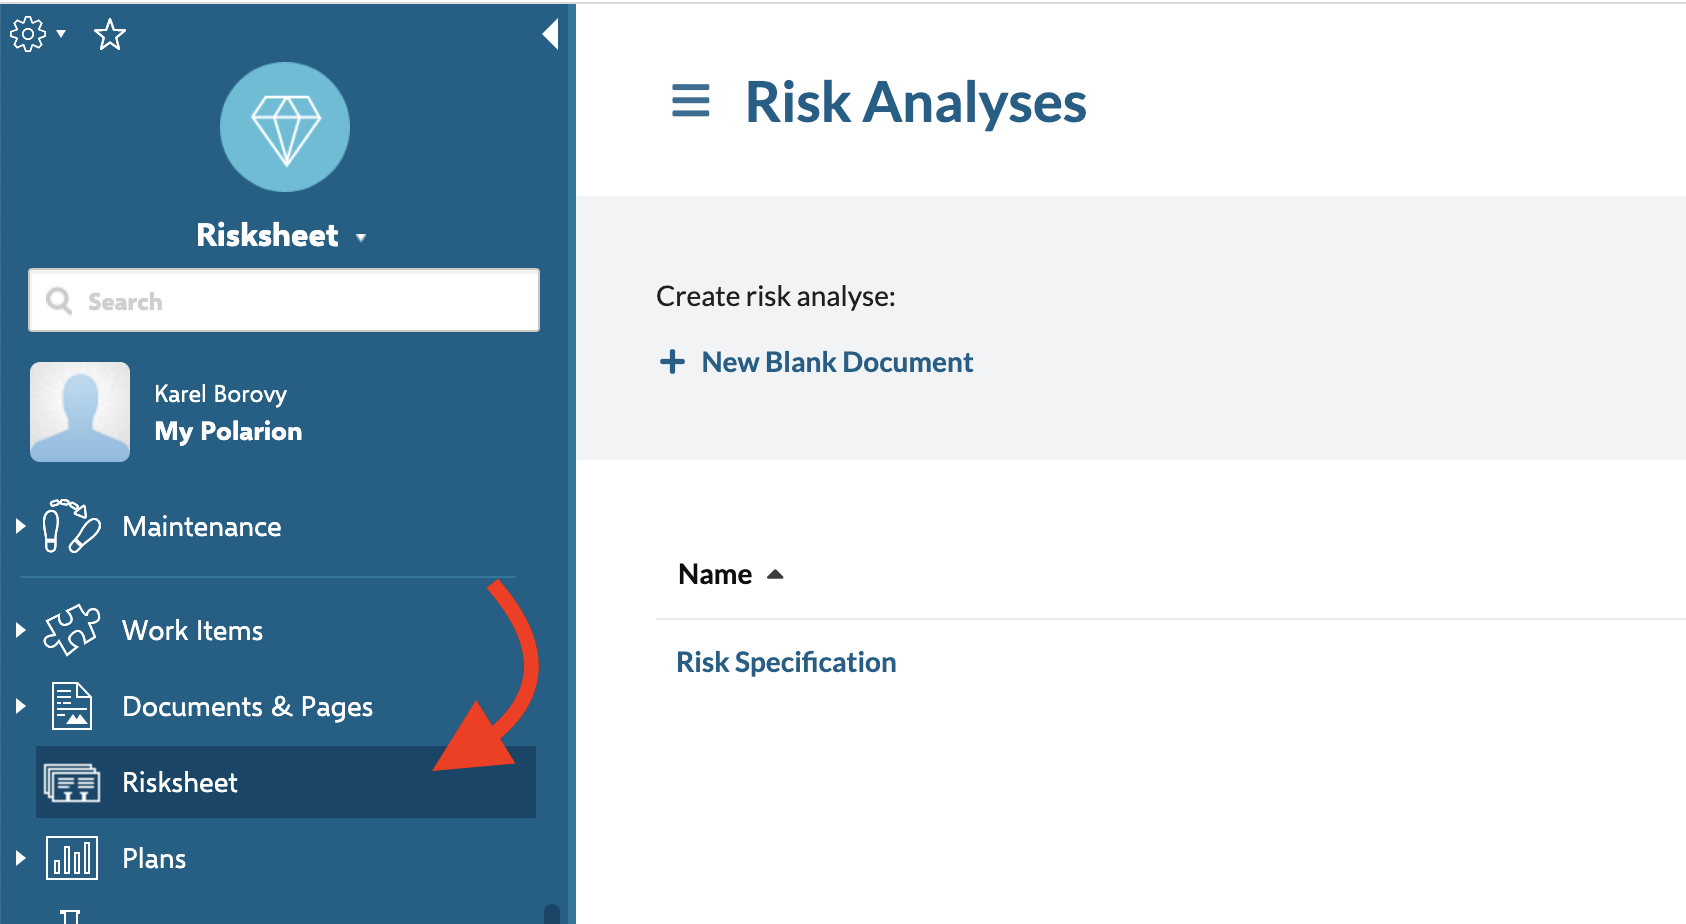 For full installation details, see [Installation](/risksheet/getting-started/installation). Then continue with **Part 3 — Common evaluation flow** below.
***
## Part 3 — Common evaluation flow
Both paths converge here. Whether you are using the hosted demo or a freshly provisioned local template, the next steps are identical.
### Step 4: Open the risksheet
Open the template LiveDoc (for example, *Risks/Risk Specification* in the functional safety project). The Risksheet grid renders inside the LiveDoc page.
You should see an Excel-like grid with:
* **Risk items** as rows (failure modes, hazards, or your methodology's equivalent).
* **Hierarchical levels** with cells visually merged where consecutive rows share the same parent value.
* **Column groups** organizing related columns (for example, initial assessment versus revised assessment).
* **Color-coded cells** for RPN and similar derived values.
* A **top panel** above the grid showing summary information.
For full installation details, see [Installation](/risksheet/getting-started/installation). Then continue with **Part 3 — Common evaluation flow** below.
***
## Part 3 — Common evaluation flow
Both paths converge here. Whether you are using the hosted demo or a freshly provisioned local template, the next steps are identical.
### Step 4: Open the risksheet
Open the template LiveDoc (for example, *Risks/Risk Specification* in the functional safety project). The Risksheet grid renders inside the LiveDoc page.
You should see an Excel-like grid with:
* **Risk items** as rows (failure modes, hazards, or your methodology's equivalent).
* **Hierarchical levels** with cells visually merged where consecutive rows share the same parent value.
* **Column groups** organizing related columns (for example, initial assessment versus revised assessment).
* **Color-coded cells** for RPN and similar derived values.
* A **top panel** above the grid showing summary information.
 ### Step 5: Explore RPN calculation and conditional formatting
Click an RPN cell to inspect how it is derived. The template defines a `formulas` section in the sheet configuration that multiplies severity, occurrence, and detection ratings:
```yaml theme={null}
formulas:
commonRpn: |
function(info) {
var value = info.item['occ'] * info.item['det'] * info.item['sev'];
return value ? value : null;
}
commonRpnNew: |
function(info) {
var value = info.item['occNew'] * info.item['detNew'] * info.item['sevNew'];
return value ? value : null;
}
```
The grid also defines a `cellDecorators` section that applies CSS classes to RPN cells based on configurable thresholds. The functional safety template uses a three-band scheme:
| RPN range | Visual class | Meaning |
| --------- | --------------- | ----------- |
| 1 — 150 | `rpn1` (low) | Low risk |
| 151 — 250 | `rpn2` (medium) | Medium risk |
| > 250 | `rpn3` (high) | High risk |
RPN thresholds are not product defaults — they are defined inside the template's `cellDecorators`. Different templates use different thresholds. When you adapt a template, adjust the thresholds in the sheet configuration to match your organization's risk policy.
Edit a severity, occurrence, or detection value in a row. The RPN cell should recalculate immediately, and its background color should update to match the new band.
### Step 6: Explore traceability — upstream and downstream
Risksheet does not store risk data separately — every row is a Polarion work item, so all data participates in Polarion authorization and traceability.
* **Upstream**: locate a column bound to a requirement or hazard link (for example, an `itemLink` column). The cell displays a linked work item ID; click it to open the source requirement in Polarion's editor.
* **Downstream**: locate the task column (typically labeled *Mitigation*, *Safety Goal*, or similar). Right-click a row and choose the option to open the linked task. The task opens in the Polarion item editor and shows a link back to the parent risk item.
You should observe that tasks are normal Polarion work items connected through a configured link role — they appear in standard Polarion reports and queries, not in a separate Risksheet-only database.
### Step 7: Try the review workflow
Risksheet supports three review strategies: comment-based, work-item-based, and approval review. The functional safety template typically ships with **comment-based review**, where each review is stored as a standard Polarion comment on the underlying work item.
Add a review on any row using the Risksheet review action. You should see the review captured as a comment on the risk item, with your author name, timestamp, and the text you entered. The review remains visible in Polarion's standard comment view.
If you switch the demo to approval review, be aware that Risksheet approval review creates approval-tagged comments but **does not trigger Polarion's formal approval state transitions** (draft -> reviewed -> approved). It is a lightweight comment-based mechanism, not a wrapper over the Polarion approval workflow.
### Step 8: Try export
Use the export action to export the current grid to Excel and then to PDF. You should receive a formatted spreadsheet and a paginated PDF that reproduce the column groups, conditional formatting, and merged cell hierarchy you see on screen.
You have now exercised the core workflow: open, edit, recalculate, link, review, export. This is enough to judge fit against your process.
## Evaluation checklist
Use this checklist to decide whether to proceed beyond evaluation:
| Capability | What to confirm |
| ---------------------- | --------------------------------------------------------------------------- |
| Grid layout | Columns, headers, and levels match how your team organizes risk analysis |
| Calculation | Formulas (RPN or your equivalent) reflect your scoring model |
| Conditional formatting | Risk bands and thresholds align with your acceptability criteria |
| Upstream traceability | Links to requirements/hazards work with your link roles and document layout |
| Downstream tasks | Mitigation tasks integrate with your existing Polarion task tracking |
| Reviews | Comment-based or work-item-based review fits your audit needs |
| Export | Excel and PDF output meet your reporting and archival requirements |
| Polarion permissions | All data is governed by standard Polarion authorization |
## What's next — building your own risksheet
Once evaluation confirms the fit, move on to building a real risksheet for your project. The single most important rule: **start from a solution template, never from a blank `risksheet.json`**. Templates encode methodology expertise — column structures, hierarchical levels, RPN formulas, cell decorators, review workflows, and risk-band styles — that took years of practice to refine. Copy the template that most closely matches your methodology (functional safety FMEA, HARA, TARA, or another variant) and adapt only what you need to change: rating scales, threshold bands, link roles, or column labels. Building from scratch almost always reproduces a worse version of what the templates already provide.
In practice this means: provision a new LiveDoc from a template (default folder path is `Risks/Risk Specification`), let the template's `risksheet.json` configuration flow in automatically, and only attach a custom `risksheet.json` to the document when you need to override specific fields. If you do attach one, the filename must be exactly `risksheet.json` — anything else is ignored and the template configuration is used instead.
* Adapt a template to your process: [Basic Configuration](/risksheet/getting-started/basic-configuration).
* Learn the grid layout, toolbar, and navigation: [Understanding the Interface](/risksheet/getting-started/understanding-interface).
* Browse pre-built configurations for other methodologies: [Configuration Examples](/risksheet/reference/examples/index).
## Next steps
* Install Risksheet in your own Polarion environment: [Installation](/risksheet/getting-started/installation).
* Learn the grid layout, toolbar, and navigation: [Understanding the Interface](/risksheet/getting-started/understanding-interface).
* Modify a template's columns, formulas, and decorators: [Basic Configuration](/risksheet/getting-started/basic-configuration).
* Browse pre-built configurations for other methodologies: [Configuration Examples](/risksheet/reference/examples/index).
* Adapt a template to your process: [Configuration Management](/risksheet/guides/configuration/index).
### Step 5: Explore RPN calculation and conditional formatting
Click an RPN cell to inspect how it is derived. The template defines a `formulas` section in the sheet configuration that multiplies severity, occurrence, and detection ratings:
```yaml theme={null}
formulas:
commonRpn: |
function(info) {
var value = info.item['occ'] * info.item['det'] * info.item['sev'];
return value ? value : null;
}
commonRpnNew: |
function(info) {
var value = info.item['occNew'] * info.item['detNew'] * info.item['sevNew'];
return value ? value : null;
}
```
The grid also defines a `cellDecorators` section that applies CSS classes to RPN cells based on configurable thresholds. The functional safety template uses a three-band scheme:
| RPN range | Visual class | Meaning |
| --------- | --------------- | ----------- |
| 1 — 150 | `rpn1` (low) | Low risk |
| 151 — 250 | `rpn2` (medium) | Medium risk |
| > 250 | `rpn3` (high) | High risk |
RPN thresholds are not product defaults — they are defined inside the template's `cellDecorators`. Different templates use different thresholds. When you adapt a template, adjust the thresholds in the sheet configuration to match your organization's risk policy.
Edit a severity, occurrence, or detection value in a row. The RPN cell should recalculate immediately, and its background color should update to match the new band.
### Step 6: Explore traceability — upstream and downstream
Risksheet does not store risk data separately — every row is a Polarion work item, so all data participates in Polarion authorization and traceability.
* **Upstream**: locate a column bound to a requirement or hazard link (for example, an `itemLink` column). The cell displays a linked work item ID; click it to open the source requirement in Polarion's editor.
* **Downstream**: locate the task column (typically labeled *Mitigation*, *Safety Goal*, or similar). Right-click a row and choose the option to open the linked task. The task opens in the Polarion item editor and shows a link back to the parent risk item.
You should observe that tasks are normal Polarion work items connected through a configured link role — they appear in standard Polarion reports and queries, not in a separate Risksheet-only database.
### Step 7: Try the review workflow
Risksheet supports three review strategies: comment-based, work-item-based, and approval review. The functional safety template typically ships with **comment-based review**, where each review is stored as a standard Polarion comment on the underlying work item.
Add a review on any row using the Risksheet review action. You should see the review captured as a comment on the risk item, with your author name, timestamp, and the text you entered. The review remains visible in Polarion's standard comment view.
If you switch the demo to approval review, be aware that Risksheet approval review creates approval-tagged comments but **does not trigger Polarion's formal approval state transitions** (draft -> reviewed -> approved). It is a lightweight comment-based mechanism, not a wrapper over the Polarion approval workflow.
### Step 8: Try export
Use the export action to export the current grid to Excel and then to PDF. You should receive a formatted spreadsheet and a paginated PDF that reproduce the column groups, conditional formatting, and merged cell hierarchy you see on screen.
You have now exercised the core workflow: open, edit, recalculate, link, review, export. This is enough to judge fit against your process.
## Evaluation checklist
Use this checklist to decide whether to proceed beyond evaluation:
| Capability | What to confirm |
| ---------------------- | --------------------------------------------------------------------------- |
| Grid layout | Columns, headers, and levels match how your team organizes risk analysis |
| Calculation | Formulas (RPN or your equivalent) reflect your scoring model |
| Conditional formatting | Risk bands and thresholds align with your acceptability criteria |
| Upstream traceability | Links to requirements/hazards work with your link roles and document layout |
| Downstream tasks | Mitigation tasks integrate with your existing Polarion task tracking |
| Reviews | Comment-based or work-item-based review fits your audit needs |
| Export | Excel and PDF output meet your reporting and archival requirements |
| Polarion permissions | All data is governed by standard Polarion authorization |
## What's next — building your own risksheet
Once evaluation confirms the fit, move on to building a real risksheet for your project. The single most important rule: **start from a solution template, never from a blank `risksheet.json`**. Templates encode methodology expertise — column structures, hierarchical levels, RPN formulas, cell decorators, review workflows, and risk-band styles — that took years of practice to refine. Copy the template that most closely matches your methodology (functional safety FMEA, HARA, TARA, or another variant) and adapt only what you need to change: rating scales, threshold bands, link roles, or column labels. Building from scratch almost always reproduces a worse version of what the templates already provide.
In practice this means: provision a new LiveDoc from a template (default folder path is `Risks/Risk Specification`), let the template's `risksheet.json` configuration flow in automatically, and only attach a custom `risksheet.json` to the document when you need to override specific fields. If you do attach one, the filename must be exactly `risksheet.json` — anything else is ignored and the template configuration is used instead.
* Adapt a template to your process: [Basic Configuration](/risksheet/getting-started/basic-configuration).
* Learn the grid layout, toolbar, and navigation: [Understanding the Interface](/risksheet/getting-started/understanding-interface).
* Browse pre-built configurations for other methodologies: [Configuration Examples](/risksheet/reference/examples/index).
## Next steps
* Install Risksheet in your own Polarion environment: [Installation](/risksheet/getting-started/installation).
* Learn the grid layout, toolbar, and navigation: [Understanding the Interface](/risksheet/getting-started/understanding-interface).
* Modify a template's columns, formulas, and decorators: [Basic Configuration](/risksheet/getting-started/basic-configuration).
* Browse pre-built configurations for other methodologies: [Configuration Examples](/risksheet/reference/examples/index).
* Adapt a template to your process: [Configuration Management](/risksheet/guides/configuration/index).