> ## Documentation Index
> Fetch the complete documentation index at: https://learn.nextedy.com/llms.txt
> Use this file to discover all available pages before exploring further.
# Create a Work Item
> Add new work items directly from the Nextedy POWERSHEET sheet view, with automatic document routing and constraint-driven placement.
export const LastReviewed = ({date}) => {
if (!date) return null;
const formatted = new Date(`${date}T00:00:00Z`).toLocaleDateString("en-US", {
year: "numeric",
month: "long",
day: "numeric",
timeZone: "UTC"
});
return
Last reviewed on {formatted}
;
};
## Prerequisites
* A Powersheet document open in Siemens Polarion ALM with a valid sheet configuration and data model
* The entity type you want to create must be defined in the data model with a valid `polarionType` mapping
* Your user account must have create permissions (`isCreatable` enabled) for the target work item type
Click the **Add** button ( ) in the sheet toolbar. A new empty row appears in the sheet with default values from the entity factory configuration.
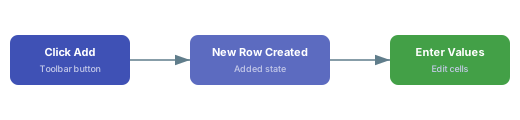 The new row is created at the current hierarchy level. If you have a multi-level sheet (for example, `UserNeed` > `SystemRequirement` > `DesignRequirement`), the row is added at the level corresponding to the selected cell's entity type.
Click into the new row and type directly into cells to populate field values. The cell that receives initial focus is determined by the `hasFocus` property in your sheet configuration:
```yaml theme={null}
columns:
title:
title: Title
width: 200
hasFocus: true
severity:
title: Severity
width: 100
```
Press **Enter** to commit the cell edit. Fields configured as `isReadOnly: true` or with `updatable: false` in the data model cannot be edited.
Powersheet supports saving several custom field types including integer fields (`c_intField`), floating-point fields (`c_floatField`), and currency fields (`c_currencyField`). Each field type tracks both the current value and the original value for change detection.
When your data model defines constraints on the entity type, new work items are automatically routed to the correct Polarion document. The constraint system scopes new entities to the current document context automatically.
For example, a data model that routes `SystemRequirement` items to a specific document:
```yaml theme={null}
domainModelTypes:
SystemRequirement:
polarionType: sys_req
constraints:
create:
document:
moduleFolder: /System Requirements
moduleName: SRS
type: sys_req_spec
```
When a user creates a `SystemRequirement`, it is automatically placed in the document matching the specified folder, name, and type.
The constraint system can route new items based on the source entity's document context. This is useful when the same entity type should go to different documents depending on where it was created from within the expansion path.
### Constrained Picker Values
In a multi-level sheet, constraints can also filter the available values in picker columns. For example, when creating a `UserNeed` and selecting a linked `SystemRequirement`, the picker shows only system requirements from the matching document type.
| Constraint Type | Behavior |
| ---------------- | ----------------------------------------------------------------- |
| Document routing | New items are placed in the specified Polarion document |
| Picker filtering | Dropdown values are filtered based on document type and component |
| Multi-property | Combines document type and component constraints |
Before saving, use **review mode** to inspect your pending changes:
1. The **Review** toggle appears automatically in the toolbar when any changes exist
2. Click it to filter the sheet to show only rows with pending changes
3. New rows are indicated with the **Added** state marker on the row header
4. Use the review mode dropdown menu to filter by change type
| Review Filter | What It Shows |
| ------------- | ------------------------------------------------ |
| **Added** | Newly created rows not yet persisted to Polarion |
| **Modified** | Existing rows with changed cell values |
| **Problems** | Rows with validation errors that block saving |
The row count display shows the format **N/M rows** where N is the number of visible filtered rows and M is the total row count.
Adding a row without entering any data does not enable the **Save** button. Only actual data changes (typing values into cells) mark the row as dirty. If you add a row and then undo, the sheet returns to its original clean state.
Click the **Save** button (💾) in the toolbar. During the save operation:
1. The sheet checks for any active error state -- if errors exist, you see an alert message and the save is blocked
2. The sheet temporarily enters read-only mode to prevent concurrent edits
3. All pending entity changes (with `Added` state) are validated and sent to the server
4. Server-generated identifiers (such as `objectId`) are assigned to new items via key mapping
5. The undo stack is cleared on successful save
6. Original read-only state and permissions (`isCreatable`, `isDeletable`, `isUpdatable`) are restored
If the sheet is in an error state, the save operation is blocked with the message: "There is an error in the app and save should not happen. Please, reload the browser." Resolve any errors or reload the page before attempting to save again.
If you make a mistake before saving, use the **Undo** () and **Redo** () buttons in the toolbar:
* **Undo** reverses the last operation (add, remove, or edit) and restores the previous sheet state including row position and content
* **Redo** re-applies a previously undone operation
* Both operations preserve selection state, including multi-row selections
* Undoing all operations disables both the **Undo** and **Save** buttons
Select multiple rows using **Shift+Click** (click the first row, hold Shift, click the last row). You can then remove all selected rows at once with the **Remove** button. This operation is fully undoable.
You should now see the new work item in the sheet with a server-assigned ID. The row header no longer shows the **Added** state indicator, and the **Save** button is disabled (indicating no pending changes remain).
Open the corresponding Polarion LiveDoc to confirm the work item appears in the expected document location with the correct work item type. If document routing constraints are configured, verify the item was placed in the correct module folder.
## Troubleshooting
| Symptom | Cause | Resolution |
| ------------------------------- | ---------------------------------------- | ------------------------------------------------------ |
| **Save** button stays disabled | No actual data entered in the new row | Type values into at least one cell |
| Save blocked with error alert | Sheet is in an error state | Reload the browser and retry |
| Row appears but picker is empty | Constraint filtering too restrictive | Check `constraints` configuration in data model |
| Wrong document placement | Missing or incorrect `create` constraint | Verify `moduleFolder`, `moduleName`, and `type` values |
## See Also
* [Update a Work Item](/powersheet/guides/save-operations/update-work-item) -- modify existing work item fields
* [Create a Link](/powersheet/guides/save-operations/create-link) -- link the new work item to other entities
* [Handle Validation Errors](/powersheet/guides/save-operations/handle-validation-errors) -- resolve errors during save
* [Configure Constraints](/powersheet/guides/data-model/configure-constraints) -- set up document routing constraints
* [Create an Entity Type](/powersheet/guides/data-model/create-entity-type) -- configure `polarionType` mappings
* [Set Entity Permissions](/powersheet/guides/data-model/set-permissions) -- control `readable` and `updatable` properties
The new row is created at the current hierarchy level. If you have a multi-level sheet (for example, `UserNeed` > `SystemRequirement` > `DesignRequirement`), the row is added at the level corresponding to the selected cell's entity type.
Click into the new row and type directly into cells to populate field values. The cell that receives initial focus is determined by the `hasFocus` property in your sheet configuration:
```yaml theme={null}
columns:
title:
title: Title
width: 200
hasFocus: true
severity:
title: Severity
width: 100
```
Press **Enter** to commit the cell edit. Fields configured as `isReadOnly: true` or with `updatable: false` in the data model cannot be edited.
Powersheet supports saving several custom field types including integer fields (`c_intField`), floating-point fields (`c_floatField`), and currency fields (`c_currencyField`). Each field type tracks both the current value and the original value for change detection.
When your data model defines constraints on the entity type, new work items are automatically routed to the correct Polarion document. The constraint system scopes new entities to the current document context automatically.
For example, a data model that routes `SystemRequirement` items to a specific document:
```yaml theme={null}
domainModelTypes:
SystemRequirement:
polarionType: sys_req
constraints:
create:
document:
moduleFolder: /System Requirements
moduleName: SRS
type: sys_req_spec
```
When a user creates a `SystemRequirement`, it is automatically placed in the document matching the specified folder, name, and type.
The constraint system can route new items based on the source entity's document context. This is useful when the same entity type should go to different documents depending on where it was created from within the expansion path.
### Constrained Picker Values
In a multi-level sheet, constraints can also filter the available values in picker columns. For example, when creating a `UserNeed` and selecting a linked `SystemRequirement`, the picker shows only system requirements from the matching document type.
| Constraint Type | Behavior |
| ---------------- | ----------------------------------------------------------------- |
| Document routing | New items are placed in the specified Polarion document |
| Picker filtering | Dropdown values are filtered based on document type and component |
| Multi-property | Combines document type and component constraints |
Before saving, use **review mode** to inspect your pending changes:
1. The **Review** toggle appears automatically in the toolbar when any changes exist
2. Click it to filter the sheet to show only rows with pending changes
3. New rows are indicated with the **Added** state marker on the row header
4. Use the review mode dropdown menu to filter by change type
| Review Filter | What It Shows |
| ------------- | ------------------------------------------------ |
| **Added** | Newly created rows not yet persisted to Polarion |
| **Modified** | Existing rows with changed cell values |
| **Problems** | Rows with validation errors that block saving |
The row count display shows the format **N/M rows** where N is the number of visible filtered rows and M is the total row count.
Adding a row without entering any data does not enable the **Save** button. Only actual data changes (typing values into cells) mark the row as dirty. If you add a row and then undo, the sheet returns to its original clean state.
Click the **Save** button (💾) in the toolbar. During the save operation:
1. The sheet checks for any active error state -- if errors exist, you see an alert message and the save is blocked
2. The sheet temporarily enters read-only mode to prevent concurrent edits
3. All pending entity changes (with `Added` state) are validated and sent to the server
4. Server-generated identifiers (such as `objectId`) are assigned to new items via key mapping
5. The undo stack is cleared on successful save
6. Original read-only state and permissions (`isCreatable`, `isDeletable`, `isUpdatable`) are restored
If the sheet is in an error state, the save operation is blocked with the message: "There is an error in the app and save should not happen. Please, reload the browser." Resolve any errors or reload the page before attempting to save again.
If you make a mistake before saving, use the **Undo** () and **Redo** () buttons in the toolbar:
* **Undo** reverses the last operation (add, remove, or edit) and restores the previous sheet state including row position and content
* **Redo** re-applies a previously undone operation
* Both operations preserve selection state, including multi-row selections
* Undoing all operations disables both the **Undo** and **Save** buttons
Select multiple rows using **Shift+Click** (click the first row, hold Shift, click the last row). You can then remove all selected rows at once with the **Remove** button. This operation is fully undoable.
You should now see the new work item in the sheet with a server-assigned ID. The row header no longer shows the **Added** state indicator, and the **Save** button is disabled (indicating no pending changes remain).
Open the corresponding Polarion LiveDoc to confirm the work item appears in the expected document location with the correct work item type. If document routing constraints are configured, verify the item was placed in the correct module folder.
## Troubleshooting
| Symptom | Cause | Resolution |
| ------------------------------- | ---------------------------------------- | ------------------------------------------------------ |
| **Save** button stays disabled | No actual data entered in the new row | Type values into at least one cell |
| Save blocked with error alert | Sheet is in an error state | Reload the browser and retry |
| Row appears but picker is empty | Constraint filtering too restrictive | Check `constraints` configuration in data model |
| Wrong document placement | Missing or incorrect `create` constraint | Verify `moduleFolder`, `moduleName`, and `type` values |
## See Also
* [Update a Work Item](/powersheet/guides/save-operations/update-work-item) -- modify existing work item fields
* [Create a Link](/powersheet/guides/save-operations/create-link) -- link the new work item to other entities
* [Handle Validation Errors](/powersheet/guides/save-operations/handle-validation-errors) -- resolve errors during save
* [Configure Constraints](/powersheet/guides/data-model/configure-constraints) -- set up document routing constraints
* [Create an Entity Type](/powersheet/guides/data-model/create-entity-type) -- configure `polarionType` mappings
* [Set Entity Permissions](/powersheet/guides/data-model/set-permissions) -- control `readable` and `updatable` properties