> ## Documentation Index
> Fetch the complete documentation index at: https://learn.nextedy.com/llms.txt
> Use this file to discover all available pages before exploring further.
# Create a Link
> This guide walks you through creating relationships between work items in Nextedy POWERSHEET using the linking workflow in Siemens Polarion ALM, covering both toolbar-driven linking and picker-based approaches.
export const LastReviewed = ({date}) => {
if (!date) return null;
const formatted = new Date(`${date}T00:00:00Z`).toLocaleDateString("en-US", {
year: "numeric",
month: "long",
day: "numeric",
timeZone: "UTC"
});
return
Last reviewed on {formatted}
;
};
## Prerequisites
* A powersheet document containing at least two entity types connected by a relationship in the data model
* The relationship must define a valid `linkRole` with `storage: linkedWorkItems`
* Your Polarion account must have permissions to create links between the relevant work item types
Before you can link entities, the data model must define the relationship between them. Open your data model YAML and verify the relationship exists:
```yaml theme={null}
relationships:
- from: UserNeed
to: SystemRequirement
cardinality: many-to-many
storage: linkedWorkItems
linkRole: requires
direct:
name: systemRequirements
back:
name: userNeeds
```
| Property | Purpose |
| ------------- | ------------------------------------------------------------------ |
| `from` / `to` | The two entity types being connected |
| `cardinality` | Relationship type (`many-to-many`, `one-to-many`, or `one-to-one`) |
| `storage` | Must be `linkedWorkItems` to use Polarion link roles |
| `linkRole` | The Polarion link role that stores the association |
| `direct` | Navigation property name on the `from` entity |
| `back` | Navigation property name on the `to` entity |
The `direct` and `back` properties create bidirectional navigation. In this example, a `UserNeed` entity exposes a `systemRequirements` navigation property, while each `SystemRequirement` exposes a `userNeeds` navigation property pointing back.
Navigate to **Administration > Work Items > Link Roles** in Polarion to see all available link role names. The `linkRole` value in your data model must match an existing Polarion link role exactly.
To link entities visually, your sheet configuration needs a column that displays the navigation property. This is typically a multi-item column bound to the relationship:
```yaml theme={null}
columns:
- key: systemRequirements.systemRequirement
label: System Requirements
width: 250
```
The binding path uses dot notation: the navigation property name (`systemRequirements`) followed by the target entity type in camelCase (`systemRequirement`). This column displays linked entities and provides the picker interface for creating new associations.
Powersheet offers two methods to create links between entities:
### Method A: Toolbar Link Command
1. Select a cell in the **source** row (the entity you want to link from)
2. Click the **Link** button in the toolbar
3. The sheet enters linking mode -- the source row becomes highlighted and the sheet switches to row-selection mode
4. A visual indicator on the sheet confirms that linking mode is active
### Method B: Entity Picker in a Multi-Item Column
For many-to-many relationships, use the inline picker:
1. Double-click the multi-item cell in the source row
2. The picker dropdown appears showing available target entities
3. Use the search field to filter entities by title or ID
4. Click an entity from the list to create the association immediately
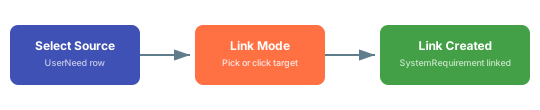 When using the toolbar link command (Method A), click the target row to establish the link. Powersheet validates the operation before creating the association:
* The target entity type must match the relationship definition in the data model
* Duplicate links between the same two entities are prevented
* Self-referencing links (linking an entity to itself) are blocked
Powersheet silently rejects duplicate links and self-referencing links. If you click a target and nothing happens, check whether the link already exists or whether you selected the source row itself.
After selecting a valid target, the cell in the multi-item column updates to show the newly linked entity. The row is marked as modified (indicated by a visual change indicator on the row header) but the link is not yet persisted to Polarion.
Before persisting the link, review your changes using Powersheet's review mode:
1. Click the **Review** button in the toolbar to filter the sheet to only rows with pending changes
2. Modified rows display a change indicator on the row header
3. The review mode filter shows a count of changed rows (format: `N/M rows`)
4. Use the dropdown menu to filter specifically by **Changed rows** or **Added** items
When creating multiple links across several rows, review mode helps you verify all associations before committing. You can toggle it on and off without losing your other active filters.
To remove an existing link without deleting either work item:
1. Locate the linked entity in the multi-item column
2. Click the **Unlink** action (
When using the toolbar link command (Method A), click the target row to establish the link. Powersheet validates the operation before creating the association:
* The target entity type must match the relationship definition in the data model
* Duplicate links between the same two entities are prevented
* Self-referencing links (linking an entity to itself) are blocked
Powersheet silently rejects duplicate links and self-referencing links. If you click a target and nothing happens, check whether the link already exists or whether you selected the source row itself.
After selecting a valid target, the cell in the multi-item column updates to show the newly linked entity. The row is marked as modified (indicated by a visual change indicator on the row header) but the link is not yet persisted to Polarion.
Before persisting the link, review your changes using Powersheet's review mode:
1. Click the **Review** button in the toolbar to filter the sheet to only rows with pending changes
2. Modified rows display a change indicator on the row header
3. The review mode filter shows a count of changed rows (format: `N/M rows`)
4. Use the dropdown menu to filter specifically by **Changed rows** or **Added** items
When creating multiple links across several rows, review mode helps you verify all associations before committing. You can toggle it on and off without losing your other active filters.
To remove an existing link without deleting either work item:
1. Locate the linked entity in the multi-item column
2. Click the **Unlink** action ( ) next to the entity name
3. The association is marked for removal -- both work items remain intact in Polarion
The unlink operation follows the same save workflow: changes remain pending until you explicitly save.
Both linking and unlinking support undo/redo. Press **Ctrl+Z** (or **Cmd+Z** on macOS) to reverse a link creation or removal before saving. The undo stack tracks all link operations alongside other edits.
Click 💾 **Save** to persist the new links to Polarion. During the save operation:
1. The sheet temporarily enters a read-only state to prevent concurrent edits
2. Entities are saved in topologically sorted order -- parent entities and dependencies are persisted first to ensure referential integrity
3. The save operation creates the appropriate link role associations in Polarion's work item linking system
4. On success, the undo stack is cleared and the sheet returns to its normal editable state
If an error occurs during save, Powersheet displays an error state. You must resolve the error (or reload the page) before attempting another save. The review mode remains active after a failed save so you can identify and fix problem rows.
You should now see the linked entity displayed in the corresponding multi-item column. To confirm the link was created correctly:
1. **In Powersheet**: Expand the source entity's expansion path to see the linked target entity in the hierarchy
2. **In Polarion**: Open the source work item and check the **Linked Work Items** section -- the target should appear under the configured link role (e.g., `requires`)
3. **Bidirectional check**: Open the target work item in Polarion and verify the back-link appears under the reverse link role
## Constrained Linking
When your data model includes constraints (such as `applyCurrentDocumentTo`), Powersheet automatically scopes new links to the current document context. This means:
* The entity picker only shows entities from matching document types
* New entities created during the linking workflow inherit the document scope
* Multi-level constraints filter through the entire expansion path
For example, in an RTM configuration where `SystemRequirement` entities are constrained to a specific document type, the picker when linking from a `UserNeed` only shows system requirements from the correct requirements document.
Constraint behavior depends on your specific data model and project configuration. Test linking with constraints in a sandbox project before deploying to production.
## See Also
* [Configure a Relationship](/powersheet/guides/data-model/configure-relationship) -- set up the data model relationship that enables linking
* [Create Bidirectional Links](/powersheet/guides/data-model/create-bidirectional-links) -- configure `direct` and `back` navigation properties
* [Configure Many-to-Many Relationships](/powersheet/guides/data-model/configure-many-to-many) -- advanced many-to-many relationship setup
* [Configure Multi-Item Column](/powersheet/guides/sheet-configuration/configure-multi-item-column) -- set up the column that displays linked entities
* [Handle Validation Errors](/powersheet/guides/save-operations/handle-validation-errors) -- troubleshoot errors during save operations
* [Configure Constraints](/powersheet/guides/data-model/configure-constraints) -- document-scoping and picker filtering rules
) next to the entity name
3. The association is marked for removal -- both work items remain intact in Polarion
The unlink operation follows the same save workflow: changes remain pending until you explicitly save.
Both linking and unlinking support undo/redo. Press **Ctrl+Z** (or **Cmd+Z** on macOS) to reverse a link creation or removal before saving. The undo stack tracks all link operations alongside other edits.
Click 💾 **Save** to persist the new links to Polarion. During the save operation:
1. The sheet temporarily enters a read-only state to prevent concurrent edits
2. Entities are saved in topologically sorted order -- parent entities and dependencies are persisted first to ensure referential integrity
3. The save operation creates the appropriate link role associations in Polarion's work item linking system
4. On success, the undo stack is cleared and the sheet returns to its normal editable state
If an error occurs during save, Powersheet displays an error state. You must resolve the error (or reload the page) before attempting another save. The review mode remains active after a failed save so you can identify and fix problem rows.
You should now see the linked entity displayed in the corresponding multi-item column. To confirm the link was created correctly:
1. **In Powersheet**: Expand the source entity's expansion path to see the linked target entity in the hierarchy
2. **In Polarion**: Open the source work item and check the **Linked Work Items** section -- the target should appear under the configured link role (e.g., `requires`)
3. **Bidirectional check**: Open the target work item in Polarion and verify the back-link appears under the reverse link role
## Constrained Linking
When your data model includes constraints (such as `applyCurrentDocumentTo`), Powersheet automatically scopes new links to the current document context. This means:
* The entity picker only shows entities from matching document types
* New entities created during the linking workflow inherit the document scope
* Multi-level constraints filter through the entire expansion path
For example, in an RTM configuration where `SystemRequirement` entities are constrained to a specific document type, the picker when linking from a `UserNeed` only shows system requirements from the correct requirements document.
Constraint behavior depends on your specific data model and project configuration. Test linking with constraints in a sandbox project before deploying to production.
## See Also
* [Configure a Relationship](/powersheet/guides/data-model/configure-relationship) -- set up the data model relationship that enables linking
* [Create Bidirectional Links](/powersheet/guides/data-model/create-bidirectional-links) -- configure `direct` and `back` navigation properties
* [Configure Many-to-Many Relationships](/powersheet/guides/data-model/configure-many-to-many) -- advanced many-to-many relationship setup
* [Configure Multi-Item Column](/powersheet/guides/sheet-configuration/configure-multi-item-column) -- set up the column that displays linked entities
* [Handle Validation Errors](/powersheet/guides/save-operations/handle-validation-errors) -- troubleshoot errors during save operations
* [Configure Constraints](/powersheet/guides/data-model/configure-constraints) -- document-scoping and picker filtering rules