> ## Documentation Index
> Fetch the complete documentation index at: https://learn.nextedy.com/llms.txt
> Use this file to discover all available pages before exploring further.
# Configure Constraints
> Define load, pick, and create constraints in your Nextedy POWERSHEET data model to control which entities are visible in the sheet, what appears in picker dialogs, and where new items can be created.
export const LastReviewed = ({date}) => {
if (!date) return null;
const formatted = new Date(`${date}T00:00:00Z`).toLocaleDateString("en-US", {
year: "numeric",
month: "long",
day: "numeric",
timeZone: "UTC"
});
return
Last reviewed on {formatted}
;
};
1. Navigate to **Administration > Nextedy Powersheet > Data Models**
2. Select the data model you want to edit
3. Locate the entity type under `domainModelTypes` where you want to add constraints
Powersheet supports three constraint stages, each controlling a different operation:
| Stage | Purpose | Effect |
| -------- | ----------------------------------------------- | -------------------------------------------------------- |
| `load` | Filters which entities are visible in the sheet | Only matching entities appear when data loads |
| `pick` | Filters picker dialog options | Only matching items appear in relationship pickers |
| `create` | Sets defaults for new entities | New items are created in the specified document location |
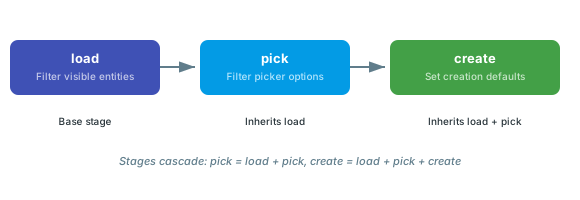 Stages cascade upward: **pick** inherits `load` constraints, and **create** inherits both `load` and `pick`. If no `create` constraints are defined, the system falls back to `pick` constraints for the create stage.
Load constraints filter which entities are visible when data loads into the sheet. Add a `constraints` block with `load` to the entity type:
```yaml theme={null}
domainModelTypes:
UserNeed:
polarionType: user_need
properties:
description:
constraints:
load:
document:
type: stakeholderRequirement
```
With this constraint, only `UserNeed` work items that exist in documents of type `stakeholderRequirement` will appear in the sheet.
Pick constraints filter what appears in relationship picker dialogs. This is useful when users link entities and you want to restrict which items they can select:
```yaml theme={null}
domainModelTypes:
SystemRequirement:
polarionType: system_requirement
properties:
description:
severity:
constraints:
pick:
document:
moduleFolder: Requirements
type: systemSpecification
```
This ensures that when a user picks a `SystemRequirement` through a relationship picker, only items from the `Requirements` space in documents of type `systemSpecification` are shown.
Create constraints specify the default document location when new items of this type are created through the sheet:
```yaml theme={null}
domainModelTypes:
DesignRequirement:
polarionType: design_requirement
properties:
description:
constraints:
create:
document:
moduleFolder: Design
moduleName: Design Specification
type: designSpecification
```
When a user creates a new `DesignRequirement` from the sheet, it will be placed in the `Design Specification` document within the `Design` space.
You can define multiple constraint stages on the same entity type. Each stage applies to its respective operation, and cascading applies automatically:
```yaml theme={null}
domainModelTypes:
SystemRequirement:
polarionType: system_requirement
properties:
description:
severity:
constraints:
load:
document:
type: systemSpecification
pick:
document:
moduleFolder: Requirements
create:
document:
moduleFolder: Requirements
moduleName: System Requirements Spec
type: systemSpecification
```
In this example:
* **Load** stage: only system requirements from `systemSpecification` documents are visible
* **Pick** stage: inherits the load filter, plus restricts to the `Requirements` space
* **Create** stage: inherits both, plus targets a specific document name
Constraint values support five comparison operators beyond exact matching:
| Operator | Behavior | Example |
| ------------ | --------------------------- | ----------------------------------------- |
| *(default)* | Exact equality | `type: systemSpecification` |
| `contains` | Substring match | `moduleName: { contains: Spec }` |
| `in` | Matches any value in a list | `type: { in: [systemSpec, designSpec] }` |
| `startsWith` | Prefix match | `moduleFolder: { startsWith: Req }` |
| `endsWith` | Suffix match | `moduleName: { endsWith: Specification }` |
When you use a plain string value (e.g., `type: systemSpecification`), the `equals` operator is applied by default. To use another operator, wrap the value in an operator object:
```yaml theme={null}
constraints:
load:
document:
type:
in: [systemRequirementsSpecification, designRequirementsSpecification]
moduleName:
contains: Specification
```
Multiple properties within the same `document` block are combined with **AND** logic -- all conditions must match simultaneously.
For **OR** logic, use the `or` keyword inside the `document` block to match entities from multiple locations:
```yaml theme={null}
constraints:
pick:
document:
or:
- moduleName: Alpha Requirements
- moduleName: Beta Requirements
```
This matches work items from either the "Alpha Requirements" or "Beta Requirements" document.
If you define constraints that conflict with each other (for example, specifying a `moduleFolder` that does not contain any documents of the specified `type`), the result set will be empty. No error is raised -- the picker simply shows no items. Always verify your constraint combinations against your actual Polarion project structure.
For component-scoped relationships, use `$context.source.document.component` to dynamically filter based on the source entity's document component:
```yaml theme={null}
domainModelTypes:
SystemRequirement:
polarionType: system_requirement
constraints:
pick:
document:
component: $context.source.document.component
```
This ensures picker results are scoped to the same component as the source entity's document. For example, if a user is editing a `UserNeed` in a document with component "Braking System", the picker will only show system requirements from documents that also belong to the "Braking System" component.
Dynamic context references are particularly useful in multi-component projects where each subsystem has its own set of documents. They prevent users from accidentally linking to entities outside their component scope.
## Constrainable Document Properties
The `document` block in constraints supports the following properties:
| Property | Description |
| -------------- | ---------------------------------------------------------------------- |
| `moduleFolder` | The space (folder) where the document resides in the project hierarchy |
| `moduleName` | The exact name of the target document |
| `type` | The document type ID (as defined in Polarion configuration) |
| `id` | The document ID in `folder/name` format |
| `title` | The document display title |
| `component` | The component property of the document, often used with `$context` |
The `type` property must use the document type **ID** (e.g., `systemSpecification`), not the human-readable display name (e.g., "System Specification"). Using the display name will silently produce no matches. Check your Polarion project configuration under **Administration > Document Types** for the correct type IDs.
Begin with a working data model that has no constraints, then add `pick` constraints first (easiest to test via the picker dialog), followed by `create` and `load` constraints. This makes it straightforward to identify which constraint is causing unexpected behavior.
## Verification
After saving the data model with constraints:
1. Open a sheet that uses this data model
2. For **load** constraints: verify that only matching entities appear in the sheet rows
3. For **pick** constraints: click a relationship picker cell and verify the dropdown shows only items matching your filter criteria
4. For **create** constraints: create a new item through the sheet and verify it appears in the expected document location
You should now see constraints actively filtering entities according to your configuration. If pickers show no results or the sheet loads with no data, review the constraint properties against your actual Polarion project structure -- particularly the `type` ID and `moduleFolder` values.
## See Also
* [Configure Context Constraints](/powersheet/guides/data-model/configure-context-constraints) -- advanced context-based constraint patterns
* [Configure a Relationship](/powersheet/guides/data-model/configure-relationship) -- setting up relationships that constraints apply to
* [Create an Entity Type](/powersheet/guides/data-model/create-entity-type) -- defining the entity types that hold constraints
* [Create an Entity Type](/powersheet/guides/data-model/create-entity-type) -- ensuring `polarionType` values are correct
* [Data Model Reference](/powersheet/reference/data-model/index) -- complete constraints property reference
Stages cascade upward: **pick** inherits `load` constraints, and **create** inherits both `load` and `pick`. If no `create` constraints are defined, the system falls back to `pick` constraints for the create stage.
Load constraints filter which entities are visible when data loads into the sheet. Add a `constraints` block with `load` to the entity type:
```yaml theme={null}
domainModelTypes:
UserNeed:
polarionType: user_need
properties:
description:
constraints:
load:
document:
type: stakeholderRequirement
```
With this constraint, only `UserNeed` work items that exist in documents of type `stakeholderRequirement` will appear in the sheet.
Pick constraints filter what appears in relationship picker dialogs. This is useful when users link entities and you want to restrict which items they can select:
```yaml theme={null}
domainModelTypes:
SystemRequirement:
polarionType: system_requirement
properties:
description:
severity:
constraints:
pick:
document:
moduleFolder: Requirements
type: systemSpecification
```
This ensures that when a user picks a `SystemRequirement` through a relationship picker, only items from the `Requirements` space in documents of type `systemSpecification` are shown.
Create constraints specify the default document location when new items of this type are created through the sheet:
```yaml theme={null}
domainModelTypes:
DesignRequirement:
polarionType: design_requirement
properties:
description:
constraints:
create:
document:
moduleFolder: Design
moduleName: Design Specification
type: designSpecification
```
When a user creates a new `DesignRequirement` from the sheet, it will be placed in the `Design Specification` document within the `Design` space.
You can define multiple constraint stages on the same entity type. Each stage applies to its respective operation, and cascading applies automatically:
```yaml theme={null}
domainModelTypes:
SystemRequirement:
polarionType: system_requirement
properties:
description:
severity:
constraints:
load:
document:
type: systemSpecification
pick:
document:
moduleFolder: Requirements
create:
document:
moduleFolder: Requirements
moduleName: System Requirements Spec
type: systemSpecification
```
In this example:
* **Load** stage: only system requirements from `systemSpecification` documents are visible
* **Pick** stage: inherits the load filter, plus restricts to the `Requirements` space
* **Create** stage: inherits both, plus targets a specific document name
Constraint values support five comparison operators beyond exact matching:
| Operator | Behavior | Example |
| ------------ | --------------------------- | ----------------------------------------- |
| *(default)* | Exact equality | `type: systemSpecification` |
| `contains` | Substring match | `moduleName: { contains: Spec }` |
| `in` | Matches any value in a list | `type: { in: [systemSpec, designSpec] }` |
| `startsWith` | Prefix match | `moduleFolder: { startsWith: Req }` |
| `endsWith` | Suffix match | `moduleName: { endsWith: Specification }` |
When you use a plain string value (e.g., `type: systemSpecification`), the `equals` operator is applied by default. To use another operator, wrap the value in an operator object:
```yaml theme={null}
constraints:
load:
document:
type:
in: [systemRequirementsSpecification, designRequirementsSpecification]
moduleName:
contains: Specification
```
Multiple properties within the same `document` block are combined with **AND** logic -- all conditions must match simultaneously.
For **OR** logic, use the `or` keyword inside the `document` block to match entities from multiple locations:
```yaml theme={null}
constraints:
pick:
document:
or:
- moduleName: Alpha Requirements
- moduleName: Beta Requirements
```
This matches work items from either the "Alpha Requirements" or "Beta Requirements" document.
If you define constraints that conflict with each other (for example, specifying a `moduleFolder` that does not contain any documents of the specified `type`), the result set will be empty. No error is raised -- the picker simply shows no items. Always verify your constraint combinations against your actual Polarion project structure.
For component-scoped relationships, use `$context.source.document.component` to dynamically filter based on the source entity's document component:
```yaml theme={null}
domainModelTypes:
SystemRequirement:
polarionType: system_requirement
constraints:
pick:
document:
component: $context.source.document.component
```
This ensures picker results are scoped to the same component as the source entity's document. For example, if a user is editing a `UserNeed` in a document with component "Braking System", the picker will only show system requirements from documents that also belong to the "Braking System" component.
Dynamic context references are particularly useful in multi-component projects where each subsystem has its own set of documents. They prevent users from accidentally linking to entities outside their component scope.
## Constrainable Document Properties
The `document` block in constraints supports the following properties:
| Property | Description |
| -------------- | ---------------------------------------------------------------------- |
| `moduleFolder` | The space (folder) where the document resides in the project hierarchy |
| `moduleName` | The exact name of the target document |
| `type` | The document type ID (as defined in Polarion configuration) |
| `id` | The document ID in `folder/name` format |
| `title` | The document display title |
| `component` | The component property of the document, often used with `$context` |
The `type` property must use the document type **ID** (e.g., `systemSpecification`), not the human-readable display name (e.g., "System Specification"). Using the display name will silently produce no matches. Check your Polarion project configuration under **Administration > Document Types** for the correct type IDs.
Begin with a working data model that has no constraints, then add `pick` constraints first (easiest to test via the picker dialog), followed by `create` and `load` constraints. This makes it straightforward to identify which constraint is causing unexpected behavior.
## Verification
After saving the data model with constraints:
1. Open a sheet that uses this data model
2. For **load** constraints: verify that only matching entities appear in the sheet rows
3. For **pick** constraints: click a relationship picker cell and verify the dropdown shows only items matching your filter criteria
4. For **create** constraints: create a new item through the sheet and verify it appears in the expected document location
You should now see constraints actively filtering entities according to your configuration. If pickers show no results or the sheet loads with no data, review the constraint properties against your actual Polarion project structure -- particularly the `type` ID and `moduleFolder` values.
## See Also
* [Configure Context Constraints](/powersheet/guides/data-model/configure-context-constraints) -- advanced context-based constraint patterns
* [Configure a Relationship](/powersheet/guides/data-model/configure-relationship) -- setting up relationships that constraints apply to
* [Create an Entity Type](/powersheet/guides/data-model/create-entity-type) -- defining the entity types that hold constraints
* [Create an Entity Type](/powersheet/guides/data-model/create-entity-type) -- ensuring `polarionType` values are correct
* [Data Model Reference](/powersheet/reference/data-model/index) -- complete constraints property reference