> ## Documentation Index
> Fetch the complete documentation index at: https://learn.nextedy.com/llms.txt
> Use this file to discover all available pages before exploring further.
# Use Model Helper Widget
> Visualize your data model structure, entity relationships, and available binding paths using the Model Helper widget in Nextedy POWERSHEET to simplify sheet configuration in Siemens Polarion ALM.
export const LastReviewed = ({date}) => {
if (!date) return null;
const formatted = new Date(`${date}T00:00:00Z`).toLocaleDateString("en-US", {
year: "numeric",
month: "long",
day: "numeric",
timeZone: "UTC"
});
return
Last reviewed on {formatted}
;
};
## Prerequisites
* A data model already configured in **Administration > Nextedy Powersheet > Data Models**
* Permissions to create a LiveReport page in your Polarion project
* At least one entity type with relationships defined in your data model
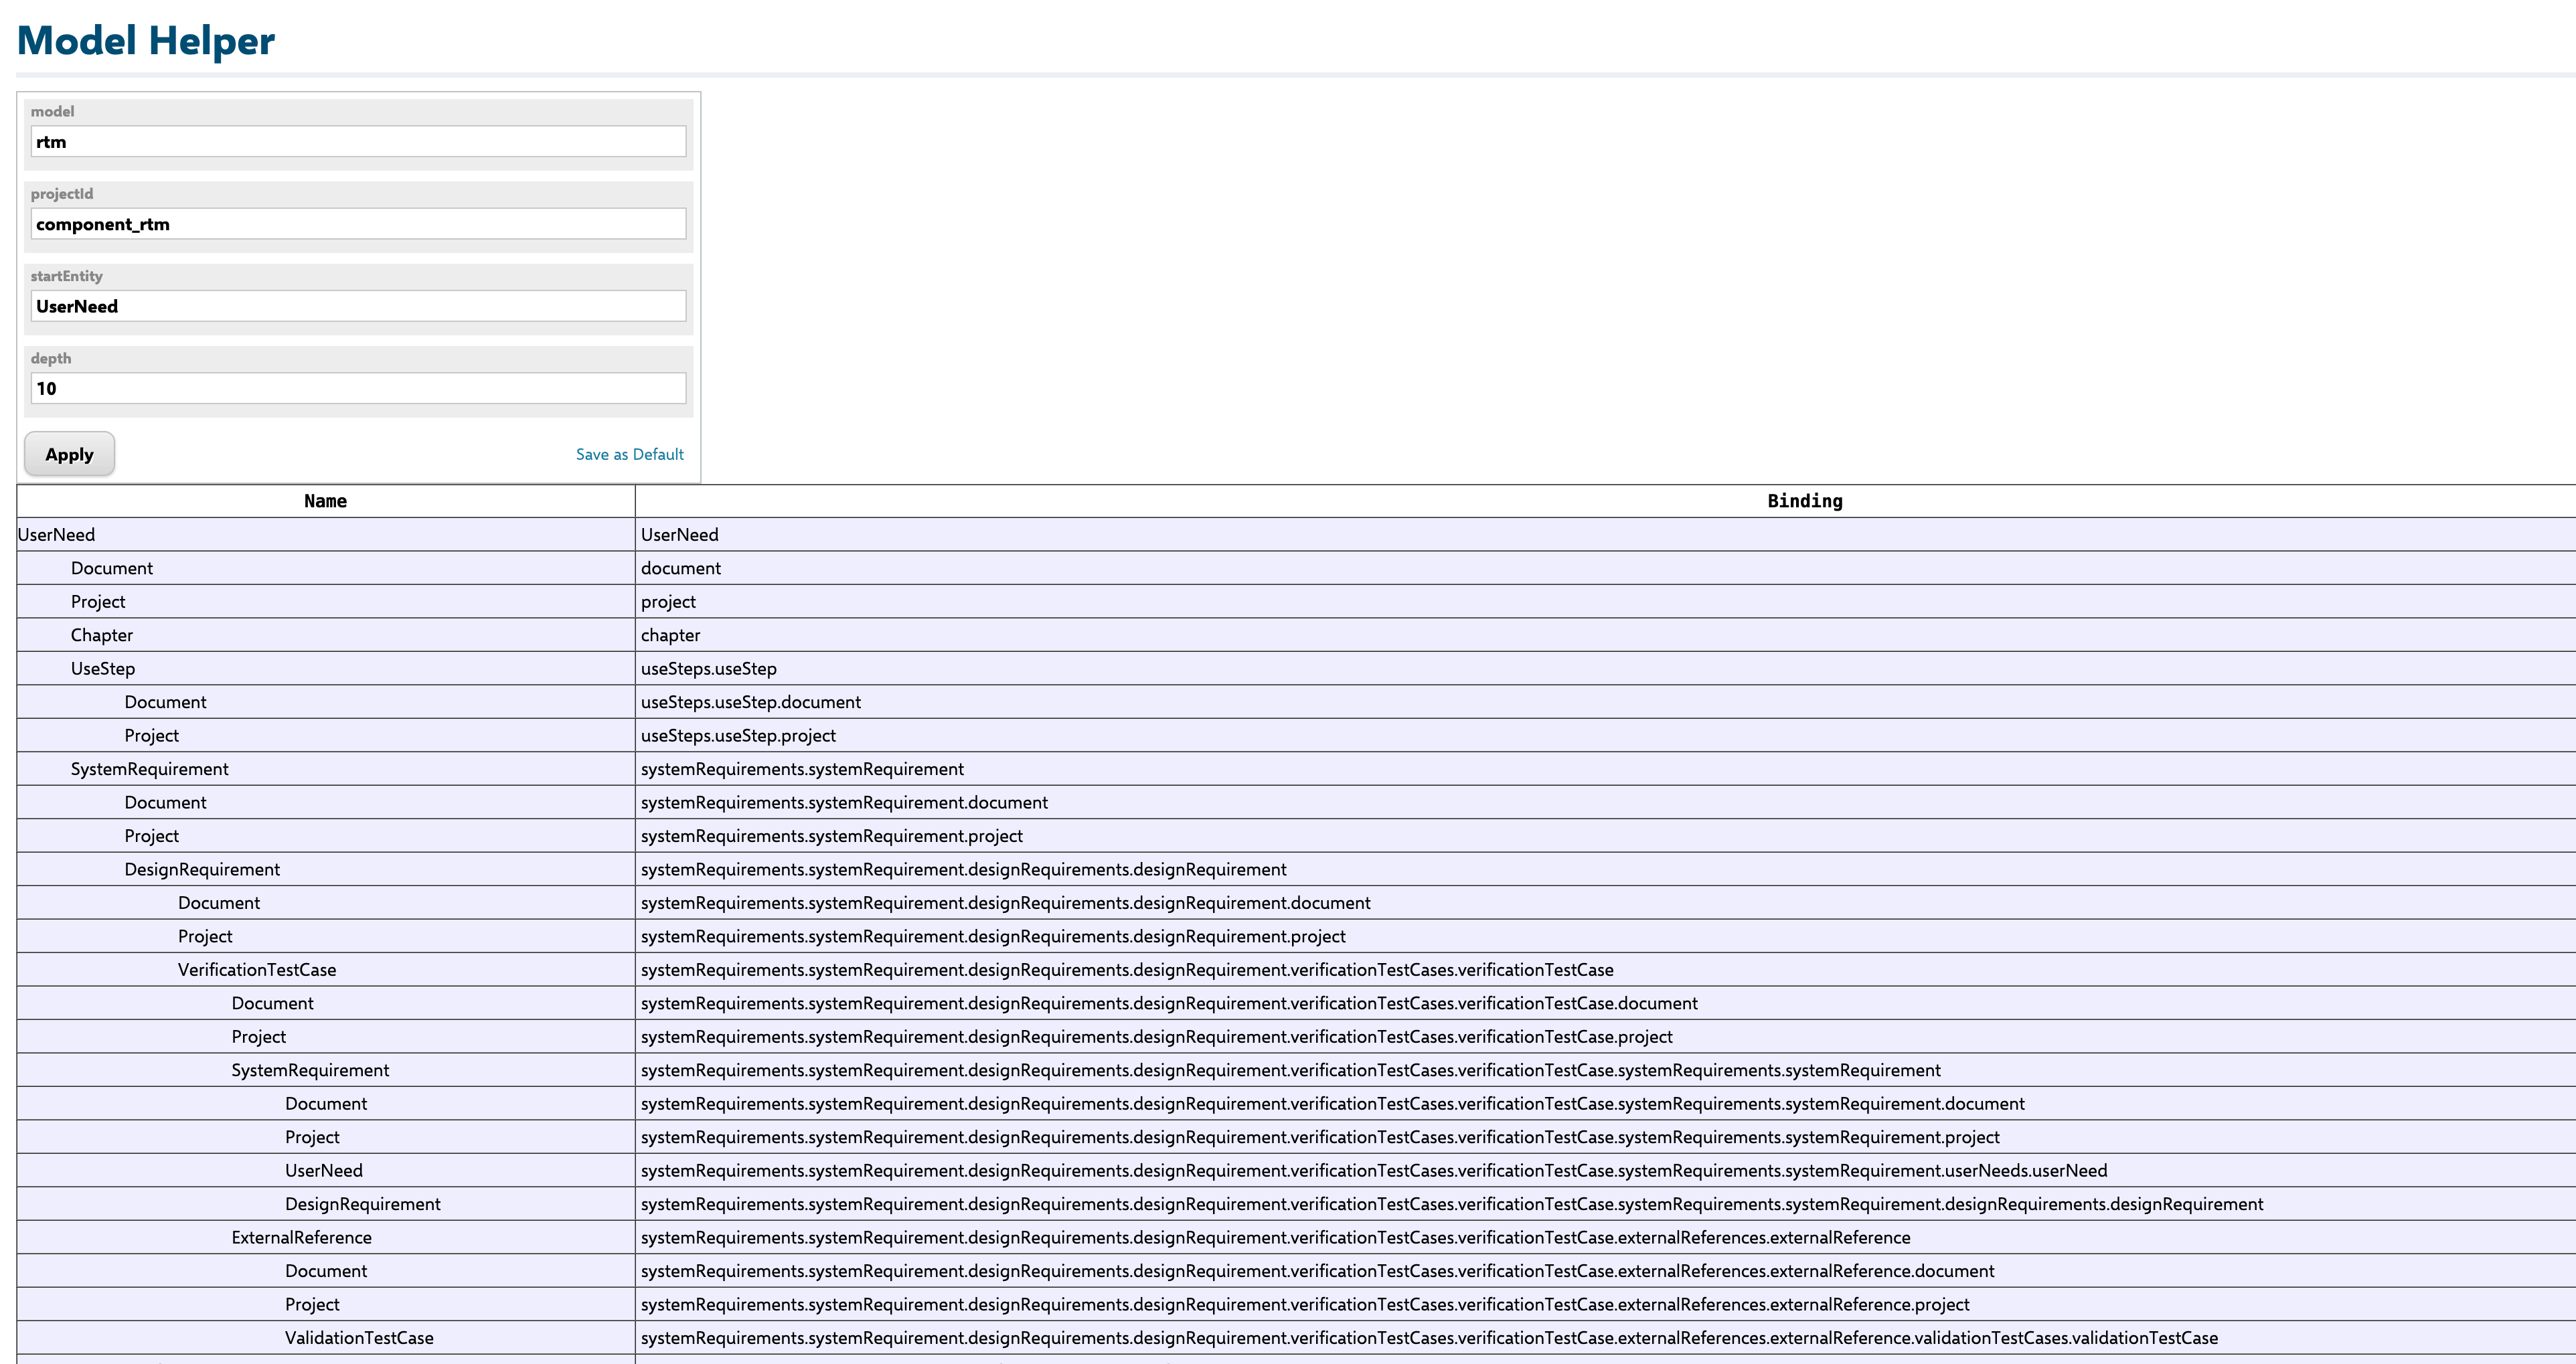 Model Helper runs as a LiveReport page inside Polarion. To set it up:
1. Navigate to your project in Polarion
2. Go to **Wiki > LiveReport Pages**
3. Create a new **LiveReport** page
4. Import the Model Helper page archive provided by Nextedy
The Model Helper page archive is supplied with the Powersheet installation package. Contact your administrator if you do not have access to the archive file.
When you open the Model Helper LiveReport, fill in four parameter values at the top of the page:
| Parameter | Description | Example |
| ------------- | ------------------------------------------------------------- | ---------- |
| `model` | Name of the data model to visualize | `rtm` |
| `projectId` | Project ID where the model is defined | `RTM_Demo` |
| `startEntity` | Root entity type for expansion visualization | `UserNeed` |
| `depth` | Number of relationship levels to expand from the start entity | `3` |
Enter these values and submit to generate the visualization.
Model Helper runs as a LiveReport page inside Polarion. To set it up:
1. Navigate to your project in Polarion
2. Go to **Wiki > LiveReport Pages**
3. Create a new **LiveReport** page
4. Import the Model Helper page archive provided by Nextedy
The Model Helper page archive is supplied with the Powersheet installation package. Contact your administrator if you do not have access to the archive file.
When you open the Model Helper LiveReport, fill in four parameter values at the top of the page:
| Parameter | Description | Example |
| ------------- | ------------------------------------------------------------- | ---------- |
| `model` | Name of the data model to visualize | `rtm` |
| `projectId` | Project ID where the model is defined | `RTM_Demo` |
| `startEntity` | Root entity type for expansion visualization | `UserNeed` |
| `depth` | Number of relationship levels to expand from the start entity | `3` |
Enter these values and submit to generate the visualization.
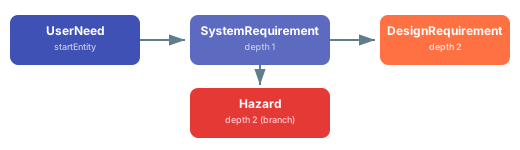 Begin with `depth: 2` or `3`. Higher values produce very large visualizations that can be difficult to read, especially for data models with many cross-entity relationships.
The Model Helper displays three key pieces of information:
* **Entity types** shown as nodes, each displaying the entity name and its `polarionType` mapping (for example, `UserNeed` mapped to `user_need`)
* **Relationships** shown as labeled connections between entity nodes, annotated with the navigation property name (the `direct` or `back` name from your data model)
* **Expansion depth** indicating how many relationship levels each entity sits from the start entity
This visualization directly maps to the three configuration layers you work with in Powersheet:
| Layer | What it defines | What Model Helper shows |
| ----------------- | ------------------------------------- | ------------------------------------- |
| **Data model** | Entity types and relationships | Nodes and connections |
| **Sheet sources** | How to query and expand relationships | Expansion paths from start entity |
| **Sheet columns** | How to display the resulting data | Available binding paths at each level |
The expansion paths shown in Model Helper translate directly to the `expand` section of your sheet sources. The cardinality of each relationship determines the expand pattern.
### Many-to-One (N:1) Relationships
For scalar navigation properties (one parent per child), use a single-level expand with the `direct` name:
```yaml theme={null}
sources:
- id: user_needs
query:
from: UserNeed
expand:
- name: chapter
```
The `direct` name in your data model (`chapter`) becomes the expand `name`. In your columns, bind to this property for a reference picker:
```yaml theme={null}
columns:
chapter:
title: Chapter
display: title
list:
search:
- title
chapter.title:
title: Chapter Title
isReadOnly: true
```
* `chapter` renders a single-value reference picker (scalar navigation property)
* `chapter.title` renders a read-only display of the referenced Chapter's title using dot-notation
### One-to-Many (1:N) Relationships
For collection navigation properties (one parent, many children), the expand opens a new hierarchy level using the `back` name:
```yaml theme={null}
sources:
- id: chapters
query:
from: Chapter
expand:
- name: userNeeds
```
The `back` name in your data model (`userNeeds`) becomes the expand `name`. In columns, reference the child level directly:
```yaml theme={null}
columns:
title:
title: Chapter
hasFocus: true
userNeeds:
title: Title
hasFocus: true
```
The expand creates child rows in the sheet -- no dot-notation needed because the expand directly opens the child level.
### Many-to-Many (M:N) Relationships
Many-to-many relationships use an **association entity** between the two types. The source expand requires two levels:
```yaml theme={null}
sources:
- id: user_needs
query:
from: UserNeed
expand:
- name: systemRequirements
expand:
- name: systemRequirement
```
The first level (`systemRequirements`) is the association collection; the second level (`systemRequirement`) is the target entity. Column bindings use dot-notation through the association:
```yaml theme={null}
columns:
systemRequirements.systemRequirement:
title: System Requirement
list:
search:
- objectId
- title
createNew: true
systemRequirements.systemRequirement.title:
title: SysReq Title
hasFocus: true
```
For M:N relationships, always use two-level expansion: the collection name (`systemRequirements`) followed by the singular entity name (`systemRequirement`). Using only the first level will expose the association entity itself, not the target entity you want to display.
After building your source and column configuration, use Model Helper to verify that every binding path in your columns corresponds to a valid expansion path.
Cross-check each column key against the visualization:
1. **Simple property** (e.g., `title`, `description`) -- the property must exist on the source entity type
2. **Single-level navigation** (e.g., `chapter`) -- must match a `direct` or `back` name in a relationship from the source entity
3. **Dot-notation path** (e.g., `systemRequirements.systemRequirement.title`) -- each segment must follow a valid relationship defined in the data model
### Cardinality Quick Reference
| Cardinality | Data Model | Source Expand | Column Binding | UI Behavior |
| ----------- | -------------------------------------------------------------- | ------------------------------------------------------------- | -------------------------------------- | -------------------------------- |
| **N:1** | `cardinality: many-to-one`, `direct` name: `chapter` | `- name: chapter` | `chapter`, `chapter.title` | Single-value reference picker |
| **1:N** | Reverse of N:1, `back` name: `userNeeds` | `- name: userNeeds` | `userNeeds` | Child rows (new hierarchy level) |
| **M:N** | `cardinality: many-to-many`, `back` name: `systemRequirements` | `- name: systemRequirements` then `- name: systemRequirement` | `systemRequirements.systemRequirement` | Multi-item reference picker |
After modifying your data model (adding entity types or relationships), re-run Model Helper with an updated depth to verify that the new paths appear correctly before updating your sheet configuration.
After configuring your sheet based on Model Helper output:
1. Open the Powersheet document that uses your sheet configuration
2. Verify that all entity types listed in Model Helper appear as expandable levels in the sheet
3. Confirm that column headers match the expected entity properties at each level
4. Expand rows at each hierarchy level to confirm that relationships load correctly
5. Test reference pickers to ensure they display the correct linked entities
You should now see your data model relationships reflected in the sheet, with each expansion level matching the depth and navigation property names shown in Model Helper.
Open Model Helper in a separate browser tab while editing your sheet configuration YAML. This lets you quickly verify navigation property names and expansion paths without switching back and forth between configuration files.
## See Also
* [Configure a Relationship](/powersheet/guides/data-model/configure-relationship) -- define relationships between entity types in the data model
* [Create Bidirectional Links](/powersheet/guides/data-model/create-bidirectional-links) -- set up `direct` and `back` navigation properties
* [Configure Many-to-Many Relationships](/powersheet/guides/data-model/configure-many-to-many) -- association entity pattern for M:N links
* [Configure Sources](/powersheet/guides/sheet-configuration/configure-sources) -- full reference for the `sources` section
* [Add a Column](/powersheet/guides/sheet-configuration/add-column) -- column binding syntax and display options
* [Data Model Reference](/powersheet/reference/data-model/index) -- complete data model specification
***
Begin with `depth: 2` or `3`. Higher values produce very large visualizations that can be difficult to read, especially for data models with many cross-entity relationships.
The Model Helper displays three key pieces of information:
* **Entity types** shown as nodes, each displaying the entity name and its `polarionType` mapping (for example, `UserNeed` mapped to `user_need`)
* **Relationships** shown as labeled connections between entity nodes, annotated with the navigation property name (the `direct` or `back` name from your data model)
* **Expansion depth** indicating how many relationship levels each entity sits from the start entity
This visualization directly maps to the three configuration layers you work with in Powersheet:
| Layer | What it defines | What Model Helper shows |
| ----------------- | ------------------------------------- | ------------------------------------- |
| **Data model** | Entity types and relationships | Nodes and connections |
| **Sheet sources** | How to query and expand relationships | Expansion paths from start entity |
| **Sheet columns** | How to display the resulting data | Available binding paths at each level |
The expansion paths shown in Model Helper translate directly to the `expand` section of your sheet sources. The cardinality of each relationship determines the expand pattern.
### Many-to-One (N:1) Relationships
For scalar navigation properties (one parent per child), use a single-level expand with the `direct` name:
```yaml theme={null}
sources:
- id: user_needs
query:
from: UserNeed
expand:
- name: chapter
```
The `direct` name in your data model (`chapter`) becomes the expand `name`. In your columns, bind to this property for a reference picker:
```yaml theme={null}
columns:
chapter:
title: Chapter
display: title
list:
search:
- title
chapter.title:
title: Chapter Title
isReadOnly: true
```
* `chapter` renders a single-value reference picker (scalar navigation property)
* `chapter.title` renders a read-only display of the referenced Chapter's title using dot-notation
### One-to-Many (1:N) Relationships
For collection navigation properties (one parent, many children), the expand opens a new hierarchy level using the `back` name:
```yaml theme={null}
sources:
- id: chapters
query:
from: Chapter
expand:
- name: userNeeds
```
The `back` name in your data model (`userNeeds`) becomes the expand `name`. In columns, reference the child level directly:
```yaml theme={null}
columns:
title:
title: Chapter
hasFocus: true
userNeeds:
title: Title
hasFocus: true
```
The expand creates child rows in the sheet -- no dot-notation needed because the expand directly opens the child level.
### Many-to-Many (M:N) Relationships
Many-to-many relationships use an **association entity** between the two types. The source expand requires two levels:
```yaml theme={null}
sources:
- id: user_needs
query:
from: UserNeed
expand:
- name: systemRequirements
expand:
- name: systemRequirement
```
The first level (`systemRequirements`) is the association collection; the second level (`systemRequirement`) is the target entity. Column bindings use dot-notation through the association:
```yaml theme={null}
columns:
systemRequirements.systemRequirement:
title: System Requirement
list:
search:
- objectId
- title
createNew: true
systemRequirements.systemRequirement.title:
title: SysReq Title
hasFocus: true
```
For M:N relationships, always use two-level expansion: the collection name (`systemRequirements`) followed by the singular entity name (`systemRequirement`). Using only the first level will expose the association entity itself, not the target entity you want to display.
After building your source and column configuration, use Model Helper to verify that every binding path in your columns corresponds to a valid expansion path.
Cross-check each column key against the visualization:
1. **Simple property** (e.g., `title`, `description`) -- the property must exist on the source entity type
2. **Single-level navigation** (e.g., `chapter`) -- must match a `direct` or `back` name in a relationship from the source entity
3. **Dot-notation path** (e.g., `systemRequirements.systemRequirement.title`) -- each segment must follow a valid relationship defined in the data model
### Cardinality Quick Reference
| Cardinality | Data Model | Source Expand | Column Binding | UI Behavior |
| ----------- | -------------------------------------------------------------- | ------------------------------------------------------------- | -------------------------------------- | -------------------------------- |
| **N:1** | `cardinality: many-to-one`, `direct` name: `chapter` | `- name: chapter` | `chapter`, `chapter.title` | Single-value reference picker |
| **1:N** | Reverse of N:1, `back` name: `userNeeds` | `- name: userNeeds` | `userNeeds` | Child rows (new hierarchy level) |
| **M:N** | `cardinality: many-to-many`, `back` name: `systemRequirements` | `- name: systemRequirements` then `- name: systemRequirement` | `systemRequirements.systemRequirement` | Multi-item reference picker |
After modifying your data model (adding entity types or relationships), re-run Model Helper with an updated depth to verify that the new paths appear correctly before updating your sheet configuration.
After configuring your sheet based on Model Helper output:
1. Open the Powersheet document that uses your sheet configuration
2. Verify that all entity types listed in Model Helper appear as expandable levels in the sheet
3. Confirm that column headers match the expected entity properties at each level
4. Expand rows at each hierarchy level to confirm that relationships load correctly
5. Test reference pickers to ensure they display the correct linked entities
You should now see your data model relationships reflected in the sheet, with each expansion level matching the depth and navigation property names shown in Model Helper.
Open Model Helper in a separate browser tab while editing your sheet configuration YAML. This lets you quickly verify navigation property names and expansion paths without switching back and forth between configuration files.
## See Also
* [Configure a Relationship](/powersheet/guides/data-model/configure-relationship) -- define relationships between entity types in the data model
* [Create Bidirectional Links](/powersheet/guides/data-model/create-bidirectional-links) -- set up `direct` and `back` navigation properties
* [Configure Many-to-Many Relationships](/powersheet/guides/data-model/configure-many-to-many) -- association entity pattern for M:N links
* [Configure Sources](/powersheet/guides/sheet-configuration/configure-sources) -- full reference for the `sources` section
* [Add a Column](/powersheet/guides/sheet-configuration/add-column) -- column binding syntax and display options
* [Data Model Reference](/powersheet/reference/data-model/index) -- complete data model specification
***