> ## Documentation Index
> Fetch the complete documentation index at: https://learn.nextedy.com/llms.txt
> Use this file to discover all available pages before exploring further.
# First sheet configuration
export const LastReviewed = ({date}) => {
if (!date) return null;
const formatted = new Date(`${date}T00:00:00Z`).toLocaleDateString("en-US", {
year: "numeric",
month: "long",
day: "numeric",
timeZone: "UTC"
});
return
Last reviewed on {formatted}
;
};
## What you will achieve
By the end of this tutorial you will have:
* A working sheet configuration with columns for `UserNeed` and related `SystemRequirement` entities
* A data source that queries and expands the entity hierarchy from your data model
* A complete configuration ready to be linked to a Nextedy Powersheet document
 ## Prerequisites
* Powersheet installed and licensed (see [Installing Powersheet](/powersheet/getting-started/installation))
* A data model created with at least `UserNeed` and `SystemRequirement` entity types (see [Creating Your First Data Model](/powersheet/getting-started/first-data-model))
* Navigation topic enabled (see [Setting Up Navigation](/powersheet/getting-started/setup-navigation))
Navigate to **Administration > Nextedy Powersheet > Sheet Configurations**.
## Prerequisites
* Powersheet installed and licensed (see [Installing Powersheet](/powersheet/getting-started/installation))
* A data model created with at least `UserNeed` and `SystemRequirement` entity types (see [Creating Your First Data Model](/powersheet/getting-started/first-data-model))
* Navigation topic enabled (see [Setting Up Navigation](/powersheet/getting-started/setup-navigation))
Navigate to **Administration > Nextedy Powersheet > Sheet Configurations**.
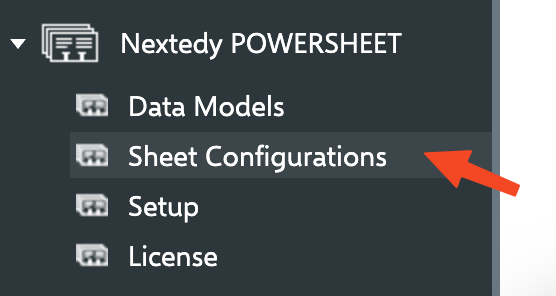 Sheet Configurations are organized into a **Global** section (applied across all projects) and a **project-level** section (specific to the current project). You can create new configurations in either scope.
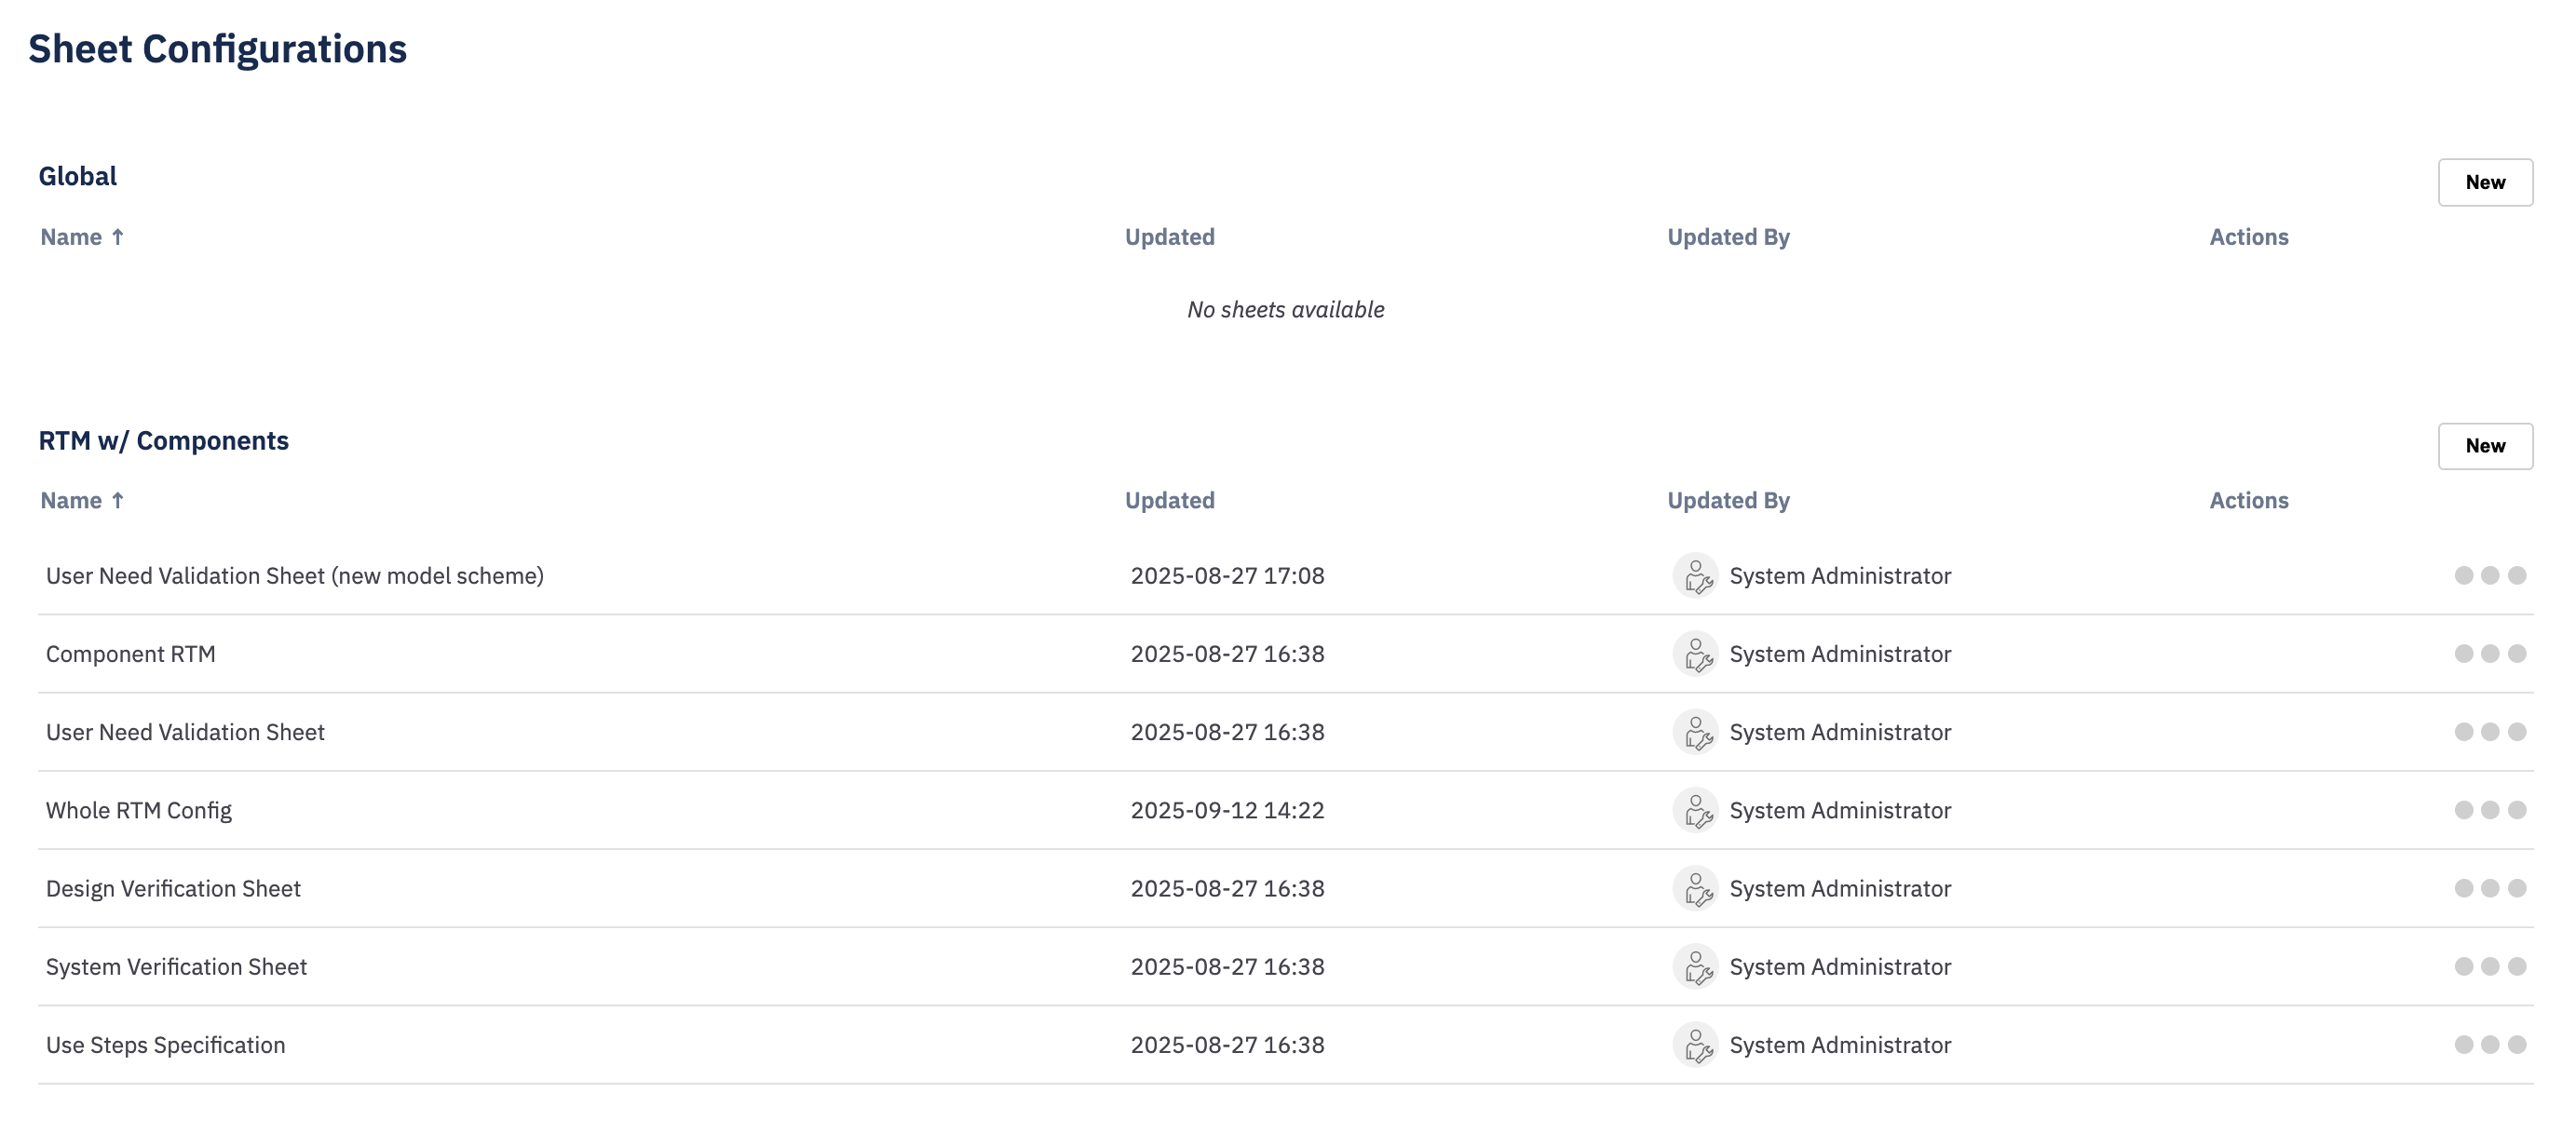
 Click **New** at the project level. Select **System Default** as the base and give your configuration a name (e.g., `rtm-sheet`).
The screenshot above shows a different example name (`my new powersheet config`). This tutorial uses `rtm-sheet` throughout — including when linking the configuration to a document in [Step 5](#step-5-link-the-configuration-to-a-document) — so use `rtm-sheet` (or your own chosen name) **consistently** wherever the tutorial refers to it.
**You should see:** A new sheet configuration file opens in the editor with default template content. The configuration editor opens in a **separate browser tab**, so your Polarion Administration view stays open behind it.
The **System Default** base ships with a substantial starting template (roughly 270 lines of commented examples covering columns, views, formatters, and styles). In Step 2 this tutorial has you replace it to keep the example minimal and focused. For a **real project**, prefer to *extend* the supplied template — or copy it aside before editing — so you keep the worked examples and inline documentation as a reference instead of throwing them away.
Sheet configuration files use YAML syntax. Indentation must use spaces (not tabs), and each nesting level uses two spaces. Most configuration errors come from incorrect indentation. For a complete introduction to YAML syntax, see the [YAML Primer](/powersheet/concepts/yaml-primer).
Replace the editor content with the following YAML. This defines columns for the root `UserNeed` entity and nested columns for related `SystemRequirement` entities:
```yaml theme={null}
columns:
title:
title: User Need
width: 250
hasFocus: true
severity:
title: Severity
width: 120
systemRequirements.systemRequirement.title:
title: System Requirement
width: 200
systemRequirements.systemRequirement.severity:
title: SR Severity
width: 120
```
Each key under `columns` is a **binding path** that references properties from your data model. A simple key like `title` refers to a property on the root entity type. A dot-separated path navigates through relationships defined in the data model:
| Path segment | Meaning |
| -------------------- | ------------------------------------------------------------------ |
| `systemRequirements` | The `direct` navigation property from your data model relationship |
| `systemRequirement` | The target entity type name |
| `title` | The property to display from the target entity |
**You should see:** Four column definitions in the YAML editor.
The configuration editor auto-indents on every Enter, and the indentation **accumulates** with each new line. If you type multi-line YAML by hand, the leading spaces compound and the structure quickly breaks (deeper-and-deeper indentation that no longer reflects the real nesting). Instead, **paste the whole block at once** — for example by copying the YAML above with the copy button on the code block — and verify the indentation matches what is shown here. If you do edit by hand, watch the leading spaces on each line rather than trusting the editor to indent for you.
The `title` property sets the column header text. Without it, the header defaults to the binding path (e.g., `0.systemRequirements.systemRequirement.title`), which is not user-friendly. Always set an explicit `title` for clarity.
Add a `sources` section below the columns. This tells Powersheet which data model to use, which entity type to query, and which relationships to expand when loading data:
```yaml theme={null}
sources:
- id: requirements
model: rtm
query:
from: UserNeed
expand:
- name: systemRequirements
expand:
- name: systemRequirement
```
The source configuration has three required parts (plus optional expansion):
* **`id`** (required) -- a unique identifier you choose for this data source. You can name it anything meaningful
* **`model`** (required) -- the name of the data model to use, which must match the data model file name (without the `.yaml` extension). The `rtm` value here assumes you named your model `rtm`; use **whatever name you actually gave the model** when you created it in [Creating Your First Data Model](/powersheet/getting-started/first-data-model). For example, `model: rtm` references the `rtm.yaml` data model file, while a model named `traceability` would require `model: traceability`
* **`query.from`** (required) -- the root entity type name, matching a key in `domainModelTypes` from your data model
* **`expand`** (optional) -- which relationships to follow when loading data. Each `name` corresponds to a navigation property from your data model. Expansion can be nested to follow multi-level relationships
**You should see:** The complete configuration now has both `columns` and `sources` sections.
Built-in properties like `id` and `title` do not need to be explicitly defined in your sources or data model to be queried; they are implicitly available. However, you must explicitly list them in your `columns` section if you want them to appear in the sheet.
The `query.from` value must exactly match a `domainModelTypes` key from your data model. If you defined `UserNeed` in the data model, you must use `UserNeed` here -- not `userneed` or `user_need`. The match is case-sensitive.
Your complete sheet configuration should look like this:
```yaml theme={null}
columns:
title:
title: User Need
width: 250
hasFocus: true
severity:
title: Severity
width: 120
systemRequirements.systemRequirement.title:
title: System Requirement
width: 200
systemRequirements.systemRequirement.severity:
title: SR Severity
width: 120
sources:
- id: requirements
model: rtm
query:
from: UserNeed
expand:
- name: systemRequirements
expand:
- name: systemRequirement
```
Save the configuration file.
**You should see:** The editor accepts the YAML without errors. The configuration is now stored in your project repository.
Click **New** at the project level. Select **System Default** as the base and give your configuration a name (e.g., `rtm-sheet`).
The screenshot above shows a different example name (`my new powersheet config`). This tutorial uses `rtm-sheet` throughout — including when linking the configuration to a document in [Step 5](#step-5-link-the-configuration-to-a-document) — so use `rtm-sheet` (or your own chosen name) **consistently** wherever the tutorial refers to it.
**You should see:** A new sheet configuration file opens in the editor with default template content. The configuration editor opens in a **separate browser tab**, so your Polarion Administration view stays open behind it.
The **System Default** base ships with a substantial starting template (roughly 270 lines of commented examples covering columns, views, formatters, and styles). In Step 2 this tutorial has you replace it to keep the example minimal and focused. For a **real project**, prefer to *extend* the supplied template — or copy it aside before editing — so you keep the worked examples and inline documentation as a reference instead of throwing them away.
Sheet configuration files use YAML syntax. Indentation must use spaces (not tabs), and each nesting level uses two spaces. Most configuration errors come from incorrect indentation. For a complete introduction to YAML syntax, see the [YAML Primer](/powersheet/concepts/yaml-primer).
Replace the editor content with the following YAML. This defines columns for the root `UserNeed` entity and nested columns for related `SystemRequirement` entities:
```yaml theme={null}
columns:
title:
title: User Need
width: 250
hasFocus: true
severity:
title: Severity
width: 120
systemRequirements.systemRequirement.title:
title: System Requirement
width: 200
systemRequirements.systemRequirement.severity:
title: SR Severity
width: 120
```
Each key under `columns` is a **binding path** that references properties from your data model. A simple key like `title` refers to a property on the root entity type. A dot-separated path navigates through relationships defined in the data model:
| Path segment | Meaning |
| -------------------- | ------------------------------------------------------------------ |
| `systemRequirements` | The `direct` navigation property from your data model relationship |
| `systemRequirement` | The target entity type name |
| `title` | The property to display from the target entity |
**You should see:** Four column definitions in the YAML editor.
The configuration editor auto-indents on every Enter, and the indentation **accumulates** with each new line. If you type multi-line YAML by hand, the leading spaces compound and the structure quickly breaks (deeper-and-deeper indentation that no longer reflects the real nesting). Instead, **paste the whole block at once** — for example by copying the YAML above with the copy button on the code block — and verify the indentation matches what is shown here. If you do edit by hand, watch the leading spaces on each line rather than trusting the editor to indent for you.
The `title` property sets the column header text. Without it, the header defaults to the binding path (e.g., `0.systemRequirements.systemRequirement.title`), which is not user-friendly. Always set an explicit `title` for clarity.
Add a `sources` section below the columns. This tells Powersheet which data model to use, which entity type to query, and which relationships to expand when loading data:
```yaml theme={null}
sources:
- id: requirements
model: rtm
query:
from: UserNeed
expand:
- name: systemRequirements
expand:
- name: systemRequirement
```
The source configuration has three required parts (plus optional expansion):
* **`id`** (required) -- a unique identifier you choose for this data source. You can name it anything meaningful
* **`model`** (required) -- the name of the data model to use, which must match the data model file name (without the `.yaml` extension). The `rtm` value here assumes you named your model `rtm`; use **whatever name you actually gave the model** when you created it in [Creating Your First Data Model](/powersheet/getting-started/first-data-model). For example, `model: rtm` references the `rtm.yaml` data model file, while a model named `traceability` would require `model: traceability`
* **`query.from`** (required) -- the root entity type name, matching a key in `domainModelTypes` from your data model
* **`expand`** (optional) -- which relationships to follow when loading data. Each `name` corresponds to a navigation property from your data model. Expansion can be nested to follow multi-level relationships
**You should see:** The complete configuration now has both `columns` and `sources` sections.
Built-in properties like `id` and `title` do not need to be explicitly defined in your sources or data model to be queried; they are implicitly available. However, you must explicitly list them in your `columns` section if you want them to appear in the sheet.
The `query.from` value must exactly match a `domainModelTypes` key from your data model. If you defined `UserNeed` in the data model, you must use `UserNeed` here -- not `userneed` or `user_need`. The match is case-sensitive.
Your complete sheet configuration should look like this:
```yaml theme={null}
columns:
title:
title: User Need
width: 250
hasFocus: true
severity:
title: Severity
width: 120
systemRequirements.systemRequirement.title:
title: System Requirement
width: 200
systemRequirements.systemRequirement.severity:
title: SR Severity
width: 120
sources:
- id: requirements
model: rtm
query:
from: UserNeed
expand:
- name: systemRequirements
expand:
- name: systemRequirement
```
Save the configuration file.
**You should see:** The editor accepts the YAML without errors. The configuration is now stored in your project repository.
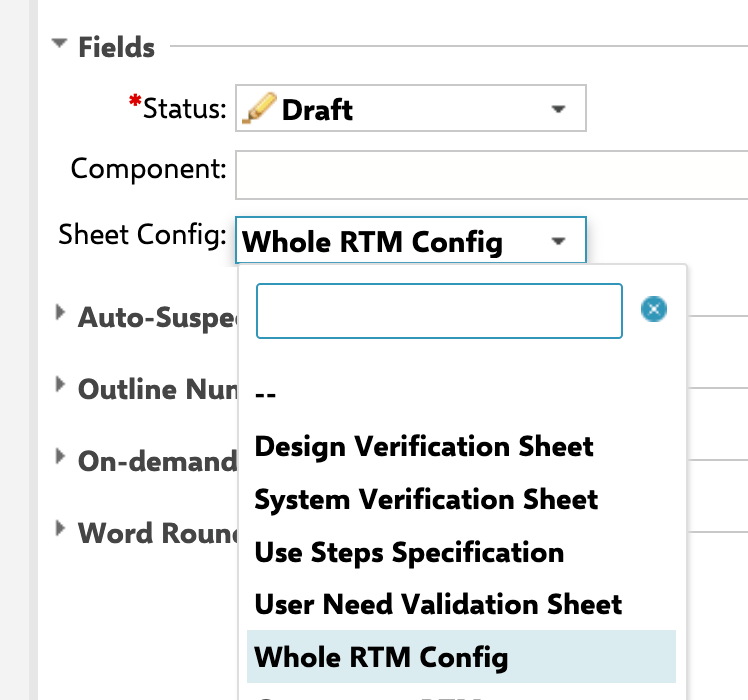 To see your sheet in action, link this configuration to a Powersheet document. Open (or create) a Powersheet document in your project and open its **Properties** sidebar. There you will find the sheet configuration custom field -- field ID `nextedySheetConfig`, labelled **Sheet Config** in the UI. Use its dropdown to select the configuration you just created (`rtm-sheet`), as shown above.
The `nextedySheetConfig` field must be registered on the document type before it appears in Properties. If it is missing, see [Installing Powersheet](/powersheet/getting-started/installation) for adding the custom field. If your project uses a different field ID, it must be declared via the `com.nextedy.powersheet.sheetConfigFieldId` configuration property.
**You should see:** When you open the document with Powersheet, it renders as a hierarchical sheet with four columns -- `UserNeed` title and severity at the root level, and `SystemRequirement` title and severity as expandable child rows.
This configuration is intentionally minimal. Once it works, you can add more columns, define views, configure formatters, and introduce additional entity types one property at a time. See [Incremental Configuration Approach](/powersheet/getting-started/incremental-configuration) for the recommended workflow.
## Understanding root-level properties
The sheet configuration supports several root-level properties beyond `columns` and `sources`. You do not need all of these to start -- `columns` and `sources` are sufficient for a working sheet:
| Property | Purpose |
| --------------------- | ----------------------------------------------------------------------------- |
| `columns` | Column definitions with binding paths, titles, and display options |
| `sources` | Data source queries and expansion paths |
| `views` | Named column visibility presets for switching between analysis perspectives |
| `formatters` | Conditional formatting rules based on cell or row values |
| `styles` | Reusable style definitions (colors, text decoration) referenced by formatters |
| `columnGroups` | Visual grouping of related columns with collapsible headers |
| `sortBy` | Default client-side sort order by column and direction |
| `renderers` | Custom rendering functions for specialized cell display |
| `showGroupRowCounter` | Whether to display item counts on group rows (default: hidden) |
## Next steps
* [Incremental Configuration Approach](/powersheet/getting-started/incremental-configuration) -- learn how to extend your configuration step by step
* [Creating Your First Powersheet Document](/powersheet/getting-started/first-document) -- create a document and see your sheet in action
* [Sheet Configuration Reference](/powersheet/reference/sheet-config/index) -- full property reference for all sheet configuration options
* [Columns Reference](/powersheet/reference/sheet-config/columns) -- detailed reference for column settings like `isReadOnly`, `formatter`, and `groupBy`
* [Data Model Guides](/powersheet/guides/data-model/index) -- extend your data model with additional entity types and relationships
To see your sheet in action, link this configuration to a Powersheet document. Open (or create) a Powersheet document in your project and open its **Properties** sidebar. There you will find the sheet configuration custom field -- field ID `nextedySheetConfig`, labelled **Sheet Config** in the UI. Use its dropdown to select the configuration you just created (`rtm-sheet`), as shown above.
The `nextedySheetConfig` field must be registered on the document type before it appears in Properties. If it is missing, see [Installing Powersheet](/powersheet/getting-started/installation) for adding the custom field. If your project uses a different field ID, it must be declared via the `com.nextedy.powersheet.sheetConfigFieldId` configuration property.
**You should see:** When you open the document with Powersheet, it renders as a hierarchical sheet with four columns -- `UserNeed` title and severity at the root level, and `SystemRequirement` title and severity as expandable child rows.
This configuration is intentionally minimal. Once it works, you can add more columns, define views, configure formatters, and introduce additional entity types one property at a time. See [Incremental Configuration Approach](/powersheet/getting-started/incremental-configuration) for the recommended workflow.
## Understanding root-level properties
The sheet configuration supports several root-level properties beyond `columns` and `sources`. You do not need all of these to start -- `columns` and `sources` are sufficient for a working sheet:
| Property | Purpose |
| --------------------- | ----------------------------------------------------------------------------- |
| `columns` | Column definitions with binding paths, titles, and display options |
| `sources` | Data source queries and expansion paths |
| `views` | Named column visibility presets for switching between analysis perspectives |
| `formatters` | Conditional formatting rules based on cell or row values |
| `styles` | Reusable style definitions (colors, text decoration) referenced by formatters |
| `columnGroups` | Visual grouping of related columns with collapsible headers |
| `sortBy` | Default client-side sort order by column and direction |
| `renderers` | Custom rendering functions for specialized cell display |
| `showGroupRowCounter` | Whether to display item counts on group rows (default: hidden) |
## Next steps
* [Incremental Configuration Approach](/powersheet/getting-started/incremental-configuration) -- learn how to extend your configuration step by step
* [Creating Your First Powersheet Document](/powersheet/getting-started/first-document) -- create a document and see your sheet in action
* [Sheet Configuration Reference](/powersheet/reference/sheet-config/index) -- full property reference for all sheet configuration options
* [Columns Reference](/powersheet/reference/sheet-config/columns) -- detailed reference for column settings like `isReadOnly`, `formatter`, and `groupBy`
* [Data Model Guides](/powersheet/guides/data-model/index) -- extend your data model with additional entity types and relationships