> ## Documentation Index
> Fetch the complete documentation index at: https://learn.nextedy.com/llms.txt
> Use this file to discover all available pages before exploring further.
# Creating Your First Powersheet Document
> This tutorial walks you through creating a LiveDoc in Siemens Polarion ALM that renders as a Nextedy POWERSHEET sheet, bringing together your data model and sheet configuration into an interactive, navigable document.
export const LastReviewed = ({date}) => {
if (!date) return null;
const formatted = new Date(`${date}T00:00:00Z`).toLocaleDateString("en-US", {
year: "numeric",
month: "long",
day: "numeric",
timeZone: "UTC"
});
return
Last reviewed on {formatted}
;
};
## What you will achieve
By the end of this tutorial you will have:
* A `nextedySheetConfig` custom field configured on documents
* A LiveDoc assigned to your sheet configuration
* A working powersheet document accessible from the Powersheet Drive
## Prerequisites
* Powersheet installed and licensed (see [Installing Powersheet](/powersheet/getting-started/installation))
* Navigation topic enabled (see [Setting Up Navigation](/powersheet/getting-started/setup-navigation))
* A data model created (see [Creating Your First Data Model](/powersheet/getting-started/first-data-model))
* A sheet configuration created (see [Creating Your First Sheet Configuration](/powersheet/getting-started/first-sheet-configuration))
 If you set up your project from the **RTM Demo template** (the template the install flow configures), the **Sheet Config** document custom field is likely already present -- check **Administration > Documents & Pages > Custom Fields** before adding it. Step 1 is for projects that don't have the field yet.
A sheet configuration is assigned to a document through a dedicated **document-scope** custom field. In Polarion this is configured under **Administration > Documents & Pages > Custom Fields** (the document custom fields -- not the work-item custom fields, which live under a separate admin section).
This admin page does not present a point-and-click form. Instead, it shows an XML editor for the project's `custom-fields.xml` definition, where each field is declared as a `` element. Add (or upload) a field definition with the following attributes:
| Attribute | Value |
| --------- | ----------------------------- |
| **id** | `nextedySheetConfig` |
| **name** | Sheet Config |
| **type** | `enum:Nextedy - Sheet Config` |
In other words, the field **Type** is `Enum`, and the enum it points to is the `Nextedy - Sheet Config` enumeration -- a Powersheet-provided enum that dynamically discovers the available sheet configuration files in the repository. A minimal entry looks like:
```xml theme={null}
```
Save the `custom-fields.xml` content to apply the definition.
If you set up your project from the **RTM Demo template** (the template the install flow configures), the **Sheet Config** document custom field is likely already present -- check **Administration > Documents & Pages > Custom Fields** before adding it. Step 1 is for projects that don't have the field yet.
A sheet configuration is assigned to a document through a dedicated **document-scope** custom field. In Polarion this is configured under **Administration > Documents & Pages > Custom Fields** (the document custom fields -- not the work-item custom fields, which live under a separate admin section).
This admin page does not present a point-and-click form. Instead, it shows an XML editor for the project's `custom-fields.xml` definition, where each field is declared as a `` element. Add (or upload) a field definition with the following attributes:
| Attribute | Value |
| --------- | ----------------------------- |
| **id** | `nextedySheetConfig` |
| **name** | Sheet Config |
| **type** | `enum:Nextedy - Sheet Config` |
In other words, the field **Type** is `Enum`, and the enum it points to is the `Nextedy - Sheet Config` enumeration -- a Powersheet-provided enum that dynamically discovers the available sheet configuration files in the repository. A minimal entry looks like:
```xml theme={null}
```
Save the `custom-fields.xml` content to apply the definition.
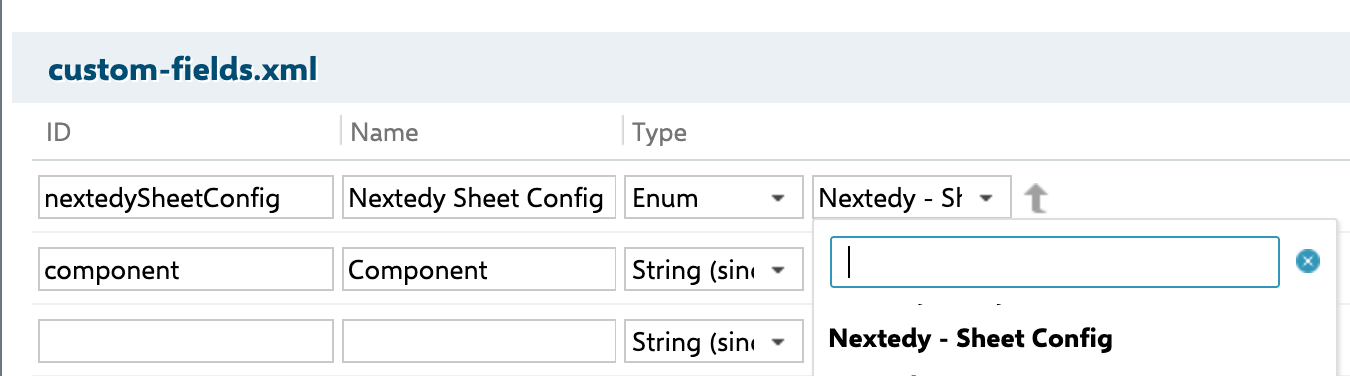 **You should see:** After saving, the new custom field is available on documents in the project, backed by the `Nextedy - Sheet Config` enum that dynamically discovers available sheet configuration files from the repository.
The field ID and name can be customized. If you use a different ID, you must declare it in **Administration > Nextedy Powersheet > Configuration Properties** with:
`com.nextedy.powersheet.sheetConfigFieldId=yourFieldId`
(only needed when you deviate from the default `nextedySheetConfig` id).
Create a new LiveDoc in your project. The creation wizard exposes several fields; the ones that matter here are:
| Field | Notes |
| -------- | ------------------------------------------------------------------------------------------------------------------------------------------------------- |
| **Name** | A descriptive document name (e.g., "User Needs Specification"). |
| **Type** | The document type. It defaults to **System Requirements Specification**, but can be any document type that exposes the **Sheet Config** field (Step 1). |
After the document is created, open its **Properties** and set the **Sheet Config** field to your sheet configuration name (e.g., `rtm-sheet`).
**You should see:** After saving, the new custom field is available on documents in the project, backed by the `Nextedy - Sheet Config` enum that dynamically discovers available sheet configuration files from the repository.
The field ID and name can be customized. If you use a different ID, you must declare it in **Administration > Nextedy Powersheet > Configuration Properties** with:
`com.nextedy.powersheet.sheetConfigFieldId=yourFieldId`
(only needed when you deviate from the default `nextedySheetConfig` id).
Create a new LiveDoc in your project. The creation wizard exposes several fields; the ones that matter here are:
| Field | Notes |
| -------- | ------------------------------------------------------------------------------------------------------------------------------------------------------- |
| **Name** | A descriptive document name (e.g., "User Needs Specification"). |
| **Type** | The document type. It defaults to **System Requirements Specification**, but can be any document type that exposes the **Sheet Config** field (Step 1). |
After the document is created, open its **Properties** and set the **Sheet Config** field to your sheet configuration name (e.g., `rtm-sheet`).
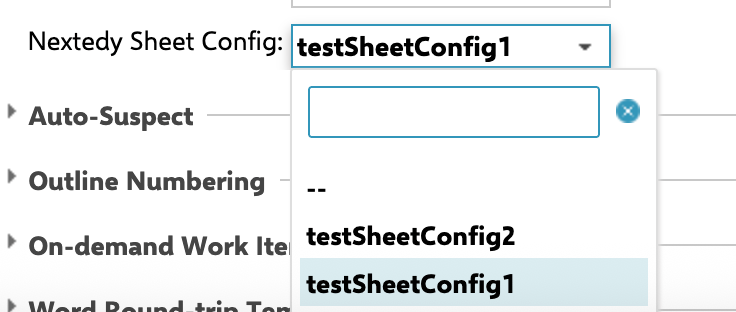 **You should see:** The **Sheet Config** field shows a dropdown with the available sheet configurations discovered from both project and global locations.
If no configurations appear in the dropdown, verify that your sheet configuration was saved correctly in **Administration > Nextedy Powersheet > Sheet Configurations**. The enum provider scans the repository for available YAML files.
To allow users to easily switch from the LiveDoc view to the Powersheet view, add the following Velocity snippet directly into the document body -- the LiveDoc's `homePageContent` (the rich-text content area you edit in the document itself), not a separate sidebar or panel:
```velocity theme={null}
$openPowersheetButton.renderOpenPowersheetButton($document)
```
**You should see:** An "Open with Nextedy Powersheet" button appears in the LiveDoc, allowing users to jump directly to the sheet view.
Navigate to the **Powersheet Drive** in the left sidebar. Your new document should appear in the list.
The Drive doesn't always list a freshly created document right away. If it doesn't appear, reload the Drive (or do a hard refresh of the browser) to force the list to update.
Click the document name to open it in the Powersheet view.
**You should see:** The sheet loads with the columns defined in your sheet configuration. If the project contains work items matching the `UserNeed` type, they appear as rows with their related `SystemRequirement` items expandable beneath them.
If the sheet appears empty, it means there are no work items matching your data model's entity types yet. You can add rows directly in the sheet using the add button in the toolbar. New entities are created with default values from the entity factory configuration -- the part of your sheet configuration that determines the initial field values applied to a work item (row) when it is first created from the sheet.
With the sheet open, try the following operations:
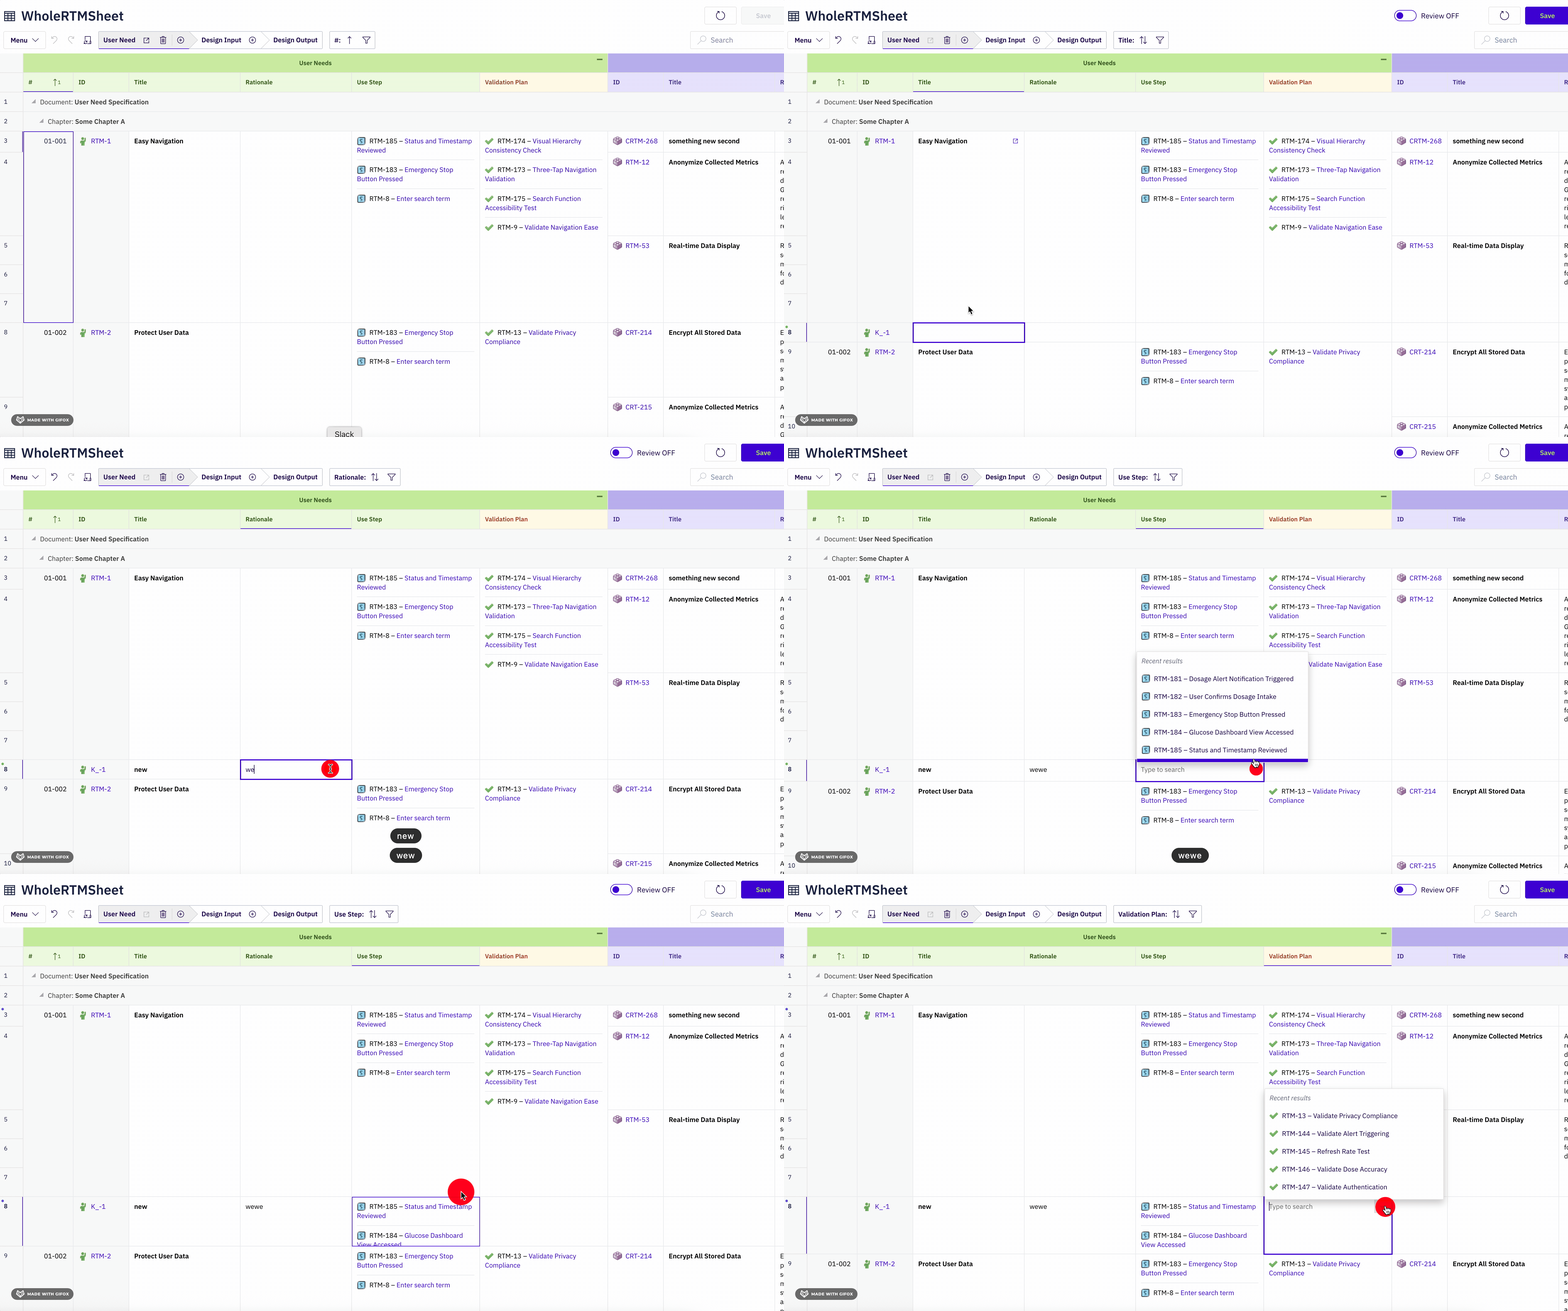
1. **Add a row** -- click the add button to create a new `UserNeed` work item. If the sheet has more than one hierarchy level, each level has its own `(+)` control; use the one at the level you want the row at. For a top-level entity like `UserNeed`, use the root-level add button.
2. **Edit a cell** -- click on the title cell and type a name
3. **Save** -- click the save button to persist your changes to Polarion
**You should see:** New work items are created in Polarion, editable directly in the sheet. The save button becomes enabled when you make changes and is disabled after a successful save.
**You should see:** The **Sheet Config** field shows a dropdown with the available sheet configurations discovered from both project and global locations.
If no configurations appear in the dropdown, verify that your sheet configuration was saved correctly in **Administration > Nextedy Powersheet > Sheet Configurations**. The enum provider scans the repository for available YAML files.
To allow users to easily switch from the LiveDoc view to the Powersheet view, add the following Velocity snippet directly into the document body -- the LiveDoc's `homePageContent` (the rich-text content area you edit in the document itself), not a separate sidebar or panel:
```velocity theme={null}
$openPowersheetButton.renderOpenPowersheetButton($document)
```
**You should see:** An "Open with Nextedy Powersheet" button appears in the LiveDoc, allowing users to jump directly to the sheet view.
Navigate to the **Powersheet Drive** in the left sidebar. Your new document should appear in the list.
The Drive doesn't always list a freshly created document right away. If it doesn't appear, reload the Drive (or do a hard refresh of the browser) to force the list to update.
Click the document name to open it in the Powersheet view.
**You should see:** The sheet loads with the columns defined in your sheet configuration. If the project contains work items matching the `UserNeed` type, they appear as rows with their related `SystemRequirement` items expandable beneath them.
If the sheet appears empty, it means there are no work items matching your data model's entity types yet. You can add rows directly in the sheet using the add button in the toolbar. New entities are created with default values from the entity factory configuration -- the part of your sheet configuration that determines the initial field values applied to a work item (row) when it is first created from the sheet.
With the sheet open, try the following operations:
1. **Add a row** -- click the add button to create a new `UserNeed` work item. If the sheet has more than one hierarchy level, each level has its own `(+)` control; use the one at the level you want the row at. For a top-level entity like `UserNeed`, use the root-level add button.
2. **Edit a cell** -- click on the title cell and type a name
3. **Save** -- click the save button to persist your changes to Polarion
**You should see:** New work items are created in Polarion, editable directly in the sheet. The save button becomes enabled when you make changes and is disabled after a successful save.
 ## Next steps
* [Incremental Configuration Approach](/powersheet/getting-started/incremental-configuration) -- learn how to extend your configuration step by step
* [How-To Guides](/powersheet/guides/index) -- task-oriented guides for common operations
* [Reference](/powersheet/reference/index) -- complete YAML property reference
## Related guides
* [Creating Your First Sheet Configuration](/powersheet/getting-started/first-sheet-configuration) -- define the columns and views referenced by this document
* [Creating Your First Data Model](/powersheet/getting-started/first-data-model) -- define the entity types that appear as rows
* [Setting Up Navigation](/powersheet/getting-started/setup-navigation) -- enable the Powersheet Drive topic in the sidebar
## Next steps
* [Incremental Configuration Approach](/powersheet/getting-started/incremental-configuration) -- learn how to extend your configuration step by step
* [How-To Guides](/powersheet/guides/index) -- task-oriented guides for common operations
* [Reference](/powersheet/reference/index) -- complete YAML property reference
## Related guides
* [Creating Your First Sheet Configuration](/powersheet/getting-started/first-sheet-configuration) -- define the columns and views referenced by this document
* [Creating Your First Data Model](/powersheet/getting-started/first-data-model) -- define the entity types that appear as rows
* [Setting Up Navigation](/powersheet/getting-started/setup-navigation) -- enable the Powersheet Drive topic in the sidebar