> ## Documentation Index
> Fetch the complete documentation index at: https://learn.nextedy.com/llms.txt
> Use this file to discover all available pages before exploring further.
# Visualize and Manage Dependencies
> Enable dependency visualization on the Nextedy PLANNINGBOARD so you can see, create, and manage links between work item cards directly on the board.
## Before you begin
Dependency visualization requires the **Dependency Roles** widget parameter to be configured. Without it, the **Show Dependencies** toolbar button has no effect. Confirm you have edit access to the widget parameters for your Planningboard page.
Open the widget parameters for your Planningboard page and locate the **Dependency Roles** field under the **Parameters for Work Items** section.
Enter one or more Polarion link role IDs that represent dependency relationships in your project — for example, `depends_on` or `blocks`. Separate multiple roles with a comma.
```text theme={null}
Dependency Roles: depends_on, blocks
```
The **Dependency Roles** field requires the exact Polarion link role ID, not its display label. Using the display label (e.g. "Depends On" instead of `depends_on`) will silently produce no arrows on the board. Check **Administration > Work Items > Link Roles** in Polarion to confirm the correct IDs.
Save the widget parameters. The board will reload with dependency tracking active.
Once dependency roles are configured, use the toolbar to reveal all dependency arrows at once.
1. Open your Planningboard page.
2. In the toolbar (upper-left corner), click the **Show Dependencies** button.
All links matching the configured dependency roles are drawn as arrows connecting the relevant cards across columns and swimlanes.
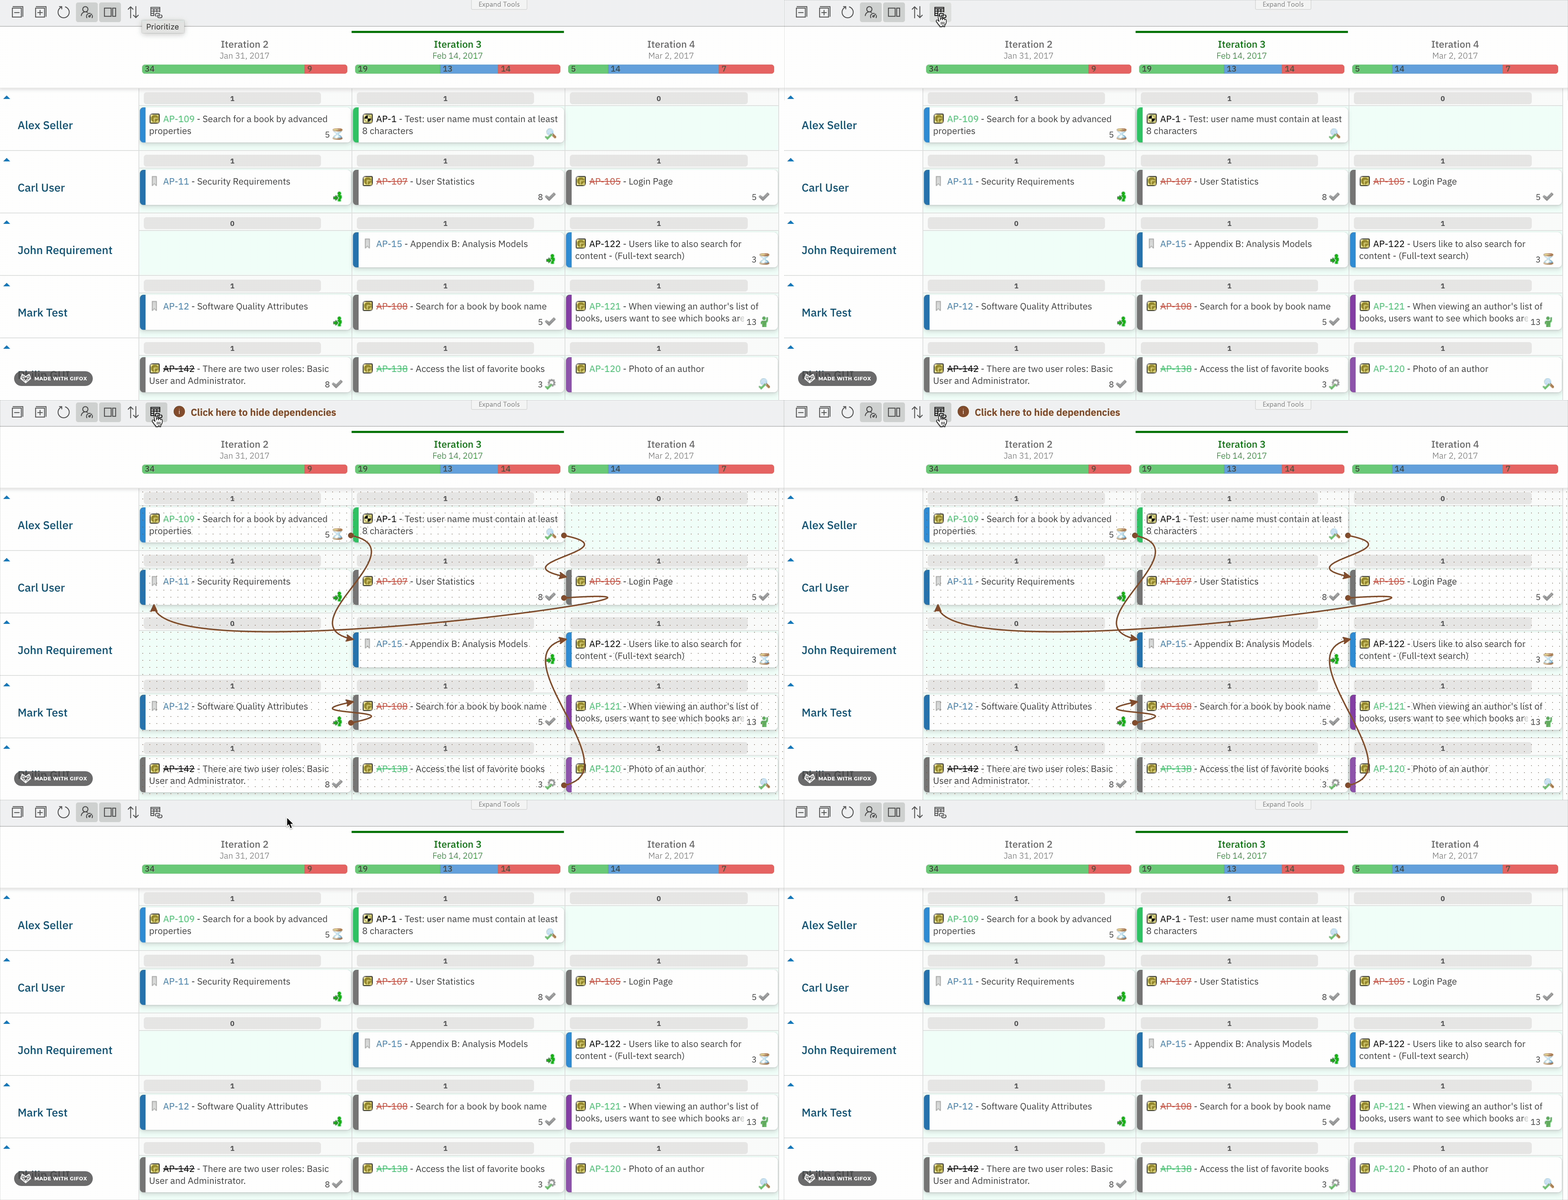 **Show Dependencies** (toolbar) reveals all dependency arrows across the entire board in one click. **Show Links** (card hover action) focuses on a single card — it hides all other cards and shows only that card and its directly linked cards. Use Show Links when investigating one item's relationships; use Show Dependencies for a board-wide view.
To examine one card's dependencies without the noise of the full board:
1. Hover over the card you want to inspect.
2. Click the **Show Links** icon (chain-link icon) that appears in the upper-right corner of the card.
All other cards are hidden. Only the selected card and its linked cards remain visible, making it easy to trace the dependency chain for that item.
To return to the full board, click the **Show Links** icon again or click away.
You can create a link between two cards without leaving the Planningboard:
1. Hover over the source card.
2. Click the **Add Link** icon (appears alongside Show Links in the card's upper-right corner).
3. The same icon appears on all other cards. Click the target card to establish the connection.
A red icon on a card during this mode indicates a link already exists between the source and that card. Clicking a red icon removes the link.
```text theme={null}
Workflow diagram:
Hover source card → Click Add Link → Click target card → Link created
(Red icon on target = link exists; click to delete)
```
Cards with the **Verified** status are locked on the board. They cannot be dragged, unplanned, or have their plan assignment changed. This constraint applies to all card interactions, including dependency management.
## Dependency relationship on the board
**Show Dependencies** (toolbar) reveals all dependency arrows across the entire board in one click. **Show Links** (card hover action) focuses on a single card — it hides all other cards and shows only that card and its directly linked cards. Use Show Links when investigating one item's relationships; use Show Dependencies for a board-wide view.
To examine one card's dependencies without the noise of the full board:
1. Hover over the card you want to inspect.
2. Click the **Show Links** icon (chain-link icon) that appears in the upper-right corner of the card.
All other cards are hidden. Only the selected card and its linked cards remain visible, making it easy to trace the dependency chain for that item.
To return to the full board, click the **Show Links** icon again or click away.
You can create a link between two cards without leaving the Planningboard:
1. Hover over the source card.
2. Click the **Add Link** icon (appears alongside Show Links in the card's upper-right corner).
3. The same icon appears on all other cards. Click the target card to establish the connection.
A red icon on a card during this mode indicates a link already exists between the source and that card. Clicking a red icon removes the link.
```text theme={null}
Workflow diagram:
Hover source card → Click Add Link → Click target card → Link created
(Red icon on target = link exists; click to delete)
```
Cards with the **Verified** status are locked on the board. They cannot be dragged, unplanned, or have their plan assignment changed. This constraint applies to all card interactions, including dependency management.
## Dependency relationship on the board
 Dependencies are drawn edge-to-edge as directional arrows. Cross-column and cross-swimlane dependencies are both supported and visible when Show Dependencies is active.
## Common pitfalls
If no arrows appear after clicking Show Dependencies, check:
1. **Dependency Roles is empty or incorrect** — open widget parameters and confirm a valid link role ID is set.
2. **No links exist yet** — the board only draws arrows for links that already exist in Polarion. Create links using Add Link on the board, or add them in the Polarion work item form.
3. **Link role not present in Polarion** — if you entered a role ID that does not exist in the project, the board silently ignores it. Verify the role exists under **Administration > Work Items > Link Roles**.
The **Dependency Roles** field appears in the **Parameters for Work Items** section. If you do not see it, confirm you are editing the Planningboard widget parameters, not a different widget on the same page.
## You should now see
After completing this guide:
* The **Show Dependencies** toolbar button reveals directional arrows between all linked cards on the board, following the link roles you configured.
* Hovering a card and clicking **Show Links** isolates that card and its linked neighbours.
* Clicking **Add Link** on a card lets you draw a new dependency to any other card on the board; a red icon flags existing links, which you can remove by clicking them.
## See also
* [Widget Parameters Overview](/planningboard/guides/configuration/widget-parameters) — full reference for all widget parameters including Dependency Roles
* [Configure Dependencies Display](/planningboard/guides/configuration/dependencies-configuration) — additional configuration options for dependency visualization
* [Basic Board Interactions](/planningboard/getting-started/basic-interactions) — overview of card actions, toolbar controls, and the Show Links feature
* [Prioritize Work Items](/planningboard/guides/planning/prioritization) — ordering cards on the board alongside dependency management
**KB Articles**
* Introduction to Planningboard
* Planningboard interface & basic interactions
* Planningboard Widget Parameters
**Support Tickets**
* [#5879](https://support.nextedy.com/helpdesk/tickets/5879)
* [#6174](https://support.nextedy.com/helpdesk/tickets/6174)
* [#4711](https://support.nextedy.com/helpdesk/tickets/4711)
**Source Code**
* `PlansMode.java`
* `Item.java`
* `Config.java`
* `PlanningBoardDataService.java`
* `PlanningBoardWidgetRenderer.java`
Dependencies are drawn edge-to-edge as directional arrows. Cross-column and cross-swimlane dependencies are both supported and visible when Show Dependencies is active.
## Common pitfalls
If no arrows appear after clicking Show Dependencies, check:
1. **Dependency Roles is empty or incorrect** — open widget parameters and confirm a valid link role ID is set.
2. **No links exist yet** — the board only draws arrows for links that already exist in Polarion. Create links using Add Link on the board, or add them in the Polarion work item form.
3. **Link role not present in Polarion** — if you entered a role ID that does not exist in the project, the board silently ignores it. Verify the role exists under **Administration > Work Items > Link Roles**.
The **Dependency Roles** field appears in the **Parameters for Work Items** section. If you do not see it, confirm you are editing the Planningboard widget parameters, not a different widget on the same page.
## You should now see
After completing this guide:
* The **Show Dependencies** toolbar button reveals directional arrows between all linked cards on the board, following the link roles you configured.
* Hovering a card and clicking **Show Links** isolates that card and its linked neighbours.
* Clicking **Add Link** on a card lets you draw a new dependency to any other card on the board; a red icon flags existing links, which you can remove by clicking them.
## See also
* [Widget Parameters Overview](/planningboard/guides/configuration/widget-parameters) — full reference for all widget parameters including Dependency Roles
* [Configure Dependencies Display](/planningboard/guides/configuration/dependencies-configuration) — additional configuration options for dependency visualization
* [Basic Board Interactions](/planningboard/getting-started/basic-interactions) — overview of card actions, toolbar controls, and the Show Links feature
* [Prioritize Work Items](/planningboard/guides/planning/prioritization) — ordering cards on the board alongside dependency management
**KB Articles**
* Introduction to Planningboard
* Planningboard interface & basic interactions
* Planningboard Widget Parameters
**Support Tickets**
* [#5879](https://support.nextedy.com/helpdesk/tickets/5879)
* [#6174](https://support.nextedy.com/helpdesk/tickets/6174)
* [#4711](https://support.nextedy.com/helpdesk/tickets/4711)
**Source Code**
* `PlansMode.java`
* `Item.java`
* `Config.java`
* `PlanningBoardDataService.java`
* `PlanningBoardWidgetRenderer.java`