> ## Documentation Index
> Fetch the complete documentation index at: https://learn.nextedy.com/llms.txt
> Use this file to discover all available pages before exploring further.
# Setup into New Projects
> Set up Nextedy PLANNINGBOARD in a brand-new Polarion project by installing the demo project template — the fastest way to get a working Planningboard with sample data you can explore and adapt.
## What you will achieve
By the end of this tutorial you will have:
* A new Polarion project created from the Planningboard demo template
* A LiveReport page with a working Planningboard widget embedded
* Sample Plans and work items arranged on the board, ready to explore
## Prerequisites
* Planningboard is installed on your Polarion server (see [Installation](/planningboard/getting-started/installation))
* A valid Planningboard license is applied (see [License Installation](/planningboard/getting-started/licensing))
* You have Polarion **Administration** access
Planningboard supports only **one widget per LiveReport page**. If you need boards for multiple teams or projects, create a separate LiveReport page for each board.
***
1. Log in to Polarion and click the top-level **Administration** link (gear icon or the global Administration project).
2. In the left navigation, locate **Planningboard** and click **Setup**.
**What you should see:** The Planningboard Setup page lists available actions, including an option to install the demo project template.
If **Planningboard** does not appear in the Administration navigation, the plugin is not loaded. Verify the installation steps in [Installation](/planningboard/getting-started/installation) — in particular that the `.config` file was deleted and Polarion was restarted.
***
On the Planningboard Setup page, follow the on-screen instructions to install the demo template into Polarion's project template registry.
**What you should see:** A confirmation message that the template was installed successfully. The template is stored in Polarion's template repository and will be available when you create a new project in the next step.
The installation is transactional — if anything fails, it rolls back automatically and no partial template is left behind. Re-run the setup action after resolving any error.
***
1. Navigate to **Polarion Administration > Projects** and click **Create Project**.
2. On the template selection screen, choose the **Planningboard** template (it appears in the list after Step 2).
3. Fill in the project name, ID, and any other required fields, then confirm.
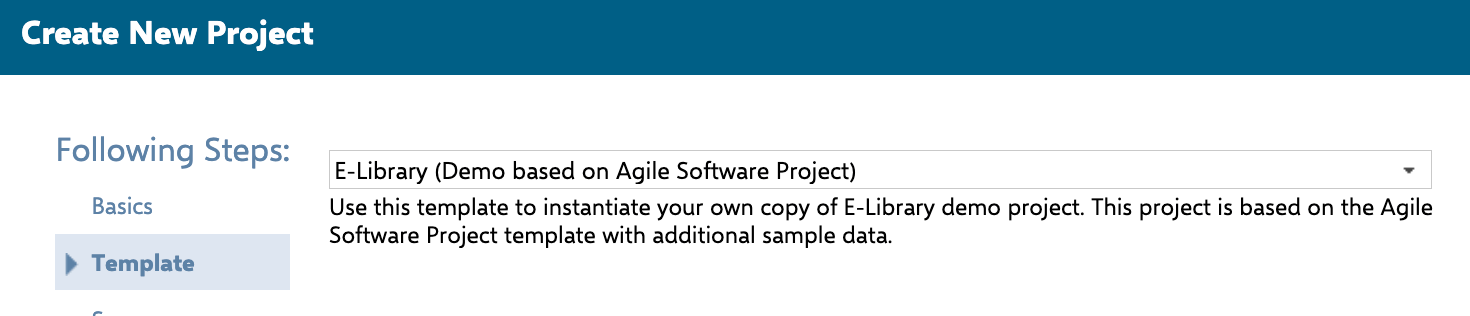 **What you should see:** Polarion creates the project and pre-populates it with sample Plans, work items, and the Planningboard page.
 ***
1. Switch to your newly created project.
2. Open **Documents & Pages** in the left navigation.
3. Navigate to the **Planning** space and open the **Planningboard** LiveReport page.
**What you should see:** The Planningboard widget loads and displays the sample Plans as columns and work items as cards organised in swimlanes. The capacity bar for each swimlane shows the current load.
***
1. Switch to your newly created project.
2. Open **Documents & Pages** in the left navigation.
3. Navigate to the **Planning** space and open the **Planningboard** LiveReport page.
**What you should see:** The Planningboard widget loads and displays the sample Plans as columns and work items as cards organised in swimlanes. The capacity bar for each swimlane shows the current load.
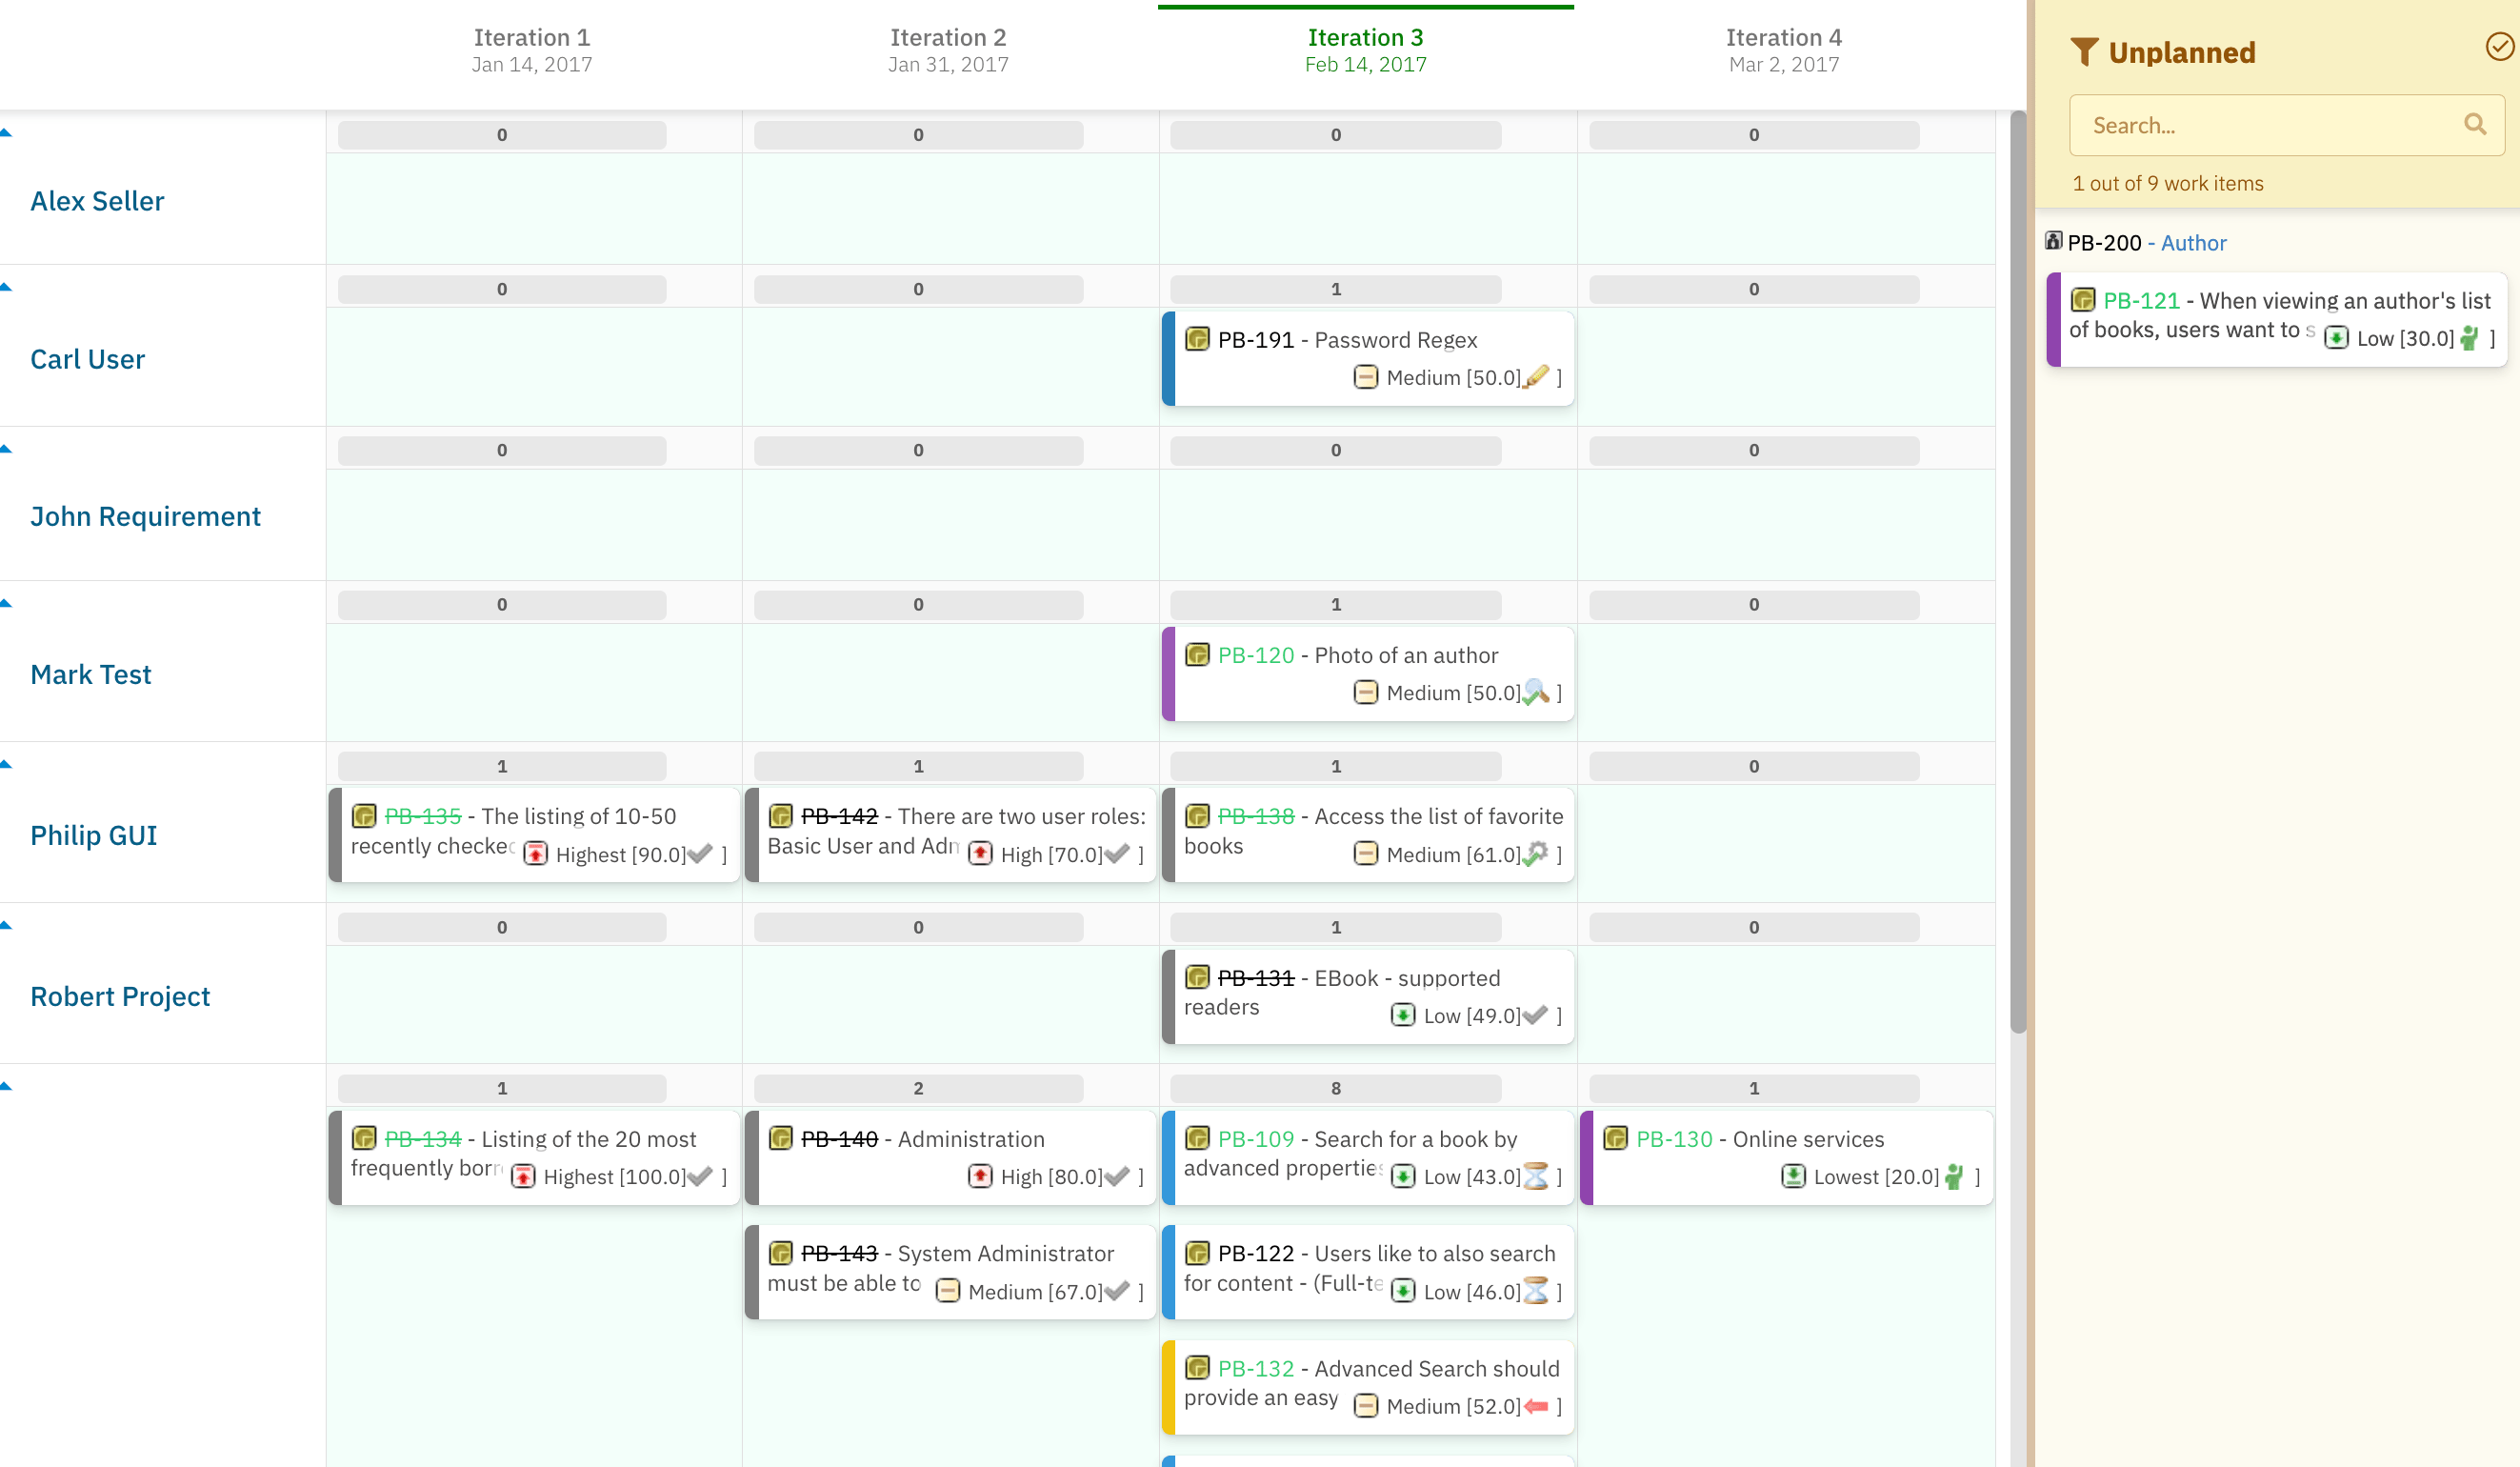 The board defaults to showing the last **1** completed Plan (`lastPlans = 1`) and the next **5** upcoming Plans (`nextPlans = 5`). You can adjust these via the widget parameters once you begin customising the board.
***
Take a few minutes to orient yourself:
* **Cards** — each work item appears as a card. Cards display the work item ID and title, for example `MAP-531 - My Story`.
* **Swimlanes** — rows that group cards by assignee (the default `assignmentMode`). Drag a card from one swimlane to another to reassign it.
* **Capacity bar** — the bar at the top of each swimlane shows load relative to capacity for the selected Plan.
* **Sidebar** — licensed users see an editing sidebar with filters and tools. Unlicensed users can view the board in read-only mode but cannot drag cards or access the sidebar.
Users without a Planningboard license can view the board (cards, swimlanes, capacity bars) but editing actions — dragging cards, accessing the sidebar, creating or showing unplanned items — are disabled for them.
***
## Widget parameter reference (overview)
The Planningboard widget on the LiveReport page is configured through **widget parameters**. Here are the key parameters you will encounter first:
| Parameter | Default | What it controls |
| ---------------- | --------------- | ---------------------------------------------------------------------------------------- |
| `plansMode` | `PROJECT_PLANS` | How Plans are sourced — project plans, SAFe sprints, SAFe Program Increments, or custom |
| `assignmentMode` | `ASSIGNEE` | How work items map to swimlanes — by assignee, enum field, parent, project, or SAFe team |
| `query` | `NOT *:*` | Lucene query filtering which work items appear on the board |
| `plansQuery` | *(none)* | Lucene query filtering which Plans appear on the board |
| `lastPlans` | `1` | Number of past/completed Plans shown |
| `nextPlans` | `5` | Number of upcoming Plans shown |
| `maxItems` | `1000` | Maximum work items loaded |
| `wiType` | *(none)* | Work item type filter (e.g. `story`, `task`) |
Capacity configuration parameters are whitespace-sensitive. Ensure there are no leading or trailing spaces when setting capacity-related widget parameters, as this can cause silent misconfiguration.
***
## Next steps
With the demo project running, continue with:
* [Create Your First Planningboard](/planningboard/getting-started/first-planning-board) — walk through building a board from scratch on an existing project
* [Basic Board Interactions](/planningboard/getting-started/basic-interactions) — learn drag-and-drop, the sidebar, and filtering
* [Setup into Existing Projects](/planningboard/getting-started/setup-existing-project) — add Planningboard to a project you already have
**KB Articles**
* Install Planningboard
* How to setup Planningboard into existing projects (based on E-library template)
* Introduction to Planningboard
**Support Tickets**
* [#6174](https://support.nextedy.com/helpdesk/tickets/6174)
* [#5879](https://support.nextedy.com/helpdesk/tickets/5879)
* [#5796](https://support.nextedy.com/helpdesk/tickets/5796)
**Source Code**
* `Config.java`
* `PlanningBoardWidgetRenderer.java`
* `PlanningBoardSetupService.java`
* `capacityHelperData.cy.ts`
* `Item.java`
The board defaults to showing the last **1** completed Plan (`lastPlans = 1`) and the next **5** upcoming Plans (`nextPlans = 5`). You can adjust these via the widget parameters once you begin customising the board.
***
Take a few minutes to orient yourself:
* **Cards** — each work item appears as a card. Cards display the work item ID and title, for example `MAP-531 - My Story`.
* **Swimlanes** — rows that group cards by assignee (the default `assignmentMode`). Drag a card from one swimlane to another to reassign it.
* **Capacity bar** — the bar at the top of each swimlane shows load relative to capacity for the selected Plan.
* **Sidebar** — licensed users see an editing sidebar with filters and tools. Unlicensed users can view the board in read-only mode but cannot drag cards or access the sidebar.
Users without a Planningboard license can view the board (cards, swimlanes, capacity bars) but editing actions — dragging cards, accessing the sidebar, creating or showing unplanned items — are disabled for them.
***
## Widget parameter reference (overview)
The Planningboard widget on the LiveReport page is configured through **widget parameters**. Here are the key parameters you will encounter first:
| Parameter | Default | What it controls |
| ---------------- | --------------- | ---------------------------------------------------------------------------------------- |
| `plansMode` | `PROJECT_PLANS` | How Plans are sourced — project plans, SAFe sprints, SAFe Program Increments, or custom |
| `assignmentMode` | `ASSIGNEE` | How work items map to swimlanes — by assignee, enum field, parent, project, or SAFe team |
| `query` | `NOT *:*` | Lucene query filtering which work items appear on the board |
| `plansQuery` | *(none)* | Lucene query filtering which Plans appear on the board |
| `lastPlans` | `1` | Number of past/completed Plans shown |
| `nextPlans` | `5` | Number of upcoming Plans shown |
| `maxItems` | `1000` | Maximum work items loaded |
| `wiType` | *(none)* | Work item type filter (e.g. `story`, `task`) |
Capacity configuration parameters are whitespace-sensitive. Ensure there are no leading or trailing spaces when setting capacity-related widget parameters, as this can cause silent misconfiguration.
***
## Next steps
With the demo project running, continue with:
* [Create Your First Planningboard](/planningboard/getting-started/first-planning-board) — walk through building a board from scratch on an existing project
* [Basic Board Interactions](/planningboard/getting-started/basic-interactions) — learn drag-and-drop, the sidebar, and filtering
* [Setup into Existing Projects](/planningboard/getting-started/setup-existing-project) — add Planningboard to a project you already have
**KB Articles**
* Install Planningboard
* How to setup Planningboard into existing projects (based on E-library template)
* Introduction to Planningboard
**Support Tickets**
* [#6174](https://support.nextedy.com/helpdesk/tickets/6174)
* [#5879](https://support.nextedy.com/helpdesk/tickets/5879)
* [#5796](https://support.nextedy.com/helpdesk/tickets/5796)
**Source Code**
* `Config.java`
* `PlanningBoardWidgetRenderer.java`
* `PlanningBoardSetupService.java`
* `capacityHelperData.cy.ts`
* `Item.java`