> ## Documentation Index
> Fetch the complete documentation index at: https://learn.nextedy.com/llms.txt
> Use this file to discover all available pages before exploring further.
# Set Up a Work Item Checklist
> Add a checklist to a work item type by creating a custom field and exposing it through the checklist form extension.
export const LastReviewed = ({date}) => {
if (!date) return null;
const formatted = new Date(`${date}T00:00:00Z`).toLocaleDateString("en-US", {
year: "numeric",
month: "long",
day: "numeric",
timeZone: "UTC"
});
return
Last reviewed on {formatted}
;
};
To set up a checklist on a document (LiveDoc) instead, see [Set Up a Document (LiveDoc) Checklist](/checklist/guides/setup/documents).
## 1. Create the custom field
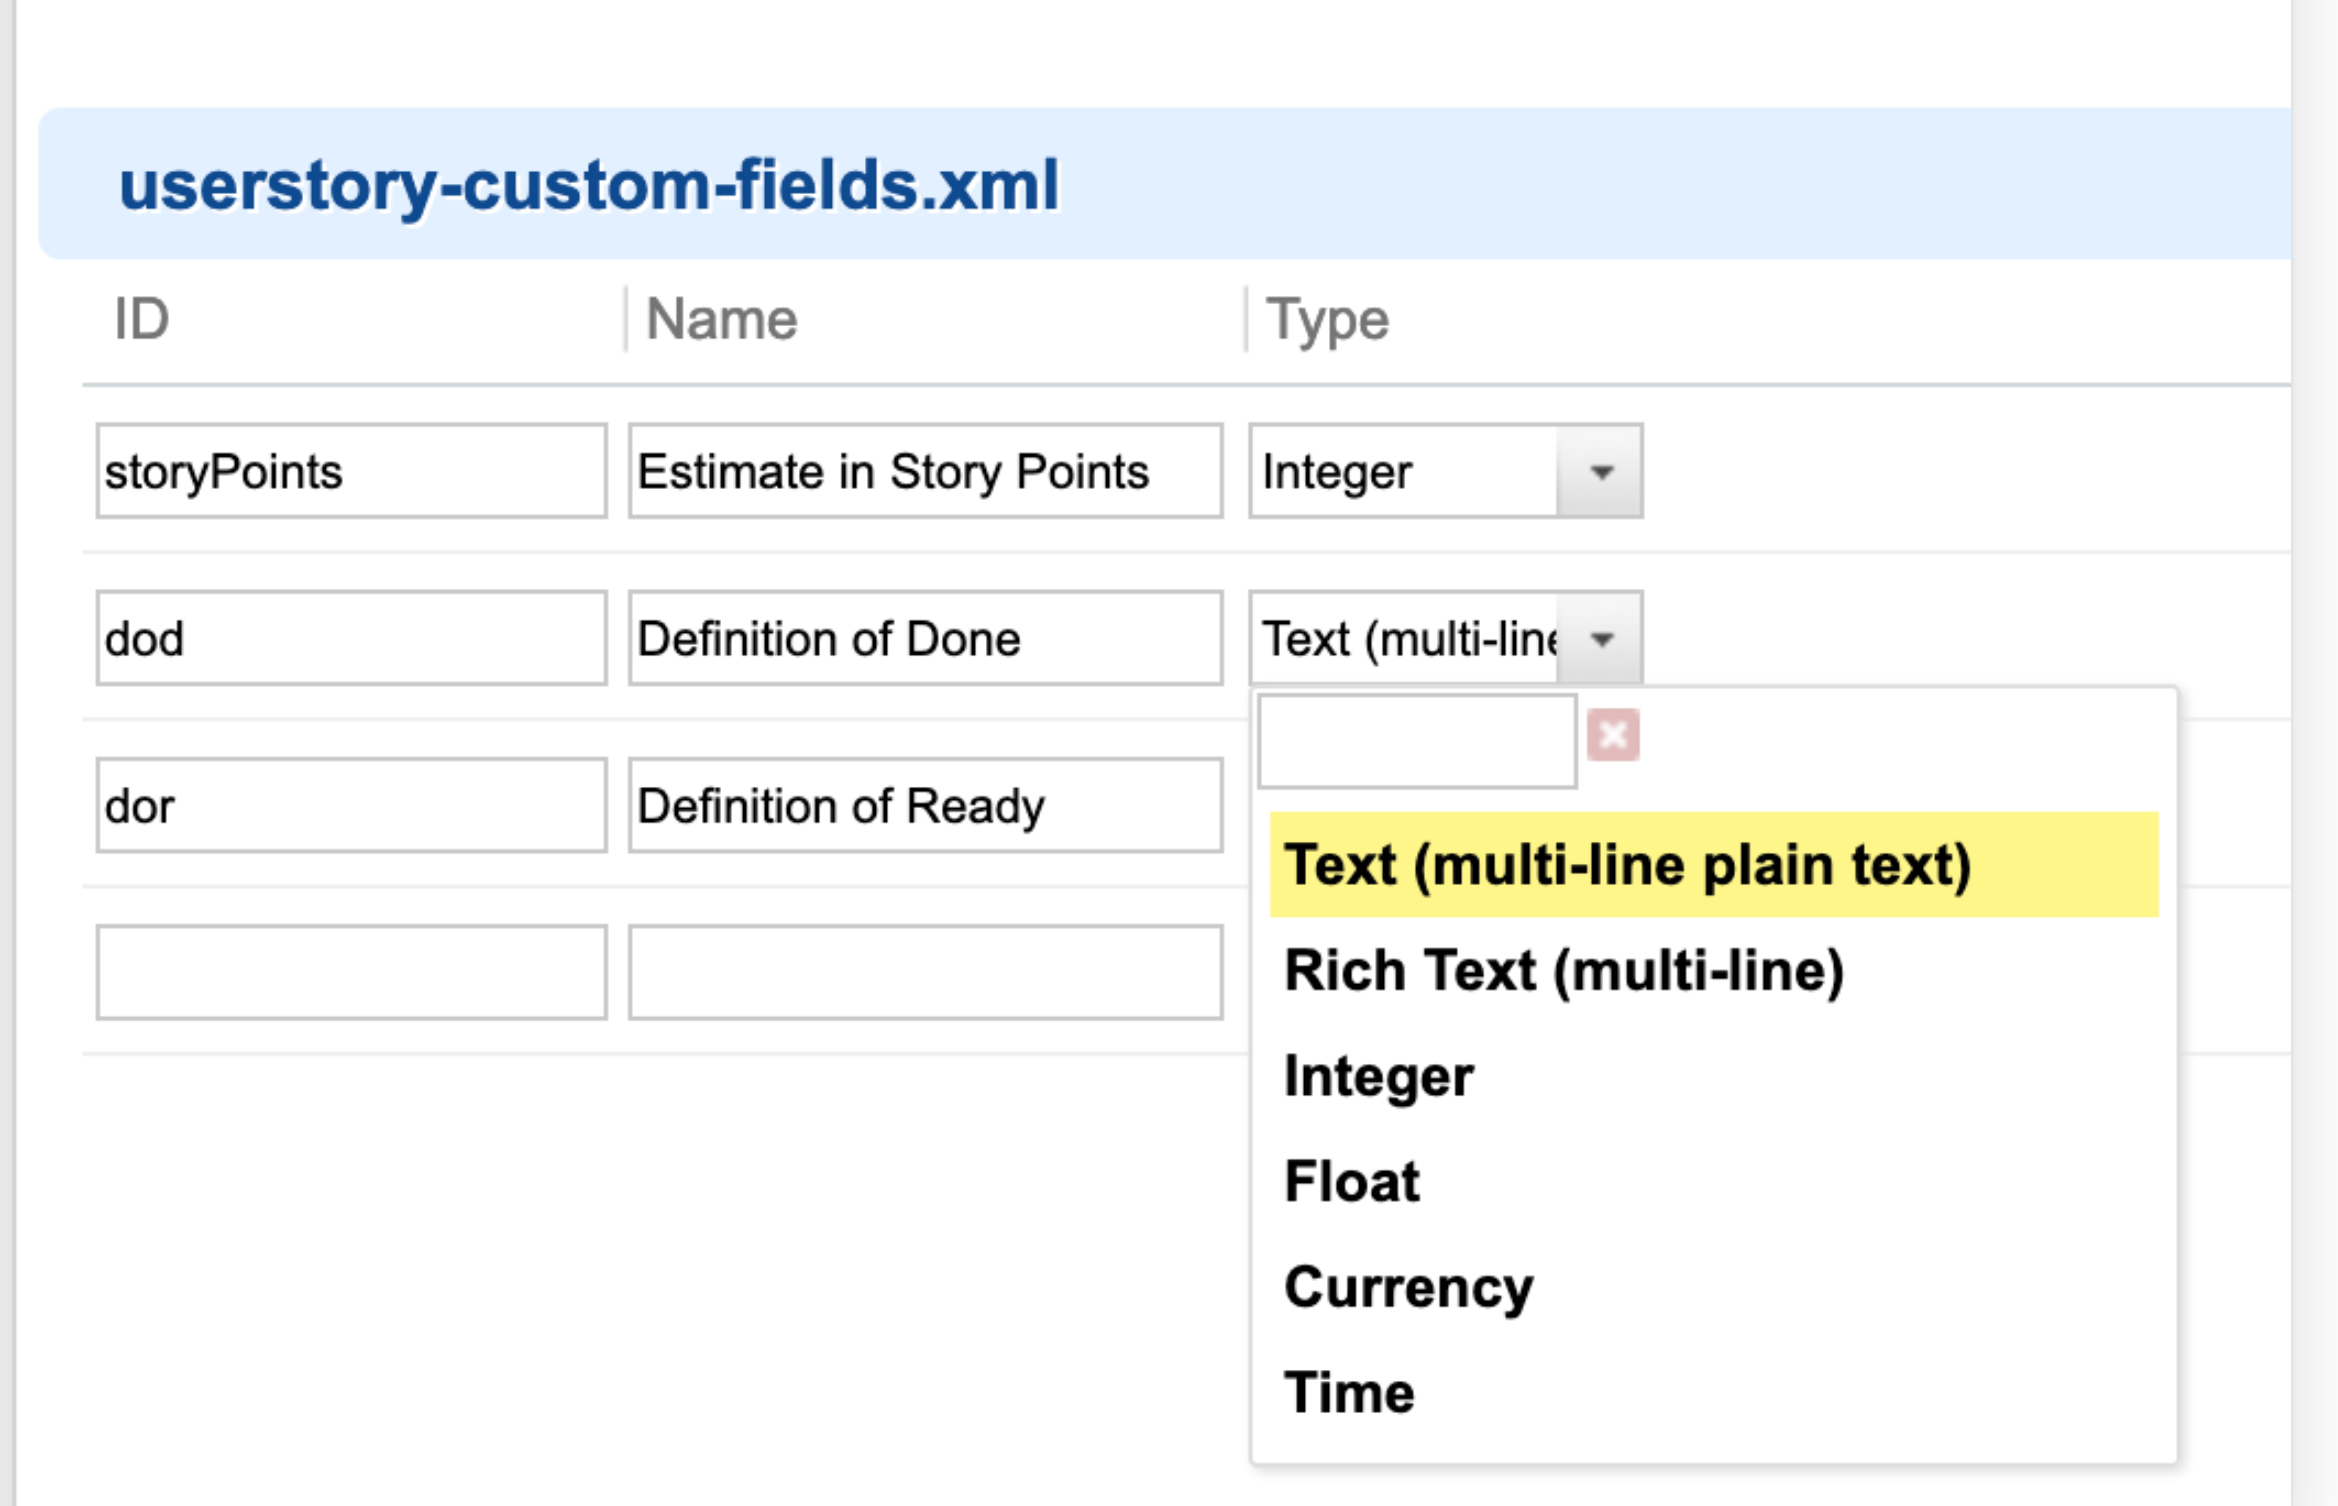
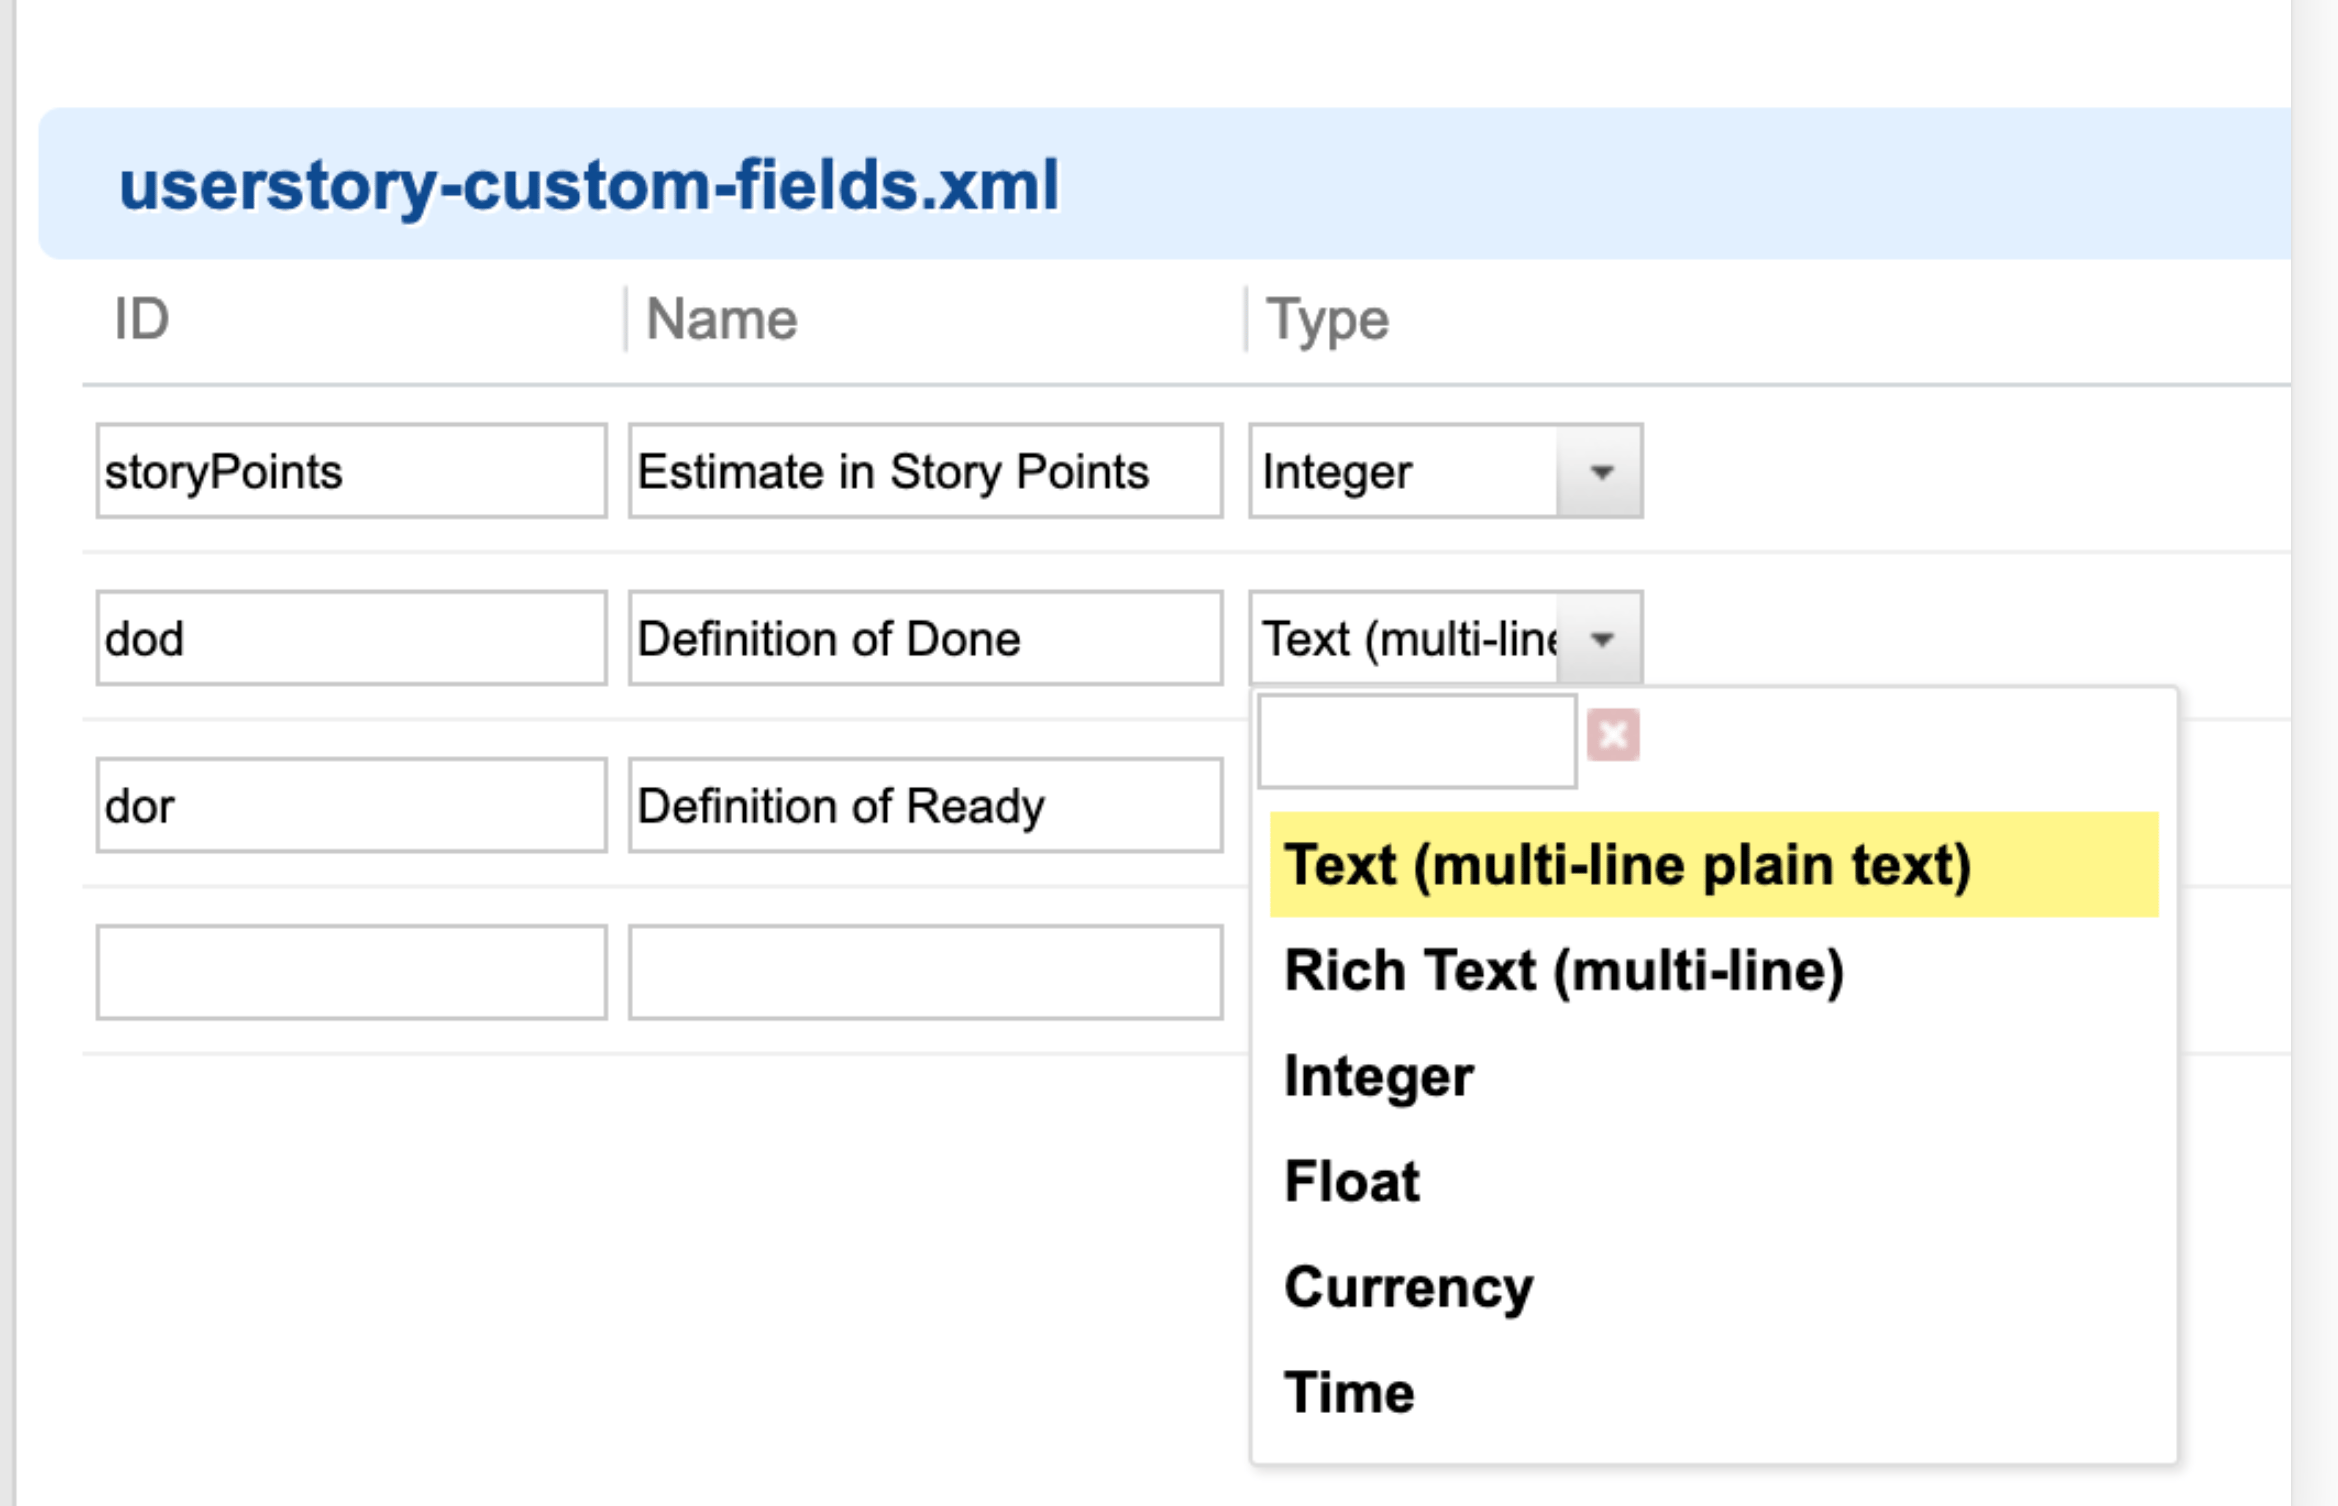
Create a new custom field of type **Text (multi-line plain text)**. This field will hold the checklist item, whose ID you'll reference in the next step (for example `dod`).
 ## 2. Expose the field on the work item form
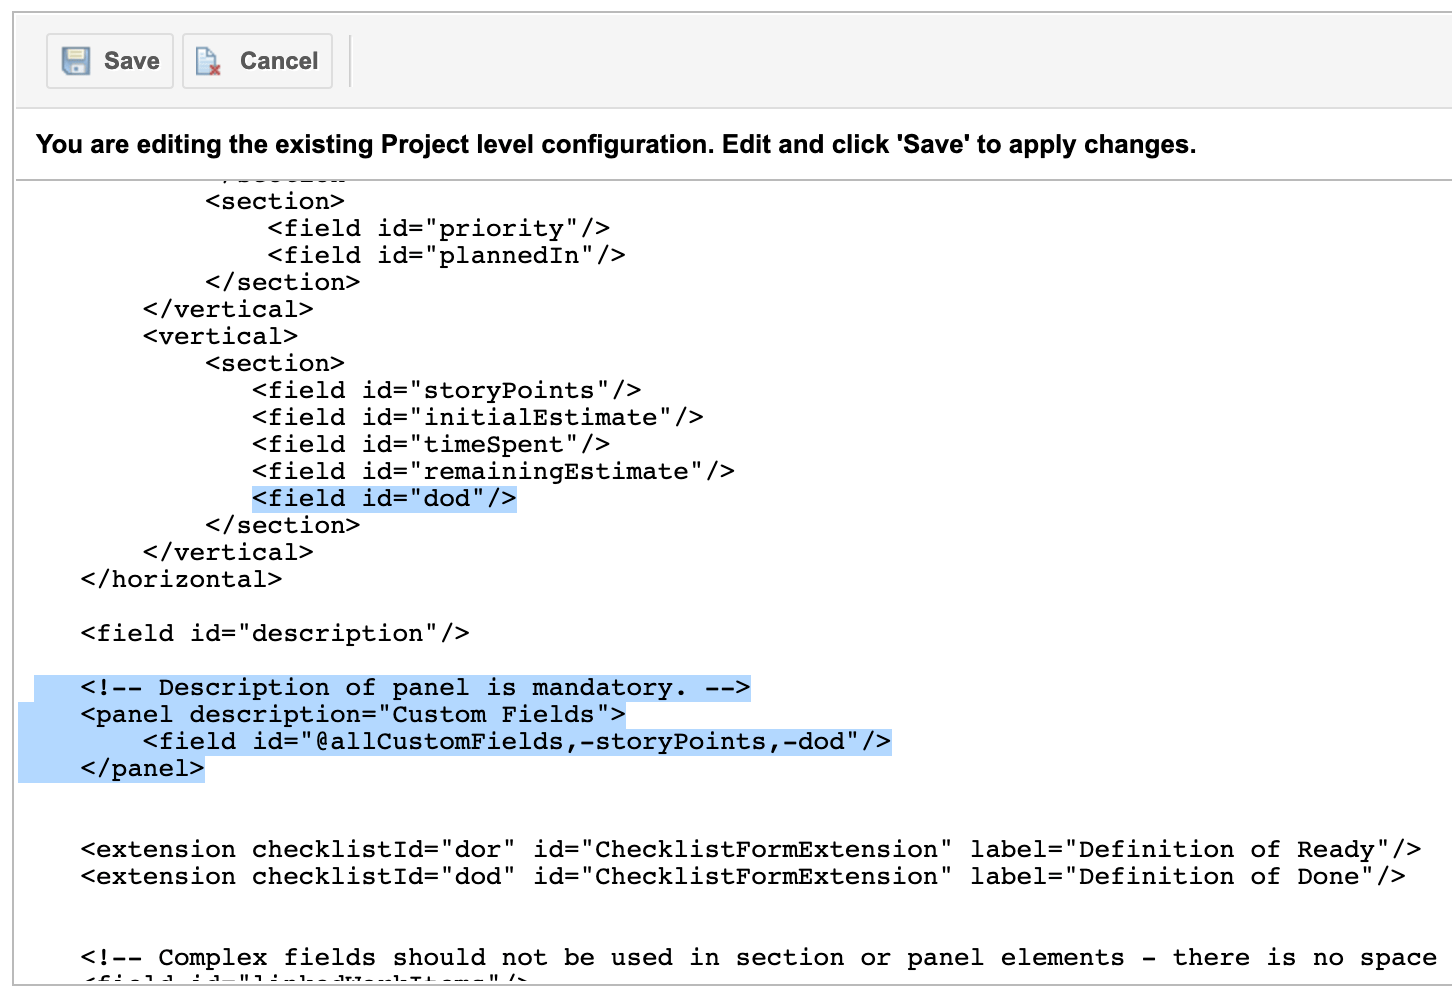
**First**, make sure the custom field is exposed on the work item form, either as part of a **panel** or a **section**. This step is mandatory. The form extension hides the raw field from view, but the field still needs to be present in the form configuration — it is **not** supported to place the checklist field outside of a `` or ``.
## 2. Expose the field on the work item form
**First**, make sure the custom field is exposed on the work item form, either as part of a **panel** or a **section**. This step is mandatory. The form extension hides the raw field from view, but the field still needs to be present in the form configuration — it is **not** supported to place the checklist field outside of a `` or ``.
 **Second**, add the `ChecklistFormExtension` work item extension at the place on the form where you want the checklist to appear:
```xml theme={null}
```
* `checklistId` refers to the ID of the custom field you created in step 1
* `label` is the title shown above the checklist section in the UI — set it to whatever you like
* `id` must be exactly `ChecklistFormExtension`
**Second**, add the `ChecklistFormExtension` work item extension at the place on the form where you want the checklist to appear:
```xml theme={null}
```
* `checklistId` refers to the ID of the custom field you created in step 1
* `label` is the title shown above the checklist section in the UI — set it to whatever you like
* `id` must be exactly `ChecklistFormExtension`
 **Field must live inside a panel or section**
Placing the `` for your checklist custom field directly on the form, outside of a `` or ``, is not supported. Keep the field declaration inside a panel or section even though the extension hides its default rendering.
## 3. (Optional) Set up a summary field
A summary field holds aggregated information about checklist completion, useful for lists, dashboards, and reports.
1. Create a new custom field of type **String (single line plain text)** with the ID `YOUR_CHECKLIST_ID_summary`. For example, if your checklist custom field from step 1 is `dod`, create a custom field called `dod_summary`.
2. Make this field read-only using the read-only fields configuration page (not by permissions).
3. **Required:** tell Checklist to calculate the summary field using **Project Administration > Config Properties**:
```properties theme={null}
nextedy.checklist.userstory.checklistsIdsForSummary=dor,dod
```
This is a comma-separated list of checklist IDs relevant to the `userstory` work item type.
**Summary fields power reporting**
Once a summary field is configured, it reflects checklist completion state without opening the work item, which makes it usable in queries, LiveReports, and dashboards. See [Export Checklists and Surface Progress in Reports](/checklist/guides/reporting-and-export) for more on this.
## 4. (Optional) Define a checklist template
To keep the checklist content centrally managed — so changes propagate to every work item using it — define a template using the `workItemTemplateId` configuration property:
```properties theme={null}
nextedy.checklist.requirement.chkApproved.workItemTemplateId=WI-124
```
Here `requirement` is the work item type and `chkApproved` is the checklist ID. You can also omit the type to apply the template to any type:
```properties theme={null}
nextedy.checklist.chkDone.workItemTemplateId=WI-125
```
Full details, including the built-in Polarion template workaround, are covered in [Create a Checklist Template](/checklist/guides/templates/create-a-template).
**Duplicated checklist items with Polarion's built-in work item templates**
If you use Polarion's own built-in work item templates (as opposed to `workItemTemplateId`) to seed a checklist, be aware of a Polarion bug (not a Nextedy Checklist bug): when Polarion copies data from a template to a new item, it changes the field's format from Text to Richtext. The workaround is to add a `ChecklistResetToTemplate` workflow function to the type's "init" action with a `checklist` parameter set to your checklist custom field's name — this resets the checklist after item creation and fixes the field type. See [Create a Checklist Template](/checklist/guides/templates/create-a-template) for the full workaround.
## How permissions interact with this setup
Two permission layers apply once your checklist is live:
* Who can **check/uncheck items** — controlled by standard Polarion field permissions (read-only fields or field-based permissions).
* Who can **change the checklist structure** (add/remove items) — controlled by the `nextedy.checklist._TYPEID_._FIELDID_._STATUS_.adminPermission` configuration property, often tied to workflow status so the structure can be frozen after a certain point.
See [Control Who Can Change the Checklist](/checklist/guides/permissions) for the full property hierarchy and evaluation order.
## Verification
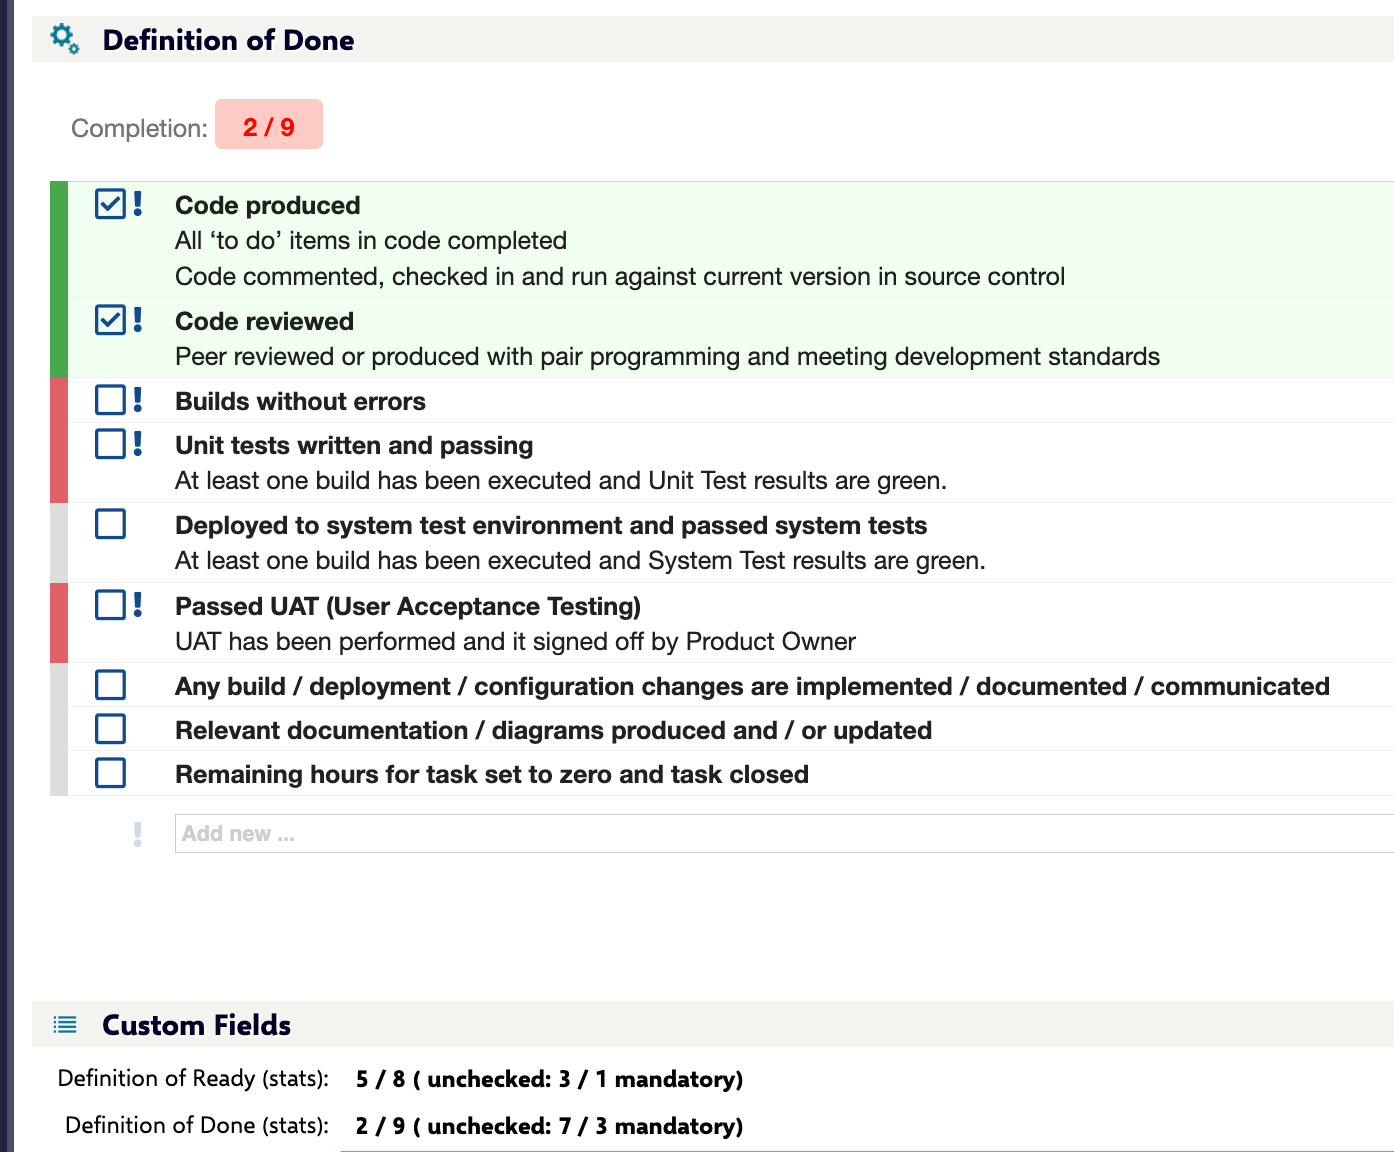
You should now see a **Definition of Ready** (or whatever label you chose) section on the work item form, rendered by the checklist form extension, with checkable items instead of a raw text field. If you configured a summary field, it should update automatically to reflect the checklist's completion state once you check items and save.
**Field must live inside a panel or section**
Placing the `` for your checklist custom field directly on the form, outside of a `` or ``, is not supported. Keep the field declaration inside a panel or section even though the extension hides its default rendering.
## 3. (Optional) Set up a summary field
A summary field holds aggregated information about checklist completion, useful for lists, dashboards, and reports.
1. Create a new custom field of type **String (single line plain text)** with the ID `YOUR_CHECKLIST_ID_summary`. For example, if your checklist custom field from step 1 is `dod`, create a custom field called `dod_summary`.
2. Make this field read-only using the read-only fields configuration page (not by permissions).
3. **Required:** tell Checklist to calculate the summary field using **Project Administration > Config Properties**:
```properties theme={null}
nextedy.checklist.userstory.checklistsIdsForSummary=dor,dod
```
This is a comma-separated list of checklist IDs relevant to the `userstory` work item type.
**Summary fields power reporting**
Once a summary field is configured, it reflects checklist completion state without opening the work item, which makes it usable in queries, LiveReports, and dashboards. See [Export Checklists and Surface Progress in Reports](/checklist/guides/reporting-and-export) for more on this.
## 4. (Optional) Define a checklist template
To keep the checklist content centrally managed — so changes propagate to every work item using it — define a template using the `workItemTemplateId` configuration property:
```properties theme={null}
nextedy.checklist.requirement.chkApproved.workItemTemplateId=WI-124
```
Here `requirement` is the work item type and `chkApproved` is the checklist ID. You can also omit the type to apply the template to any type:
```properties theme={null}
nextedy.checklist.chkDone.workItemTemplateId=WI-125
```
Full details, including the built-in Polarion template workaround, are covered in [Create a Checklist Template](/checklist/guides/templates/create-a-template).
**Duplicated checklist items with Polarion's built-in work item templates**
If you use Polarion's own built-in work item templates (as opposed to `workItemTemplateId`) to seed a checklist, be aware of a Polarion bug (not a Nextedy Checklist bug): when Polarion copies data from a template to a new item, it changes the field's format from Text to Richtext. The workaround is to add a `ChecklistResetToTemplate` workflow function to the type's "init" action with a `checklist` parameter set to your checklist custom field's name — this resets the checklist after item creation and fixes the field type. See [Create a Checklist Template](/checklist/guides/templates/create-a-template) for the full workaround.
## How permissions interact with this setup
Two permission layers apply once your checklist is live:
* Who can **check/uncheck items** — controlled by standard Polarion field permissions (read-only fields or field-based permissions).
* Who can **change the checklist structure** (add/remove items) — controlled by the `nextedy.checklist._TYPEID_._FIELDID_._STATUS_.adminPermission` configuration property, often tied to workflow status so the structure can be frozen after a certain point.
See [Control Who Can Change the Checklist](/checklist/guides/permissions) for the full property hierarchy and evaluation order.
## Verification
You should now see a **Definition of Ready** (or whatever label you chose) section on the work item form, rendered by the checklist form extension, with checkable items instead of a raw text field. If you configured a summary field, it should update automatically to reflect the checklist's completion state once you check items and save.
 ## See also
* [Set Up a Document (LiveDoc) Checklist](/checklist/guides/setup/documents)
* [Create a Checklist Template](/checklist/guides/templates/create-a-template)
* [Control Who Can Change the Checklist](/checklist/guides/permissions)
* [Configure Gate Enforcement (DoD / DoR) and Freeze on Status](/checklist/guides/workflow-gates-and-freeze)
* [Export Checklists and Surface Progress in Reports](/checklist/guides/reporting-and-export)
**KB Articles**
* Setup new document (LiveDoc) checklist
* How to create checklist template?
* Setup new Work Items checklist
**Support Tickets**
* [#332](https://support.nextedy.com/helpdesk/tickets/332)
* [#235](https://support.nextedy.com/helpdesk/tickets/235)
* [#418](https://support.nextedy.com/helpdesk/tickets/418)
**Source Code**
* `proc-checklist-src/com.nextedy.polarion.checklist/src/com/nextedy/polarion/checklist/ChecklistServlet.java`
* `proc-checklist-src/com.nextedy.polarion.checklist/src/com/nextedy/polarion/checklist/internal/ChecklistAdminService.java`
* `proc-checklist-src/com.nextedy.polarion.checklist/src/com/nextedy/polarion/checklist/IChecklistService.java`
* `proc-checklist-src/com.nextedy.polarion.checklist/src/com/nextedy/polarion/checklist/wf/ChecklistFailIfMandatoryUnchecked.java`
* `proc-checklist-src/com.nextedy.polarion.checklist/src/com/nextedy/polarion/checklist/wf/ChecklistApplyTemplate.java`
## See also
* [Set Up a Document (LiveDoc) Checklist](/checklist/guides/setup/documents)
* [Create a Checklist Template](/checklist/guides/templates/create-a-template)
* [Control Who Can Change the Checklist](/checklist/guides/permissions)
* [Configure Gate Enforcement (DoD / DoR) and Freeze on Status](/checklist/guides/workflow-gates-and-freeze)
* [Export Checklists and Surface Progress in Reports](/checklist/guides/reporting-and-export)
**KB Articles**
* Setup new document (LiveDoc) checklist
* How to create checklist template?
* Setup new Work Items checklist
**Support Tickets**
* [#332](https://support.nextedy.com/helpdesk/tickets/332)
* [#235](https://support.nextedy.com/helpdesk/tickets/235)
* [#418](https://support.nextedy.com/helpdesk/tickets/418)
**Source Code**
* `proc-checklist-src/com.nextedy.polarion.checklist/src/com/nextedy/polarion/checklist/ChecklistServlet.java`
* `proc-checklist-src/com.nextedy.polarion.checklist/src/com/nextedy/polarion/checklist/internal/ChecklistAdminService.java`
* `proc-checklist-src/com.nextedy.polarion.checklist/src/com/nextedy/polarion/checklist/IChecklistService.java`
* `proc-checklist-src/com.nextedy.polarion.checklist/src/com/nextedy/polarion/checklist/wf/ChecklistFailIfMandatoryUnchecked.java`
* `proc-checklist-src/com.nextedy.polarion.checklist/src/com/nextedy/polarion/checklist/wf/ChecklistApplyTemplate.java`